You are using an out of date browser. It may not display this or other websites correctly.
You should upgrade or use an alternative browser.
You should upgrade or use an alternative browser.
simond
Western Thunderer
Made new bogie mountings which lowered the body on the bogies - height to top ot roof now 88.6, should be 87.5 (12’6”), and it does look challenging to get it lower - I might try to scrounge another half millimetre, but I’d then have to lift it up again if the bogies catch on the solebars. I could file them down a wee bit, but it wouldn’t be much fun…
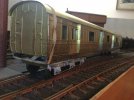
it does run sweetly, I put a domed support on one bogie to allow pitch & roll and a transverse edge on the other to allow only pitch. seems fine.
More soon
Simon

it does run sweetly, I put a domed support on one bogie to allow pitch & roll and a transverse edge on the other to allow only pitch. seems fine.
More soon
Simon
Peter Cross
Western Thunderer
I use 1mm wire for the same effect, one transverse, and one longitudinally.I put a domed support on one bogie to allow pitch & roll and a transverse edge on the other to allow only pitch. seems fine.
simond
Western Thunderer
Doors and solebar footsteps fitted. Took a while for what should have been a simple job. I made the battery boxes too, and found some suitable brass strip for the gutters, which I’ll use instead of the angle I’d bought for the job. The body etch has a fold over flange on top, this contributes to the overheight issue. Use of a strip (which will be a pita to solder on) will help. I’ll fit the boxes, trusses and gutters in due course.
More progress over the weekend is expected as ‘er ladyship ’as the lurgi, and I’m assuming I’m infectious, even though I’m testing neg. So we’re not going out, which is a pain. Missed a show at the Quarterhouse this evening, and have put drinks with the neighbours, and a trip to the British museum Stonehenge exhibition on the back burner .
.
Still, I have a hole to dig in the garden, so I’ll do that. And more on the van.
state of play this evening.
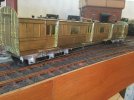
must buy some of that invisible solder…
atb
Simon
More progress over the weekend is expected as ‘er ladyship ’as the lurgi, and I’m assuming I’m infectious, even though I’m testing neg. So we’re not going out, which is a pain. Missed a show at the Quarterhouse this evening, and have put drinks with the neighbours, and a trip to the British museum Stonehenge exhibition on the back burner
 .
.Still, I have a hole to dig in the garden, so I’ll do that. And more on the van.
state of play this evening.

must buy some of that invisible solder…
atb
Simon
simond
Western Thunderer
The cantrail gutter issue is visible in the above photo, perhaps clearer below:
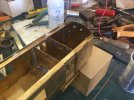
the body was pre-folded at the solebars and cantrails, along the half - and fully-etched bendlines. because the etches are on the outside, this effectively makes the cantrails (and the sides) higher than they should be. I could have cut the sides free from the floor and cantrail stiffeners, but that would have made this into an epic build, probably leading to a bad attack of shelf queen….
So instead, I’m soldering 1x2mm strip along the top of the half etch to create a gutter, and will hide the roof edge inside that. And I might have to live with the overall height being a little over half a mm too high.
it is a pain to do. Mainly in the fingers holding it in place. Start in the middle, tack & cool. Then 2” one way, 2” the other etc., so it doesn’t get hot and then cool curved. When I’ve got both of them on, I’ll sort out the lumps of solder, once it is secured, it’s easy enough to drag excess solder along the joint whilst holding the gutter with a bit of wood.
AJC
Western Thunderer
So instead, I’m soldering 1x2mm strip along the top of the half etch to create a gutter, and will hide the roof edge inside that. And I might have to live with the overall height being a little over half a mm too high.
I could probably wear that in 4mm. In the larger scale it should barely register.
Adam
Dog Star
Western Thunderer
Any connection?... as ‘er ladyship ’as the lurgi...
I have a hole to dig in the garden...
Focalplane
Western Thunderer
Tony Overton
Western Thunderer
But, if you've got a big cat then the alley might have met its match............
simond
Western Thunderer
Well, as our Scottish neighbour says, he’s “a Bonny cat”, but he’s not “a big cat”!

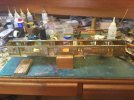
loads of handrails next, I think. 6 per door, plus the guard’s compartment.
Correction. There are half etched holes for a horizontal rail either side of each door, but the photos of 876 & 877 in Russell do not show rails in these positions. It does appear that there might be a horizontal waist-height rail at the end away from the guard’s compt. There are half etched dimples for these too, which I’ll use.
There are two commode handles either side for the guard, and four per main door. Plus the curved rails to the roof, of course.

Last edited:
Tony Overton
Western Thunderer
Are there any window bolections to add yet to your van? The reason I ask is that not having any experience of fitting any I'll be interested to see how you tackle them.
simond
Western Thunderer
Tony,
the kit provides three “levels” for the windows. It appears that the three large windows were fixed, with vertical bars behind the glass. There are also vertical bars behind the glass on the sliding doors, but not on the guard’s compartment.
The inner layer is a separate etch.
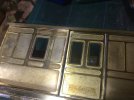
you wouldn’t think I’d just “Jiffed” that would you?
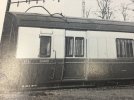
(photo cropped from JH Russell GW Coaches 1903-1948 fig 100 for illustrative purposes only)
I think the kit represents the vehicle quite well in this respect, and I won’t add anything else.
OTOH, the door is hinged the wrong way on this side of the model. The other side is correct. I’ll have to drill for the commode handles, and add hinges in the right place.
The kit also includes 5 inner frames for the three (per side!) big windows, but these are designed for 3 horizontal bars, so I’ll have to create something, as they have 4 or probably 5 vertical ones. Similarly, I need to do the door window bars, looks like two per pane. I wonder whether scribing them on the back of the glazing would be sufficiently convincing.
I presume the bars were to protect the glass from moving loads, rather than to prevent break-in.
atb
Simon
the kit provides three “levels” for the windows. It appears that the three large windows were fixed, with vertical bars behind the glass. There are also vertical bars behind the glass on the sliding doors, but not on the guard’s compartment.
The inner layer is a separate etch.

you wouldn’t think I’d just “Jiffed” that would you?

(photo cropped from JH Russell GW Coaches 1903-1948 fig 100 for illustrative purposes only)
I think the kit represents the vehicle quite well in this respect, and I won’t add anything else.
OTOH, the door is hinged the wrong way on this side of the model. The other side is correct. I’ll have to drill for the commode handles, and add hinges in the right place.
The kit also includes 5 inner frames for the three (per side!) big windows, but these are designed for 3 horizontal bars, so I’ll have to create something, as they have 4 or probably 5 vertical ones. Similarly, I need to do the door window bars, looks like two per pane. I wonder whether scribing them on the back of the glazing would be sufficiently convincing.
I presume the bars were to protect the glass from moving loads, rather than to prevent break-in.
atb
Simon
Tony Overton
Western Thunderer
I see........ a third layer. Its look very convincing, go with it.
simond
Western Thunderer
After a bout of “not Covid” I felt somewhat more useful today. I discovered that the issues with my laser were not a failing tube, but, bizarrely, a significant misalignment of the beam. I spent some time today trying to improve it, but it’s not designed to be easy. That said, it is possible, if irritatingly tedious.
The supplied roof of the M14 kit is not a great fit. I set about making an alternative, having at least partially sorted the laser
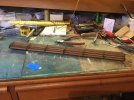
one A4 sheet of 2mm MDF creates a roof structure like this, which I expect to cover with thick cartridge paper.
unfortunately, the fit is not quite as nice as I hoped, so a Mk2 will need to be made.
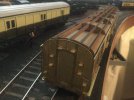
you can see here that the radii of the rollover at the sides of the roof of my version is too small compared to the brass. I’ll have to have another go.
The supplied roof of the M14 kit is not a great fit. I set about making an alternative, having at least partially sorted the laser

one A4 sheet of 2mm MDF creates a roof structure like this, which I expect to cover with thick cartridge paper.
unfortunately, the fit is not quite as nice as I hoped, so a Mk2 will need to be made.

you can see here that the radii of the rollover at the sides of the roof of my version is too small compared to the brass. I’ll have to have another go.

simond
Western Thunderer
Well, it’s been a strange few days.
I got up last Friday, showered, had my brekky, got on my motorbike and went to work. About an hour later, the ambulance delivered me to the William Harvey Hospital with a query cardiac event. Various blood and other tests suggested that it was probable that I’d had a very minor heart attack. Just to add to the fun, I discovered that I had Covid too.
They let me out last night, with a bag of drugs and strict instructions not to do anything exciting for a week, as they’re going to do the angiogram that they would have already done had I not had bl00dy Covid, next Friday.
So a rather tedious & boring week in hospital, but I’ve been very well looked-after and I’m apparently in pretty good condition.
Of course my thoughts turn to a few modellers who have been less lucky than I have. Grahame H & Chris K spring to mind.
Anyway, “taking things very easy” does include making some progress on shelf queens, and during last Tuesday evening’s ”Beer & 8ollocks” conference call, my pal Bryan had described using his bending bars as a combined vice and guide to trim the edges of a brass coach roof. I applied the same approach to the roof of the M14 van, and it’s come out rather better than my attempts at laser cutting a planked frame was doing, so I’m going with that. I’ll cover it with cartridge paper as I have with most of my other coaches. Photos to follow.
Cheers all
Simon
Heather Kay
Western Thunderer
Ooer! All the best wishes for a swift recovery.


