SimonD’s workbench

simond

Western Thunderer
They do look good from the photos - are they full depth?

This is just pushed in. There’s a very thin gap where the weight just doesn’t quite sit on the rim of the wheel.

As you can see, the back in nearly flush and a smear of filler would make it so
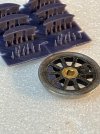
image.jpg

I need to do a set for the 48xx and the Manor.

I wonder about generating a parametric model that allows the weight to be defined by wheel diameter and number of spokes, but I think it might be more trouble than it’s worth as there are other variables required to fully constrain the design.

I think it’s likely to be quicker to just re-save and modify the existing design for each application.
 

simond

Western Thunderer
image.jpg

This is the chassis of a possibly unwise acquisition, a 3R 4-2-2, 3047 “Lorna Doone”. All the carrying wheels have unscrewed from their axles and can thus easily be hub insulated.

The drivers are very firmly fixed to their axle and show no signs of unscrewing. The wheels are cast iron, as far as I can tell, and I’d very much like to save them.

I can see no sign of a pin between wheel & axle, but there is a suggestion that the axle has been peened over.

I have given it a bit of blow lamp in case they’re loctited but no obvious effect.

My thought is to drill the axle ends and progressively open out until the wheel will pull off.

Before I get aggressive with it, any bright ideas?

image.jpg

Thanks
Simon
 

Ian@StEnochs

Western Thunderer
As you suggest drill the axle out almost to size which would let it collapse as you drifted it out. The frames look quite robust but a forked support as near the bearing as possible would lessen any chance of distortion.
 

simond

Western Thunderer
Thanks Ian, the axle is definitely sacrificial in these circumstances. I have a pal coming over later in the day bringing a Brit for some valve gear repair - I’ll ask him for bright ideas, and assuming he hasn’t got a better one, ask him to hold it whilst I drill…
 

simond

Western Thunderer
The wasn’t really room between frames and wheels but there was plenty of space between the wormwheel and the frames, so I applied Paul’s suggestion & cut the axle there - the added advantage being that it gave me something very convenient to chuck the wheels by whilst drilling the axles out in the Unimat.

image.jpg

As Mr Punch said, “that’s the way to do it”

image.jpg

Paint stripper next!
 

simond

Western Thunderer
Yes, they do, but they are well hidden behind the outside frames so I’ll lose no sleep over that!

all the other wheels look very much like Walsall castings, I don’t know if these are from that source too. They’ve been nicely turned, though the rim is very thin, suggesting they were “the nearest thing” that could be pressed into service.

The other wheels will need a bit of fine-scaling, the flanges aren’t huge but they are definitely a bit thick, options are to go gently and use the Unimat or grind up a form tool, and use the Haas at work. Or indeed, program the Haas and use a fine point tool.
 

paulc

Western Thunderer
The wasn’t really room between frames and wheels but there was plenty of space between the wormwheel and the frames, so I applied Paul’s suggestion & cut the axle there - the added advantage being that it gave me something very convenient to chuck the wheels by whilst drilling the axles out in the Unimat.

View attachment 226374

As Mr Punch said, “that’s the way to do it”

View attachment 226375

Paint stripper next!
Dire Straits sung something similar as well , maybe they got the lyric from Mr Punch but then he never got his money for nothing .
 

simond

Western Thunderer
Whilst waiting to be able to test Chris’ loco, I’ve been dabbling with the 3D printer again.

First up, a couple of wagon bodies for the project that I started with Nick @magmouse some year and a bit ago. I’d never been happy with the previous prints but this feels like we’re getting there.

image.jpg

next up, an experiment with sleepers. @martin_wynne has noted that resin-printed sleepers were not a good solution due to their tendency to curl up. These are the baseline of an experiment to see if I can prevent that. I’ll give them a week or two before putting rails in, just to see what happens.

image.jpg

and finally a load of bits for Tony’s locos, including four sizes of balance weights, a couple of name plates, and the insulating bits for pick-ups

image.jpg

might get them running at the weekend.
 
Last edited:

Hayfield1

Western Thunderer
Whilst waiting to be able to test Chris’ loco, I’ve been dabbling with the 3D printer again.

First up, a couple of wagon bodies for the project that I started with Nick @magmouse some year and a bit ago. I’d never been happy with the previous prints but this feels like we’re getting there.

View attachment 226588

next up, an experiment with sleepers. @martin_wynne has noted that resin-printed sleepers were not a good solution due to their tendency to curl up. These are the baseline of an experiment to see if I can prevent that. I’ll give them a week or two before putting rails in, just to see what happens.

View attachment 226590

and finally a load of bits for Tony’s locos, including four sizes of balance weights, a couple of name plates, and the insulating bits for pick-ups

View attachment 226591

might get them running at the weekend.

Simond

There was an interesting post in Templot club stating that by adding an additional chemical to the resin, it makes the print more pliable and should cure the trend of resin curl. Sorry I cannot find the post, ask on Templot forum

Certainly Wayne at British Finescale has his own recipe and resin curl seems very much limited

On the other hand if you can have access to a FDM printer try printing a section of COT track in filament
 

SimonT

Western Thunderer
Try using a decent cureing machine. I use a Formlabs Cure and haven't had any after-curing by sunlight since I started to use it. Mickoo does the same with a different machine.
 

simond

Western Thunderer
Simond

There was an interesting post in Templot club stating that by adding an additional chemical to the resin, it makes the print more pliable and should cure the trend of resin curl. Sorry I cannot find the post, ask on Templot forum

Certainly Wayne at British Finescale has his own recipe and resin curl seems very much limited

On the other hand if you can have access to a FDM printer try printing a section of COT track in filament

my experience is that resin prints have a tendency to curl away from the first layers - so what was stuck to the build plate becomes a convex surface. I have printed quite a lot of small parts, and generally create a sprue on which the parts are attached whilst printing, and these definitely curl - it doesn’t matter in that application, but obviously it’s not ideal if you’re printing chaired sleepers or point timbers.

the experiment is really just that, I have an idea why it’s doing it, and would like to convince myself a) that my understanding is correct, and b) that I can control it. We shall see, eventually, maybe.
 

simond

Western Thunderer
Try using a decent cureing machine. I use a Formlabs Cure and haven't had any after-curing by sunlight since I started to use it. Mickoo does the same with a different machine.
Hi Simon,

I think the one I have is ok, it’s an Elegoo one with a transparent turntable with leds below and two towers of leds.

I think Mick pointed me in the right direction some months back, talking about the exposure times, and my suspicion is that he’s right, and I hope I now understand why. I think the difference in initial layer exposure times, and subsequent layers’ much shorter ones is the driver for the curl. Everything else is pretty much constant across the layers. I don’t think the curl is caused by sunlight.

we’ll see
S
 

SimonT

Western Thunderer
Ah! I was talking about prints curling in the months after printing!
I call what you are describing as 'de-lamination'. I try to put a convex filleted edge on the line of the first layers on the model where the first supports touch. This can be a scarificial edge that is removed in post print processing. I also increase the exposure time on those first dozen or so layers on the model.
I also now only use heavy supports with the touch point size adjusted to suit the location. And 2mm thick bases!

My new machine is an Anycubic Photon Mono M5s with a heater. A big improvment over the Saturn I had before.
S
 

simond

Western Thunderer
Yes, I’m talking about it happening slowly over time.

I guess that once the resin has cured “enough”, we might do the post processing, and use the parts, but my suspicion is that “enough” might be some way from “completely “, and whilst the first few layers have been very thoroughly cured in the tank, and the outside of the object has been thoroughly exposed in the lightbox, I wonder if the middle of the part is still curing, and potentially shrinking, over a period of weeks or months. I expect that such shrinkage would lead to built-in stresses, and thus to deformation.

I’m going to try some very much longer exposures to see what, if any, difference it might make.
 
Top