You are using an out of date browser. It may not display this or other websites correctly.
You should upgrade or use an alternative browser.
You should upgrade or use an alternative browser.
simond
Western Thunderer
Work at the workbench has resumed after a very pleasant trip to France. We timed it well, and went a week before Kent’s roads closed, and came back the weekend after. I’d have been more impressed with ‘erself than I usually am if we’d planned it but blind luck sometimes plays a part!
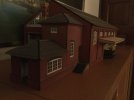
I have made some more progress with the goods shed, the office roofs are slated and when dry will be trimmed and fitted to the skeleton of roof beams, which if I was both careful, and lucky enough with the glue, will then be removable.
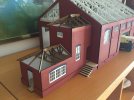
The steps were a faff to put together, if the bottom step had been made with a “tail” to fit between the side pieces, it would have been much easier to assemble them square. Anyway, they came out close enough, and a touch on the Lidl disc sander made it a snug fit.
suggestions for flaunching (Sp?) on the horizontal edges of the thicker brickwork would be welcome. Current thoughts are filler (potentially messy, inconsistent) or profiled strip plastic or wood.
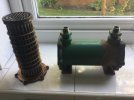
The other big thing on the workbench is the boat’s port gearbox oil cooler - this appears to have sprung a leak, as the gearbox ended up half full of mayonnaise, and clearly we were losing oil through the raw water coolant going into the exhaust. It was not a comfortable job to get the damn thing off, it’s awkward and heavy, and full of oil so messy too.
And of course, I had to drain & flush the gearbox, and refill with clean oil, and I’ll have to do that again, at least once and maybe twice when it’s all back together, to ensure the gearbox doesn’t start rusting from the inside. Oil’s expensive, but it’s cheaper than metal.
Anyway, I have cleaned it all up, have purchased new o-rings, will laser cut a new gasket, and put it back together to pressure test it. Hopefully, it was an o-ring leak, though why it should, I have no idea. Unfortunately, it’s more likely to be a solder failure, so it’ll be out with the big torch, and a new tub of Powerflo. Not looking forward to that.
Apart from that, I have to help MissD fix her LED torch, seems to be a button failure, but almost impossible to test without three hands (possibly more), and I need to fit a lamp housing & wiring to one of John’s signals.
I’m also looking at possible designs for surface-mounted servo point motors, for John’s layout. I’d like a cam arrangement so the servo can travel pretty much full throw and not overload the points or mechanism, and I’d like to 3D print it so I can repeat as required. Suggestions welcome. I shall revisit Giles’ thread as I recall he did something like this, but not with servos.
atb
Simon
I have made some more progress with the goods shed, the office roofs are slated and when dry will be trimmed and fitted to the skeleton of roof beams, which if I was both careful, and lucky enough with the glue, will then be removable.

The steps were a faff to put together, if the bottom step had been made with a “tail” to fit between the side pieces, it would have been much easier to assemble them square. Anyway, they came out close enough, and a touch on the Lidl disc sander made it a snug fit.
suggestions for flaunching (Sp?) on the horizontal edges of the thicker brickwork would be welcome. Current thoughts are filler (potentially messy, inconsistent) or profiled strip plastic or wood.
The other big thing on the workbench is the boat’s port gearbox oil cooler - this appears to have sprung a leak, as the gearbox ended up half full of mayonnaise, and clearly we were losing oil through the raw water coolant going into the exhaust. It was not a comfortable job to get the damn thing off, it’s awkward and heavy, and full of oil so messy too.
And of course, I had to drain & flush the gearbox, and refill with clean oil, and I’ll have to do that again, at least once and maybe twice when it’s all back together, to ensure the gearbox doesn’t start rusting from the inside. Oil’s expensive, but it’s cheaper than metal.
Anyway, I have cleaned it all up, have purchased new o-rings, will laser cut a new gasket, and put it back together to pressure test it. Hopefully, it was an o-ring leak, though why it should, I have no idea. Unfortunately, it’s more likely to be a solder failure, so it’ll be out with the big torch, and a new tub of Powerflo. Not looking forward to that.

Apart from that, I have to help MissD fix her LED torch, seems to be a button failure, but almost impossible to test without three hands (possibly more), and I need to fit a lamp housing & wiring to one of John’s signals.
I’m also looking at possible designs for surface-mounted servo point motors, for John’s layout. I’d like a cam arrangement so the servo can travel pretty much full throw and not overload the points or mechanism, and I’d like to 3D print it so I can repeat as required. Suggestions welcome. I shall revisit Giles’ thread as I recall he did something like this, but not with servos.
atb
Simon
Focalplane
Western Thunderer
Messing about with boats, eh?
Emulsified oil potentially a bad sign. A friend and I visited a very lively guy aged 96 who was selling his Riley RM. He hadn’t done more than drive down the road every year to renew the MoT (which he didn’t have to do) so we were not too surprised to see white emulsion inside the rocker covers. But my friend bought the car, trailered it back to Bristol and then flushed the engine. No problem at all, it had just not been driven enough! The water probably got into the engine through 10 years of condensation and English weather.
Glad the trip to France went well. So far the problems on the Portsmouth-Caen route have been with passport control in France, causing my last crossing in June to be 40 minutes late leaving for Portsmouth, where, despite crowds things went better than usual.
Paul
Giles
Western Thunderer
I'm afraid mine is much simpler and basic than the one shown above, although possibly more bomb-proof, and intended to be home-printed on a filament printer. I fit three micro switches to mine - one to control the motor, one to switch frog polarity, and one to detect switch position for indicator LEDs or whatever. The other drawback or bonus - whichever - is that there is one momentary push-button to change the points from whatever direction they are in to the other. They are not really aimed at a commercial market.....
simond
Western Thunderer
Thanks Martyn, Giles,
I’m aiming somewhere between the two. What I’d like is something very like the first design, using an eccentric, with a tortoise-like operating wire lever, which will be stiff enough to throw the points, but soft enough to allow the servo to go its whole travel, or just less. The adjustment can be done, of course, either analog like the Bexhill board, or digital on Arduino as I plan, but I don’t believe it’s necessary. Simply arrange that the servo goes far enough, and lose any excess with a spring.
I do like the 3D printed nature of the Bexhill design. Exactly what I had in mind.
muchas gracias
S
simond
Western Thunderer
Thanks Chris,
please accept an honorary degree “Master of Understatement”.
it is quite large. I bought it from John Taylor, who presumably realised it’s a bit big.
it’s a pretty decent kit, though sorting out what went where was occasionally puzzling. I haven’t done a step-by-step but will detail the lighting and crane when I get to them.
please accept an honorary degree “Master of Understatement”.

it is quite large. I bought it from John Taylor, who presumably realised it’s a bit big.
it’s a pretty decent kit, though sorting out what went where was occasionally puzzling. I haven’t done a step-by-step but will detail the lighting and crane when I get to them.
simond
Western Thunderer
Hi Phil,
no, more due to a lack of effort than any difficulty!
Chris,
it’s 13” wide plus canopy and weighbridge, & 26” long. Give or take 330 x 660 in real money
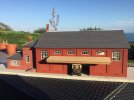
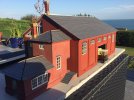
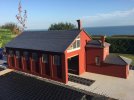
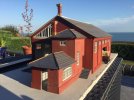

I’m quite pleased with the weathering I’ve done on the deck, and I’ve started on the weighbridge & office, but there’s lots of walls to do! I’m using a technique that I think @Yorkshire Dave suggested, of rubbing on well thinned filler, and wiping it off pretty smartish with a damp sponge. This both fills the mortar lines, and makes the rattle can red primer much more matt/brick-like, imo.
Also lots of flashing to do, along with sills, rainwater goods, doors, interior details, cranes, lighting, office details, weighbridge…
it’s a shame the kit doesn’t have brick etching on the inside, but I guess that’s not a dealbreaker!
no, more due to a lack of effort than any difficulty!
Chris,
it’s 13” wide plus canopy and weighbridge, & 26” long. Give or take 330 x 660 in real money


I’m quite pleased with the weathering I’ve done on the deck, and I’ve started on the weighbridge & office, but there’s lots of walls to do! I’m using a technique that I think @Yorkshire Dave suggested, of rubbing on well thinned filler, and wiping it off pretty smartish with a damp sponge. This both fills the mortar lines, and makes the rattle can red primer much more matt/brick-like, imo.
Also lots of flashing to do, along with sills, rainwater goods, doors, interior details, cranes, lighting, office details, weighbridge…
it’s a shame the kit doesn’t have brick etching on the inside, but I guess that’s not a dealbreaker!
Last edited:
michael mott
Western Thunderer
A lovely Model and also the background overlooking the sea?
Michael
Michael
simond
Western Thunderer
34091 Weymouth
Western Thunderer
Sorry you’ve had issues with Ersa, Simon.
View attachment 138572
Here’s mine. Battered, grubby but bulletproof. I bought two new tips for it, which I’ve not even used yet! The only issue I’ve encountered is the iron cable plug to the main unit sometimes works loose and gives an error reading.
I've had mine years too, it's a brilliant tool for modelling, without a doubt the best iron I've ever had.
simond
Western Thunderer
The other big thing on the workbench is the boat’s port gearbox oil cooler - this appears to have sprung a leak, as the gearbox ended up half full of mayonnaise, and clearly we were losing oil through the raw water coolant going into the exhaust. It was not a comfortable job to get the damn thing off, it’s awkward and heavy, and full of oil so messy too.
And of course, I had to drain & flush the gearbox, and refill with clean oil, and I’ll have to do that again, at least once and maybe twice when it’s all back together, to ensure the gearbox doesn’t start rusting from the inside. Oil’s expensive, but it’s cheaper than metal.
Anyway, I have cleaned it all up, have purchased new o-rings, will laser cut a new gasket, and put it back together to pressure test it. Hopefully, it was an o-ring leak, though why it should, I have no idea. Unfortunately, it’s more likely to be a solder failure, so it’ll be out with the big torch, and a new tub of Powerflo. Not looking forward to that.
Happy, actually deliriously so, to report that the clean-up worked. I discovered some putting in the casting where the o-ring seats at one end, polished it with a rotary mini wire brush, washed with acetone and wiped epoxy into the pits. Once set, a little cleaning up and new o-rings and the job is a good’un. Pressure tested ok.
Refitted last weekend, no leaks, very relieved.

