4mm Polsarrett: BR(S) N Cornwall Clay, The Final Countdown

AJC

Western Thunderer
Those look good. I think that's what Mark is doing to the 2no Bachmann ones. I'm trying to work out when / why some changed from grey to bauxite. I assume some were fitted?

The first lot of 1/051 (2590) were built with independent brakes so were grey, but later converted and thus bauxite. All the remainder were vac’ fitted from new.

Adam

(Citing Bartlett et al, p. 64)
 
Last edited:

Mark F

Western Thunderer
A bit more progress on the GWR 013 wagons this evening. The one at the top Chris had assembled and all I've done is give it a quick coat of primer. One of the other two was assembled but needed brakes and buffers, the other was an unbuilt kit.
From what I can tell most (all?) of these would have received 4 shoe independent Morton brakes by BR days, so that's the direction I'm heading in using 51L castings (and Bill Bedford safety loops) for durability.20220326_215710.jpg
 

Pencarrow

Western Thunderer
A bit more progress on the GWR 013 wagons this evening. The one at the top Chris had assembled and all I've done is give it a quick coat of primer. One of the other two was assembled but needed brakes and buffers, the other was an unbuilt kit.
From what I can tell most (all?) of these would have received 4 shoe independent Morton brakes by BR days, so that's the direction I'm heading in using 51L castings (and Bill Bedford safety loops) for durability.View attachment 159060

Good to see someone who knows what they are doing sorting them out.

Shocking thing is that the wagons were started for our old Treneglos layout probably over 10yrs ago...
 

simond

Western Thunderer
Re post 899, I thought the white diagonal was only at the end door end? Could be my ignorance, in which case please ignore me. It’s been a very long day.
 
Point rodding plans

Pencarrow

Western Thunderer
Finally bit the bullet yesterday and trashed a perfectly good ballast shoulder to install the first length of point rodding. Yes, I should have done this prior to ballasting. I am however glad I'm doing this now before fencing, platforms and other obstacles go in!

It's only roughly placed insitu at the moment but it gives a good idea of the finished effect.
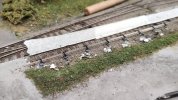
IMG_20220327_182915_1.jpg

The left hand end near the level crossing will have to go lower and some 'timbers' installing in the roadway over the rodding.

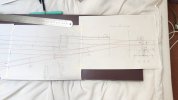
After many abortive attempts planning this little lot I resorted to working it out full size and produced a base plan by tracing the track on the layout.

rps20220328_062820.jpg

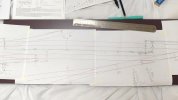
The loop crossover and associated FPL at the platform will be controlled by a separate ground frame which will be released from the SB. Finding a sensible route through for the rodding runs wasn't easy and the route in the current plan wasn't by any means the first shot.

IMG_20220327_165752.jpg

IMG_20220327_165755.jpg

IMG_20220327_165758.jpg

It's unlikely to be perfect but it would work, all the pushes and pulls balance, and I've used the 5 compensators. As an added bonus the rods end up at the SB in the correct order. Going to be a serious test of the eyesight though.

Certainly kept me quiet yesterday afternoon!
 
Last edited:

Pencarrow

Western Thunderer
Help!

Any thoughts folks on what to do about this issue?:

rps20220328_141833.jpg

The rodding is 0.4mm. The 3d printed cranks are scale sized with tiny fixing holes. How on earth do you fix one to the other?

Suggestions appreciated.
 
Top