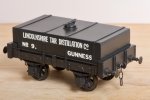
The Heybridge Railway, 1889 to 1913

Richard Gawler

Western Thunderer
I created a YouTube channel so I could upload videos of my models, this began with Nellie the crane tank.

audience.jpg
I have now had enough views of one video to be able to get audience statistics. These are the figures for about 1,400 viewers. Not even 0.1% female? Certainly a male-dominated hobby.
 

Richard Gawler

Western Thunderer
Some kit instructions exasperate me. For the rectangular tank wagon I quote,
"The kit represents the 8, 10 or 12 ton versions"
How can this be true with no optional parts?

On the bright side, the transfers include a "12T" so I will guess the kit really builds a 12 ton wagon. Good - my wagon is smaller.
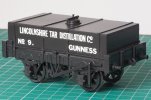
DSC_0342.jpg

The transfers also include a "Yorkshire and Lincolnshire Tar company" of Gunness on Trent so I will imagine this firm began as a smaller operation, based in Lincolnshire.

This is the first time I have used Micro Sol as well as Micro Set. It is important to accept the instructions on the bottle and let the Micro Sol dry in its own time. An attempt to use compressed air lifted the transfer next door. And above all, do not touch the transfers with anything except a brush load of Micro-either. Definitely not a finger!
 
Last edited:

Mike W

Western Thunderer
I suspect the main difference between 10ton and 12ton wagons was the size of the journals and maybe the overall size of the axleboxes, which might be hard to distinguish on a model. I think your adaptation is brilliant and feel an urge to do the same with one of my own kits.

Mike
 

Richard Gawler

Western Thunderer
I suspect the main difference between 10ton and 12ton wagons was the size of the journals and maybe the overall size of the axleboxes, which might be hard to distinguish on a model. I think your adaptation is brilliant and feel an urge to do the same with one of my own kits.

Mike thank you for your kind words.

This model has come about for two reasons. I built one of these kits last year, it was my first 0 gauge wagon. Unready to finish off the model I punched two holes in an envelope, slipped the transfers inside and put the envelope in the ring binder I had started for the project. I built more wagon kits, so many in fact I took an empty kit box, labelled it "Transfers" and put my fresh transfers inside.

Forward eight months, I could not find the transfers for the tank wagon, and the only sensible solution seemed to be to buy another kit. So I bought a kit from an unidentified trader at a show. Then, needless to say, I found the envelope with the transfers. Tried to sell the second kit and my first buyer asked if it was complete. Well, the box had two lots of factory seals in place and (I don't know if this was reasonable!) I wondered if Slaters had put in some coarse scale wheels. So I broke the seals, and found the usual fine scale wheels, but by now my buyer had lost interest.

Meanwhile (I will get to the end!) I had spent a lot of time looking at photos of early tank wagons but failed to find anything much from Victorian times. Yet the creation of coal tar had been going on for decades, ever since the first gas works opened. So, knowing the Victorians built wagons with a 7 ft 6 in wheelbase, especially before the 1887 RCH standard, and imagining they shipped coal tar by rail (surely they did?), I simply made this up working things out as I went along.

The cladding is a big fudge. I know of transfers to represent rivets . . . I have never tried them but somehow I know cladding is whole lot easier.
 

Richard Gawler

Western Thunderer
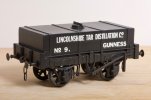
I have finished my tar wagon . . .

DSC_0355.jpg
I have darkened the buffer heads and coupling chains with Perma Blue.
The handle on the filler lid broke off twice, the second time while I was fitting the last chain - I suspect I will soon forget it has gone. Better to lose it at home than have it fall off in someone else's hands at the club.

DSC_0352.jpg
The "black" paint here is Volvo dark grey 228 from Halfords, I think this looks better and certainly photographs easier than a true black.

There is a light coat of Humbrol enamel satin varnish (spray) over the model, the edges of the transfer backing film are quite difficult to see now.

I am enjoying building 7mm wagons, they are turning out into satisfying models. This is my 11th.
 
Last edited:

Richard Gawler

Western Thunderer
Interesting, will bear that in mind. :thumbs:
I picked up the Volvo dark grey idea some years ago. I don't really enjoy using black paint on a model, or white either I suppose.

These are my current colours for "black" on models:
RAL 9005 Jet black - this is too black for my liking but can be had as an enamel aerosol from Halfords
RAL 9004 Signal black - this is easier on the eye and is closer to what Tamiya and Revell and so on sell as "black"
Halfords 228 Volvo dark grey
Revell no. 9 Anthracite
Tamiya Dark Iron

The Volvo dark grey looks really good on a 4mm scale model - as though it compensates perfectly for the usual viewing distance. In 7mm, some observers might think it is a little pale, but at the moment it is still my favourite. It is a good quality paint, even I can get results with it.
 
Last edited:
GWR 4-plank wagon (1880s) . . part 2 painting

Richard Gawler

Western Thunderer
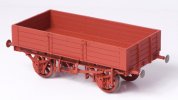
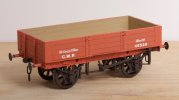
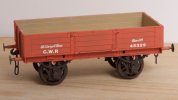
I have finished off my GWR 4-plank wagon - paint and transfers and couplings.

DSC_9365.jpg
This is how I left the model on 15th June - Halfords red primer (link).

I cut off the door springs, these seem to have been a later fitment.

DSC_0371.jpg
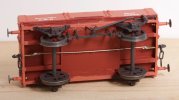
I have now acquired 18 wagons and I still don't understand why coupling hooks should be sprung. Furthermore, if I take my wagons to the club track they could end up near the front of a forty-wagon train. So for this wagon, like my last, I have tied the coupling hooks together, and the wire link takes the weight of the train behind. I do hope someone will tell me the error of my ways if this is wrong.

I did all of the painting (after the primer) by brush. The underframe is Tamiya 'dark iron' with a little brown mixed in.

DSC_0368.jpg
I bought some Vallejo acrylics for the bodywork. I tried the recipe suggested by Mikkel Kjartan, this is:
  • 3 parts 70908 Carmine Red;
  • 2 parts 70829 Amaranth Red;
  • 1 part 70918 Ivory.
The result seemed a bit too orange to me, so I increased the quantity of Carmine Red from 3 parts to 4. So 4:2:1 overall. The measuring is done by squeezing blobs of paint out of the bottles so this is a bit approximate and maybe I really did something nearer to 3:2:1.

I gave the model two very thin coats, the paint brushed on neat as thinly as I could (no thinning). The result after the second coat was still a little blotchy but I thought this took me part of the way towards a weathered look so I stayed with it.

DSC_0365.jpg
The transfers came with the Slaters kit. They include the right designs but the wrong numbers. I really wanted the tare weight to be 4 tons but the smallest value on the sheet is 7 tons and I didn't fancy my chances of cutting out a '4' and getting into place. I am hoping, a casual viewer will notice the style of the lettering and not the values . . . although I haven't found many casual viewers on WT :))

The Heybridge railway is supposed to be a light railway with initially an six-ton axle limit. So I dropped the capacity of the wagon from 10 tons (which was included on the sheet of transfers) to 8, which with a tare of 4 tons would just about squeeze in.

These transfers went on with lukewarm water and sometimes Micro Set, but not Micro Sol.

The whole model has two light coats of Humbrol enamel spray matt varnish. These went on about ten minutes apart. The white witness marks in the photos are evidence of how the white printing on a box of Felix cat food sticks to tacky Humbrol varnish better than to its underlying cardboard box.
 
Last edited:

Richard Gawler

Western Thunderer
P1040417.JPG

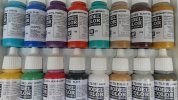
I have bought myself a box of paints. I nearly started a Member's Board thread for it but thinking it through I'm not sure how many replies it could generate.

I am a new convert to Vallejo - I bought their "old wood" and "new wood" and then bought some more to make the "GWR red". Buying a box saves money over buying individual bottles, as long as most of the colours are useful.

Well, I had a browse through what Vallejo do as a box set and bought "70.142 Medieval colours" blind for my Victorian railway. I think, almost everything here will be useful, even the Royal Purple might work for upholstery. Against all odds there is one duplicate with my original six bottles (Amarantha Red), just look at the size of the Vallejo range. But, this ought to be a good buy.
 
Ex-MR 8-ton box van

Richard Gawler

Western Thunderer
I am supposed to be painting my GWR Hydra. In fact I am, but the progress is so slow (and I ought to get the transfers before posting the finished result here) I have started another wagon kit.

I often read positive things about Three Aitch Mouldings and the built kits seem to sell well too. So I consider myself privileged to have picked up an unbuilt MR 8 ton box van. This came from Elaine Harvey, and still sealed in its original plastic bag. My railway is set before the pooling which began in 1916, so I will probably use this as a token covered van belonging my railway rather than as a foreigner from the Midland. The size and the external framing should look the part for the 1890s.

DSC_0386.jpg
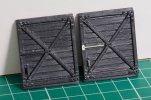
I have had a go at the doors, to put wire handrails in place of the moulded plastic ones. The wire is nickel silver, I am hoping the usual Halfords grey primer will stick to this better than it does to brass.

DSC_0390.jpg
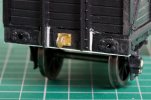
The instructions for the kit mention moulded plastic wheels though these weren't included in the bag. I think these had shorter axles than Slaters wheels.

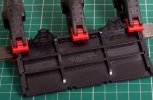
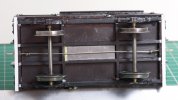
So, to make room for Slaters axles I have drilled out the axle boxes all the way through, and put shims of 0.5 mm styrene to set the solebars far enough apart. I can add new fronts onto the axle boxes later.

The flat file was to hand and seems to be a convenient reference surface to get the first bit of assembly straight.

I like this kit. It seems to be made out of a slightly soft styrene which accepts solvents well. Also the moulded surfaces seem to have some texture from the moulding process; perhaps this will help the finished model to look more natural.
 

Simon

Flying Squad
The 3H kits were wonderful, I built several, including an O gauge 3 plank which I sent Jordan's way some years ago.

I think the art or lack of precision in their toolmaking is a wonderful foil to all of the computer generated exactitude that the hobby and current products benefit from.

Simon
 

Richard Gawler

Western Thunderer
The 3H kits were wonderful, I built several, including an O gauge 3 plank which I sent Jordan's way some years ago.

I think the art or lack of precision in their toolmaking is a wonderful foil to all of the computer generated exactitude that the hobby and current products benefit from.

Simon

Absolutely! You know that there was a model-maker behind the tooling, not a CAD program and a CNC milling machine.

I've just put the second solebar on along with the wheels . . . I am glad I have some etched brass kits behind me. This is going to build into a lovely model, but if I had arrived here from the precision of (say) a Tamiya kit I would be struggling.
 
Last edited:

Allen M

Western Thunderer
I have built & rebuilt quite a number over the years since they came out in the very late 1960s.
I generally undercoat with Halfords plastic primer.
Two points to watch out for, 1st the sole-bars can some times have a very slight taper and as it is the same way on both it is opposite handed when assembled and can leave the axles out of alignment. Check the top edge for any molding marks, mount the first then try the second and file up if necessary before the final fix.
2nd the buffers have a thin spike on the base and are a bit weak unless well glued. If intended for a lot of use may be worth replacing them.
Regards
Allen
 

Richard Gawler

Western Thunderer
Thanks Allen. I noticed the solebars are thinner at one end and decided to accept this and make some cosmetic adjustments after everthing has set solid.

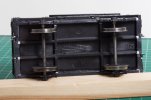
What I did do, was to drill out three of the axle boxes 2.5 mm diameter and slip in the bearings with a dab of cyano. For the fourth axlebox I made an oval hole about +/- 0.5 mm extra up and down so I can (later) fix this last bearing with Milliput to get the two axles dead in line. This is really a variation on how I did my last brass wagon but using glue and filler instead of solder.

I am going to use some Slaters buffers in place of the kit ones and my query on these has been kindly solved by @Rob Pulham and @Tony Overton here:
https://www.westernthunder.co.uk/threads/midland-railway-wagon-buffers-7mm-scale.10914/#post-257667
 

Richard Gawler

Western Thunderer
DSC_0432.jpg
The loose axle bearing is the one bottom right.

All of the "filler" here is slips of white styrene. I ended up with two thicknesses of 0.5 mm to hold the solebar at the top and one thickness for the solebar at the bottom (post #295). Looking at this with everything set solid, I could have put both solebars 0.5 mm further inboard. This would have made the wheel bearings completely fill the axle boxes but would have needed cutting material away at the corner top left. I think it was easier to start from the tightest joint (top left) and work outwards.

DSC_0433.jpg
The loose axle box is now at the left.

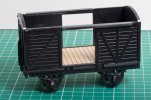
I put some effort into filing the edges of the parts flat and square (to get rid of a slight curvature from the moulding process) but the sides and ends seem to have gone together perfectly.

The wooden floor is from Poppy's Woodtech. The model is designed to have sliding doors, I might as well make the most of them.

DSC_0436.jpg
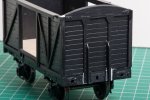
I put some scraps of styrene on the top corners and then filed then to a radius to connect the tops of the ends to the outside of the side.

Looking at this photo suggests I could have a go at extending the strapping at the top.

Edit: I have added the following progress from Monday 29th August to retain the continuity of the build in the thread

DSC_0472.jpg
The weakest part of the kit was probably the coupling hooks. These were pressed steel ones and quite rusty, so I took some brass GER pattern ones and their mounting plates from an etch supplied by Connoisseur Models.

This is the first time I have used my micro flame torch in anger as opposed to doing test pieces - look, no solder!

DSC_0474.jpg
The two hooks are tied together with a length of nickel silver wire. This looks straighter and tighter in real life than in this photo, the idea is to take the weight of a train on the couplings not their connections onto the buffer beams.

The piece of lead weighs 8 grams. The wagon will probably take another 10 or 15 grams to get it up to match my other wagons but I might use some parcels inside the model to do this.

On my model, the variations between the heights of the buffer beams and the heights of the ends of the solebars vary a bit but they are all around 0.5 mm so I added the strips of styrene onto the undersides of the buffer beams to do most of the work of levelling things out.

Construction of the model continues at post no.310.
 
Last edited:

Rob R

Western Thunderer
Richard,
If you come across the 3 Aitch 7mm Cattle Van, grab it as it is an LTSR prototype and would fit in rather well with your Heybridge scheme.
The 3 Aitch stuff is quite "rustic" but full of character, I must try a bit harder to add some to my collection heap of shelf queens.
Rob
 

Wagonman

Western Thunderer
View attachment 169135
The transfers came with the Slaters kit. They include the right designs but the wrong numbers. I really wanted the tare weight to be 4 tons but the smallest value on the sheet is 7 tons and I didn't fancy my chances of cutting out a '4' and getting into place. I am hoping, a casual viewer will notice the style of the lettering and not the values . . . although I haven't found many casual viewers on WT :))

The Heybridge railway is supposed to be a light railway with initially an six-ton axle limit. So I dropped the capacity of the wagon from 10 tons (which was included on the sheet of transfers) to 8, which with a tare of 4 tons would just about squeeze in.

As one of the non-casual viewers I will have to point out that all the GWR 4-plank wagons of this type were rated to carry 10 tons. In practice they rarely did carry anything like the maximum load especially in merchandise traffic. The tare weights were typically in the 5-0-0 to 5-6-0 range. By the time the company got around to fitting them with oil 'boxes (c1900), the G . W . R lettering was on the right hand side – and rather more spaced out than in your example. The door banger plate is surplus to requirements on the non-brake side, and the brake shoes should be 'handed' (ie without the bottom lug). Other than that it's a lovely model!

Sorry!
 
Last edited:

Richard Gawler

Western Thunderer
As one of the non-casual viewers I will have to point out that all the GWR 4-plank wagons of this type were rated to carry 10 tons. In practice they rarely did carry anything like the maximum load especially in merchandise traffic. The tare weights were typically in the 5-0-0 to 5-6-0 range. By the time the company got around to fitting them with oil 'boxes, the G . W . R lettering was on the right hand side – and rather more spaced out than in your example. The door banger plate is surplus to requirements on the non-brake side, and the brake shoes should be 'handed' (ie without the bottom lug). Other than that it's a lovely model!

Sorry!

Axle boxes are the bane of my life so if you could suggest a source of earlier pattern ones or even a scale drawing so I could make some slip-over ones this would help me a great deal. Also I could try to trim the brake shoes if you could post a picture of what they should look like.
 
Top