SimonD’s workbench

Mike W

Western Thunderer
Sorry I'm a bit slow, but referring to Tim Birch's photo of a LNWR D95A van, there is no short piece of bolt just protruding beyond the nut. They wouldn't do that because the exposed bolt would rust, making it harder to get the nut off when needed. Indeed, the bolts seem to be just a fraction short. The LNWR would have made all of their bolts in-house to the exact length needed.

Mike
 

simond

Western Thunderer
Sorry I'm a bit slow, but referring to Tim Birch's photo of a LNWR D95A van, there is no short piece of bolt just protruding beyond the nut. They wouldn't do that because the exposed bolt would rust, making it harder to get the nut off when needed. Indeed, the bolts seem to be just a fraction short. The LNWR would have made all of their bolts in-house to the exact length needed.

Mike
Thanks Mike,

they’re still on the workbench, along with the Match truck and two Parkside 20T coal wagons I was given part built, which have been unbuilt, and are now part built again.

I’m sure you’re right, but I’m not changing them!

but next time…

cheers
Simon
 

Deano747

Western Thunderer
Having just caught up with the threads for a few weeks, i think you are 'nuts'!! ;);)
Looking good Simon, and hats off for perseverance.

Cheers, Rob
 

simond

Western Thunderer
Rob (R)

the latest version, not sure I can get the 70 degree version so easily, it was similar but...

1691336648010.png

1691336698676.png

as you can see, on the visible face nearest the build plate i've used the rivet heads as attachment points for the support - there are about thirty rivets on the boxes themselves, and maybe 26 on the door, and I think there were two I didn't go for because of the limited clearance.

What I did do, about two iterations back, was to make a recess in the underneath face, if that is now a bit lumpy, it can be ignored, as there is only a 1mm wall 1mm high all around the edge, and that cleans up very easily on a bit of sandpaper on top of a piece of glass.

1691337060769.png

Rob (Deano)

nuts? stark staring raving bonkers...

cheers
Simon
 

simond

Western Thunderer
Well, yes, sort of. Found a bubble…. It’s not very obvious, but.

(you can see it in the second photo, just under the cross beaM, on the left, but out of focus)

I know how to fix it, but it will mean print #7.
 
Last edited:

magmouse

Western Thunderer
This is looking very good Simon. I like the use of mixed materials. Could you do a complete solebar overlay, with the number and weight plates, so you can add the river detail? You’ve gone to such lengths to get all that lovely rivet detail on the bodywork, it seems a shame to leave the solebars bare. Also don’t forget the retaining straps on the w-irons, below each axle box.

Nick.
 

simond

Western Thunderer
Thanks Nick, the axlebox straps are on the to-do list, along with brake safety loops, which I forgot in my post last night. I have etched safety loops and the straps are drawn for 3DP.

a solebar overlay would be possible, but I fear, probably only in etched brass. Or, if I’d used deeper channel,& 3DP’d it before putting the T stanchions on!

I do have rivet transfers. Perhaps…

I suspect that mixed materials is the way to go. I’m going to have a go at the iron round-cornered loco coal wagons, as the Coopercraft kits I have are famously wrong. I suspect I can fix that too, so hybrid injection moulded plastic, brass & 3DP. Watch this space but don’t hold your breath!
 
Last edited:

magmouse

Western Thunderer
a solebar overlay would be possible, but I fear, probably only in etched brass.

Or 10 thou plasticard? I have found my rivet press forms very nice rivet heads in plasticard. It would be bendy enough to slide behind the stanchione once you had done the detailing of it. A few drops of runny CA on the end of a pin, and presto.

I’m going to have a go at the iron round-cornered loco coal wagons, as the Coopercraft kits I have are famously wrong.

I did an N13 from the Coopercraft kit the hard way, modifying the corners to get the rounded profile and correct body width:


I have a vague plan to do an N4 in brass or nickel silver sheet, with rivet transfers. 3DP for all the L, T and Z section ironwork would be ideal, though.

Nick.
 

simond

Western Thunderer
Thanks Nick,

the stanchions are already on. Maybe rivetted PK in the gaps, I’ll have a look. Thanks for the suggestion.

The square ended model wagons have a 5’ door whereas the real thing is 5’4” if my memory serves. I’m going to see if it’s possible to covert the Coopercraft square Enders to N19? by changing the doors, and whether I can simply 3DP the whole shooting match for the N13. We’ll see.

cheers
Simon
 

magmouse

Western Thunderer
The square cornered loco coal wagons all come after my 1908 period, so I had to do a round type. And yes, the doors get wider on later diagrams, so the Coopercraft model doesn't accurately reflect anything. Also watch out for the width, which to too narrow in the kit - it's only 6" IIRC, but it makes a difference in my view. I think it is an important part of their character - wide and short, compared to more 'upright' wooden PO coal wagons.

N19 still has round corners - an N20 has square, but of course wider doors and the 8' over plate work body, so the Coopercraft still needs fair amount of work to do that. A big question is whether you want to have the wagon loaded or not - I only got away with bashing the Coopercraft because I was modelling it loaded and so I could taper the over-thick sides towards the top edge. An empty wagon needs a thin material for the sides and ends, and internal rivet detail, which implies metal or a metal / 3DP mix, I think.

Regards -

Nick.
 

simond

Western Thunderer
Has anyone got, or can anyone point me at, a drawing of a GWR square shank buffer? (Or even a tapered found shank type with the rectangular base). I’m sure I have seen a drawing in a book or magazine, but I cannot find it…

TIA
Simon
 

simond

Western Thunderer
The square cornered loco coal wagons all come after my 1908 period, so I had to do a round type. And yes, the doors get wider on later diagrams, so the Coopercraft model doesn't accurately reflect anything. Also watch out for the width, which to too narrow in the kit - it's only 6" IIRC, but it makes a difference in my view. I think it is an important part of their character - wide and short, compared to more 'upright' wooden PO coal wagons.

N19 still has round corners - an N20 has square, but of course wider doors and the 8' over plate work body, so the Coopercraft still needs fair amount of work to do that. A big question is whether you want to have the wagon loaded or not - I only got away with bashing the Coopercraft because I was modelling it loaded and so I could taper the over-thick sides towards the top edge. An empty wagon needs a thin material for the sides and ends, and internal rivet detail, which implies metal or a metal / 3DP mix, I think.

Regards -

Nick.
Just had a browse of ABT (pages 235-237) which confirms your post. The N20 diagram came in in 1915, 10T, followed by N21 which was 12T in 1918, and fitted with self contained draw gear / buffers. 16’ x 8’ x 3’1.5” or 3’6” (inches difficult to read - caution) with 5’4” doors.

The Coopercraft kit claims to be N13, which had round corners. It is 112mm (16’) long and 53mm (7’6”) wide, 22.5mm (3’2.5”) high, and the doors are 34.something (thus less than 5’) between stanchions, so it’s a complete dog’s breakfast, certainly isn’t an obvious candidate for N20/21 as I had hoped. I’ve got a couple, I’m inclined to number them as N20/21 and say no more. I can’t imagine why Mr Cooper didn’t choose a later wagon and simply do it right.

I do fancy having a go at an N13 on the 3DP. I’m confident it’ll do “thin”, but how thick is required for robustness and to actually print it remains to be seen.

On the Match Truck, I did the more drawings today, and will put them on to print tomorrow - Roller, support and pivot plate, and the axleguard keeps. I also fitted the brake safety loops. Haven’t done anything about the plates or solebar details yet.

Cheers
Simon
 

magmouse

Western Thunderer
I’m confident it’ll do “thin”, but how thick is required for robustness and to actually print it remains to be seen.

Yes, that will be interesting. If you are doing a loaded wagon, you only need a thin top edge, but for an empty one, it needs to be thin all the way down - you might get away visually with a very slight taper. My concern would be the long term stability of the print, since some other people have reported small but noticeable distortions appearing over a period of several months. Anyway, the only way to find out is to try it! Certainly, 3DP seems a great way to do all that rivet detail, inside and out - it’s looking really good on your match truck body.

Nick.
 

simond

Western Thunderer
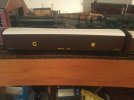
It might be ambitious to describe this as “weathering”, but I’ve taken the RTR shine off it: image.jpg

There are a few photos in Russell’s coach bible but there’s only one of an inside framed Siphon without the later ventilators. In any case, they seem to be universally “matt dirty” - certainly more so than I want to do to a new model anyway.

Model comments

I think it’s a duck, it walks & talks like one and I can’t see anything glaring. Very pleased with my purchase, all the exterior detail looks present & correct to me, brake shoes are reasonably close to the wheels, slightly outboard, probably enough room to go S7 if that’s your thing.

I will dig out my other brown vehicles and make a train just to have a look. :)

Wheels are blackened, but look distinctly metallic-glossy. They run fine through my home built pointwork, I assume they’re compatible with Peco. Bogies secured with central screw & spring - it doesn’t appear to wobble. In common with other Minerva (and Dapol) RTR the coupling springs are the weak and wibbly side of wimpish and need sorting out.

Insides of corridor connectors are brilliant white - I guess this could be seen as “glaring” :)

Bags of bits supplied with model - mild concern on delivery that package rattled but it was the loose bits in their plastic bags. There are lower body vents, battery boxes and roof ventilators to fit if required. I’ll fit the battery boxes, not the other bits.

Model very well packed. Seems like a sensible weight, rolls freely.

What I’ve done so far

Painted ends of brake handles white, painted insides of corridor connectors very dark grey, painted axleboxes tops & dampers blue

Weathering mix of mahogany, black & rust applied to inside and outside faces of wheels including rims but not treads

Thin version of similar mix sprayed quite heavily over bogies, less so over solebars and ends, and gently over rest of body

Very thin wash of black sprayed very lightly over roof

All the paints were Vallejo

What I should have done / will do

Fit the battery boxes before spraying chassis - prat - job for later when it’s all dried.

Possible application of some dark rust wash to bogies particularly brakes and wheels

Open hand holes in doors - they’re a bit low-relief

Improve coupling springs

Bit of oily steel metalcote on the buffer heads, maybe edges of steps, etc


One happy shopper :)
 
Last edited:
Top