7mm Heybridge Basin

Richard Gawler

Western Thunderer
Yes it can be turned into a nice piece of furniture. With this in mind, and to match the pine edge mouldings have you used, have you considered using iron-on wood veneers for the fronts, outer ends, and rear of the baseboards to hide the ugly burnt (to me anyway) laser cut joints to finish the outer edges?

Wood Veneer 200mm

I have bought some American Oak veneer from Veneers Online, and applied it to the front and rear of the baseboard frame. This has rather transformed the good but bland birch plywood into something which, as you suggest, could resemble a piece of furniture.

DSC_6185.jpeg
The glue on this veneer has a coarse texture, in places like a honeycomb. When you melt it (domestic iron) I guess the hollows consume the surplus glue which doesn't penetrate into the substrate.
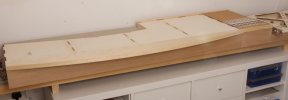
DSC_6182.jpeg
Truly I have never encountered a woodworking product which is so easy to use and which produces such a dramatic effect. The veneer is easier and quicker than paint, and about the same price if you have to buy fresh undercoat and gloss. The veneer also hides the laser-scorched tenons of the construction.

I wrapped the sole plate with kitchen foil to make sure I didn't transfer any dirt onto the veneer, and I used a moderate heat i.e. "cotton" rather than "linen".
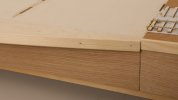
DSC_6184.jpeg
Oak photographs much better than birch!

The wood grain of the pine mouldings is not particularly attractive. My current thinking is to paint these mouldings in satin black, and treat the veneer with a hard wax oil. This way I will end up with only two finishes, veneer and black paint; and the model will appear to be built on a slender baseboard resting on a deeper plinth. However I do wonder if a dark wood stain and more oil on the mouldings would be just as good? Staining and oiling is so much easier than painting.
 

Yorkshire Dave

Western Thunderer
Personally I wouldn't do anything to the pine moulding yet and let it darken with age. One (another?) thing you may wish to consider before doing anything is nail punching the pins deeper in to the pine and fill the resulting countersink with a mixture of pine sawdust and pva. Let it set hard and sand back which will hide the pins.

Rather than paint the pine I'd look at dark wood wax stain. It would be worth experimenting with some of these on some scrap pine to see which one compliments the light/mid oak veneer. Something like Osmo Ebony wood wax Wood Wax Finish - Osmo UK

Gosh! do tell me to stop if it feels like I'm dictating upon the appearance of the baseboards :eek:. Presentation is just one of those things I take my time over to ensure it looks right (my grandfather was a carpenter and builder). I never use black, brown or green paint as it has a propensity to scuff, look unsightly and untidy - which ultimately requires repainting to restore it's look. At least with varnished and stained wood, knocks and dents become part of the patina like a well used piece of furniture.

As for the veneers - I used some beech veneer ironed back to back for the body and floor of this scratchbuilt 7mm SECR 10T dropside wagon.... forget plasticard, resin and brass. :rolleyes: . Full details are in my thread Yorky D's SECR dropside - Rollout - 4 groovy planks man

SECR 35.jpg
 

Osgood

Western Thunderer
By the time you've experimented with stains dyes etc etc it may be worth simply replacing the pine moulding with oak?
Mind you, oak mouldings have skyrocketed in price this last few years.....
 

Richard Gawler

Western Thunderer
Thanks for these suggestions though to be honest the pine mouldings are stuck down so well I doubt anything will shift them except planing them off.

All of my recent layouts have received an attempt to prettify their presentation; I really cannot cope with the slabs of black fascias seen on so many exhibition layouts. At least at home. Browsing around the living room, most of the furniture has two finishes – I can see wood/fabric, wood/glass and glass/laminate. Only a lamp table has one finish, and where there is a third this is always something minor like a highlight on a door knob.

So two finishes seems sensible – the veneers and something else. I need a scheme I can carry across to other baseboards in the project in a coherent sort of a way. The most difficult of these is the traverser because it has prominent laser-cut edges. So after a lot of soul searching I have settled on a hard wax oil for the veneers and paint for everything else.

The oil is from Gilboy's, their promotional video was just too good to ignore. The oil seems to be jolly good too.

DSC_6199.jpeg
The colour coat is undecided, but if I think of the diorama as a picture and the baseboard as its frame and mount then perhaps a pale cream or ivory colour for the pine mouldings and the other parts without veneer I want to blend in.
 

magmouse

Western Thunderer
For what it's worth, I think you have made the right decision. The only thing I would query is doing the pine mouldings in a pale colour - I feel a dark colour (not black) would provide an edge line in contrast to both the veneer facias and the scenery, to stop the eye leaving the frame. Rather like drawing a line around the picture of the scenic space - perhaps in a dark blue, red, green or brown, as a complementary colour to the overall tones of the scenery.

Nick.
 

Osgood

Western Thunderer
I wonder if a variable colour, picking adjacent colours from the layout, might possibly work on the edge moulding?

Here is the technique used on a framed photograph - excuse the awful light, needs a daylight shot to do it justice:

Graduated border.jpg

It's all Lawrence of Arabia's fault.....
 
Last edited:

Richard Gawler

Western Thunderer
I think Nick is right. I have now applied a second coat of the hard wax oil and the veneers are darker than they were in my last post. I am going to need a darker, stronger colour to connect model to underframe.

I like the varied colours on Tony's picture mount but for me there is a vertical step down from ground level to basin floor and I don't think this sort of scheme will fit here.

Ideas:
  • Blue would complement a large Essex sky on the background and the reflection of the sky in the navigation
  • Red oxide might emphasise a look of Victorian industry
  • A brown could go with the local soil type, which is probably heavy clay though I need to check this
I could have a blue along only the front of the basin water, but introducing this as an extra colour may make the project look ill-thought out.

I think a dull red would suit the other modules in the project pretty well, especially the traverser. Or for a more conservative choice, how about RAL7013 brown grey?
 

Richard Gawler

Western Thunderer
An ineresting dilema. Perhaps a shade of a GER colour. Dark Blue perhaps.

If this was a GER branch line I would pursue the dark blue because it would help to set the location. But by the 1890s the GER were only putting blue on their express passenger locos. The H&LLR is a poorly-funded independent railway, and it it is primarily a freight operation, and if I give it a formal livery (maybe blue) it will look better off than I imagine it to be. Nice idea though :thumbs:

My inclination would be to wait until the scenics are done - you will probably end up getting scenic materials on it anyway, so it will need a repaint. Then you can judge the colour to complement the tones in the 'stage picture'.

I want to put something on "now", if only to rub it down in six month's time. Experience of decorating the house suggests the first paint on new wood looks meagre. I want lots of paint to hide the various wood grains and layers of plywood.

I also have a feeling, the highlight colour needs to be on the same side of the colour wheel as the oak veneers. Then the mouldings can provide a frame to the model when viewed from above, yet look suitably subtle when viewed side on as when sitting on the sofa.
 
Last edited:

Rob R

Western Thunderer
If this was a GER branch line I would pursue the dark blue because it would help to set the location. But by the 1890s the GER were only putting blue on their express passenger locos.
Richard,
The GER painted all passenger engines blue at that period not just express locos.
 

Richard Gawler

Western Thunderer
I wonder if a variable colour, picking adjacent colours from the layout, might possibly work on the edge moulding?

Here is the technique used on a framed photograph - excuse the awful light, needs a daylight shot to do it justice:

View attachment 209956

It's all Lawrence of Arabia's fault.....
I can imagine this effect working well on the front of a longer layout where the foreground scenery changes from pasture to river to station yard or whatever along the length. But I think the layout has to be sufficiently long to need the viewer to conciously walk along it to see the whole scene.

Nice picture though, which in a way it shouldn't be.
 

Richard Gawler

Western Thunderer
nice work Richard, you definitely put a lot of thought into your projects

A while ago I built three consecutive failed layouts. They were all micros and they all had some style to them, but they didn't work out. I sold one (to a buyer who immediately destroyed the entire visual concept!) and the other two got broken up. They suffered by not having a proper definition of time and place, and maybe now I am trying a bit too hard. Though the idea of re-use of a modular system appeals a lot.

Some sunlight fell on the baseboards a moment ago (and now the sun is too high in the sky!) and it does bring the veneers to life.
 
Last edited:

Osgood

Western Thunderer
......
Nice picture though, which in a way it shouldn't be.
I understand, Richard - then again if you see anything more than just a pile of scrap it shows you feel some kind of empathy with the machine.

It shouldn't have been this picture, but the one below from a book by Colin Garratt (which is from a train blown up by L of A).
I wrote a letter (so presumably prior to the email era), asking if I might obtain a large print.
He wrote back explaining that it was not possible for this particular image, but to come over and choose something else from his collection.
I spent two entire afternoons trawling through his personal slide collection, all hung, over 100 per file, from suspended clear slide files in filing cabinets.
The one above was the replacement - but imagine this image in large format on a wall:

Desert copy wm.jpg
Above is Copyright with photographer
 
Last edited:

Hayfield1

Western Thunderer
We were down at the basin yesterday, it was high tide and the sea gate was open and the flow of the canal was over the internal lock gates

108.jpeg

There is a lot of flooded ground up stream increasing the height of both rivers and canal

109.jpeg

Sea lock gate open, I assume to release flood water as normally its locked up till the end of March
 

Richard Gawler

Western Thunderer
Hello John and welcome to Western Thunder!

For those unfamiliar with the navigation, the surplus water we see here going over the lock gates at Heybridge Basin is merely the excess from the Long Pond, i.e. the cut from here back to Beeleigh lock. The excess from the River Chelmer (and the River Blackwater) goes over the weir at Beeleigh . . . I imagine there is a fair torrent flowing there at the moment.

Thanks ever so much for the pics, you have saved me a trip to visit at high tide.
 
Top