7mm Heybridge Basin

Richard Gawler

Western Thunderer
Hopefully I can include 0-F and 0-MF track, some BH and FB rail, some inset track ...

Well that puts us with an interest in S7 firmly in our place.

Now seems a good time to make the best of the lull in the Boat Traffic.

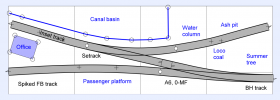
One of the nice things about this particular layout thread is that hardly anyone has said anything about the railway. In fact, the topic might be best kept this way - I am going to glue down a Peco point and some hand-made track (plan), do something about the ballasting (not keen) and make a gesture towards providing a facing point lock. This is probably all of the railway stuff this topic needs, good.

Nevertheless, our hobby is an inclusive one and I want to use this diorama as a photographic background. Therefore I will try to set the gauge of the hand built FB track past the passenger platform (marked 0-MF on the plan) as wide as I can, up to a maximum of 33 mm.

I need to make sure my 0-F wheels don't fall through the gap, otherwise this ought to work. My S7 friends can visit and have their models photographed at Heybridge Basin (subject to length, no Garretts please) and all I need to hope is that they will accept the 'land locked' nature of the location.

Hope this helps :D
 

Dog Star

Western Thunderer
My S7 friends can visit and have their models photographed at Heybridge Basin.
From the sublime (GWR 517 class and a couple of wagons) to the ridiculus something longer (class 37/4 plus four Mk.1s), just how long is the piece of track?

With our diverse interests we ought to have something to fit!

regards, Graham
 

simond

Western Thunderer
Now seems a good time to make the best of the lull in the Boat Traffic.

One of the nice things about this particular layout thread is that hardly anyone has said anything about the railway. In fact, the topic might be best kept this way - I am going to glue down a Peco point and some hand-made track (plan), do something about the ballasting (not keen) and make a gesture towards providing a facing point lock. This is probably all of the railway stuff this topic needs, good.

Nevertheless, our hobby is an inclusive one and I want to use this diorama as a photographic background. Therefore I will try to set the gauge of the hand built FB track past the passenger platform (marked 0-MF on the plan) as wide as I can, up to a maximum of 33 mm.

I need to make sure my 0-F wheels don't fall through the gap, otherwise this ought to work. My S7 friends can visit and have their models photographed at Heybridge Basin (subject to length, no Garretts please) and all I need to hope is that they will accept the 'land locked' nature of the location.

Hope this helps :D

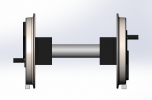
Standard OF will fit (of course!)


1687436422247.png

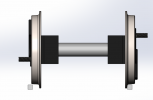
And won't obviously fall in
1687436648891.png

apologies for the crude rail section to the S7 crowd, (if I'd had a few minutes more I'd have done Hornby tinplate rails to S7 standards :) )
 

Richard Gawler

Western Thunderer
From the sublime (GWR 517 class and a couple of wagons) to the ridiculus something longer (class 37/4 plus four Mk.1s), just how long is the piece of track?

With our diverse interests we ought to have something to fit!

About 500 mm to the fouling point.
 

Richard Gawler

Western Thunderer
Going back to the water, I have had some ideas for a Magnorail installation in the basin. The first idea was to have this move a couple of swans, shouldn't be too challenging in 7mm scale. The water surface can be 2 mm acrylic painted a muddy brown or whatever underneath.

But I am now thinking, could I have a horse swimming in the basin? Just the head and neck being modelled of course. Did working horses go for a swim in the waterway where they worked? Would this be better with a thin layer of real water above the acrylic sheet? At the moment the Magnorail has much more appeal than the barge, even though the barge would help to pin down the location a lot better.
As far as I know the horses occasionally fell in. I know of one such event,and by the time they the beast got out,half the towpath was in the cut,and had rendered it impassable.
 

simond

Western Thunderer
Going back to the water, I have had some ideas for a Magnorail installation in the basin. The first idea was to have this move a couple of swans, shouldn't be too challenging in 7mm scale. The water surface can be 2 mm acrylic painted a muddy brown or whatever underneath.

But I am now thinking, could I have a horse swimming in the basin? Just the head and neck being modelled of course. Did working horses go for a swim in the waterway where they worked? Would this be better with a thin layer of real water above the acrylic sheet? At the moment the Magnorail has much more appeal than the barge, even though the barge would help to pin down the location a lot better.
I’d suggest glass. The swans would otherwise wear tracks in the acrylic which will not be easy to hide.

not favouring the horse, as it would make waves. I guess the swans would also, but the horse…
 

Richard Gawler

Western Thunderer
I have been experimenting with a piece of pencil rubber in a tray holding some water, and sadly the result is going to look like something of nothing. I mean, horses make quite big waves. Well it was an idea, my first animated horse, but no. In comparison the swans could look quite serene.

I have some 1.5 mm sheet acrylic and some 2 mm glass, both from old picture frames. The acrylic has taken some colour using Tamiya matt acrylics, and their colour "Sky" gives quite a decent effect of algae after spraying it on the underside.

Supposing I wanted to cut a sheet of 2 mm glass to roughly match the curving bank of my canal basin, any pointers as to how to do this without slashing fingers to pieces would be a great help.

DSC_3211.jpeg
 

simond

Western Thunderer
Can you create a rebate under the curving bank, so a rectangular piece of glass can fit and be disguised?

If not, make a template for the bit you want to keep, so your scriber cannot stray into that material, get a TC or diamond scriber and carefully mark the curve on your glass, and scribe it several times. With a template, you can scribe both sides. You can add a few lines off into the waste too, but the key thing is a smooth curve That the fracture will follow.

Then with your gloves and safety glasses on, place the scribed line on the glass over a bit of wood in the garden, and press gently on the outer edges, whilst simultaneously keeping your toes, eyes and fingers crossed…
 

Richard Gawler

Western Thunderer
Thanks for this Tim. I have the first edition, published in 1979. The fact that a second edition was produced so many years later does suggest this book could always produce some more sales . . . I have ordered a copy through Abebooks.
 

Tim Birch

Western Thunderer
Thanks for this Tim. I have the first edition, published in 1979. The fact that a second edition was produced so many years later does suggest this book could always produce some more sales . . . I have ordered a copy through Abebooks.
Richard,
I think you will find it a worthwhile purchase. The only problem is that there seem to be so many boats worth modelling!
 

Richard Gawler

Western Thunderer
For all here who are interested in Britain's canal and river craft, I think the second edition of Edward Paget-Tomlinson's book is the better buy. This was published posthumously in 2005. In the second edition, the reproduction of all of the illustrations is to a far higher standard than in the reprint of the first edition. The second edition also contains more photographs, and these taken from the collection of E P-T.

Prices I have found secondhand are around £2 for the reprint and £15 for the second edition. This is a very good book, where the mixture of narrative and illustrations is just right.

Be aware, Landmarks Publishing correctly but a bit confusingly call this their 1st edition. As Tim says, ISBN 1-84306-173-2.
 

Richard Gawler

Western Thunderer
View attachment 188062
George @Herb Garden : The track plan is very is close to this, but I am showing a Peco curved point here in AnyRail to represent a mildly-curved A6 which I am using.

@adrian : The baseboard is from a standard G&H module. I placed the track on the board as carefully as I could and marked a line to show the rail nearest to the basin. Then I marked another line parallel to this and cut out the baseboard top to suit - see Dockside tracks. It was then easy to lay the cross members onto the top to mark them for cutting out. The construction sequence for the big bits was (with the structure upside down) top, three cross members, both ends, front and rear, basin base; and then trimmings like the back of the basin and the three diagonal braces.

@Yorkshire Dave : The operating practice on the Navigation was for sea-worthy vessels to tie alongside near Osea Island, where their loads were transferred to old Thames barges. These were towed across to the sea lock, moved into the basin, and everything was moved again this time onto barges. There is more in part 1 of my back story, this part of the story is factual. I will be very happy to make some passable looking water. Some kind of watercraft would be a bonus but it isn't a must have. Shoving all of this track into five square feet is probably a cliche in its own right, but if I can end up with a better test track and some experience of larger-scale scenics this will be good.

I have been pondering the scenic development of "Heybridge Basin". The track plan has been fixed since early June but some thought is needed to show this is "Essex" and not "in England". So, thinking about localisation, the ideas so far are the following:

Great Britain
  • Sleepers 9 ft long, set at the usual British spacing with spiked FB rail
  • Facing point lock on the passenger line
  • Architecture item 1: platform shelter
  • Navigation to look like a canal not a river
  • Wildlife: mute swans in the basin
East Anglia
  • Water column of GER pattern
  • Large sky on the backscene
Essex
  • Ballast: local sand and gravel (independent railway, so not GER ash from Stratford)
Chelmer and Blackwater Navigation
  • Architecture 2: small office building from Paper Mill Lock, this is seven miles away on the Navigation
Heybridge Basin
  • Waterfront defined by stone slabs on brick walls, like the sides of the sea lock
  • Early use of concrete for building blocks, pioneered by E H Bentall
  • Station name board “Heybridge Basin” (!)
I would love to add "painting of local buildings on backscene" to this list, but while the usual constraints of time and money always apply, there is is also the matter of ability :))

Screenshot 2023-09-09 09.22.12.png
I have built, it seems, seventeen model railway layouts. Only four worked out really well, and these were the four where I planned the treatment of every square inch before I even laid the track. It makes sense really, especially if some more of the baseboard top has to be cut away. There is no rush, but I do think "Essex" deserves more than "ballast". This is the 1890s but I still await the first TOWIE remarks :cool:
 

Dog Star

Western Thunderer
Sleepers 9 ft long, set at the usual British spacing with spiked FB rail
I think that you made need to re-visit this thought so as to make the PW more appropriate to a backwater in Essex - just what is meant by "usual" in regard to sleeper spacing. In simple terms, sleepers were spaced apart as required to support the axle-weight of the passing stock or the expected speed of the services.

One might say that the gap between sleepers got less as time moved on.

Some years ago I built the trackwork for a GER layout for Adrian Marks, the idea was to show how an inner-city service point developed over time and PW styles were key to the picture. So we had BH rail in 21', 22', 24' and 30' lengths with 8-13 sleepers per rail length. You can read about the research and the modelling here.

regards, Graham
 

Richard Gawler

Western Thunderer
Well, I am imagining my railway, whilst operating at its opening with a maximum permitted axle weight of 8 tons (from the The Regulation of the Railways Act 1868) was physically able to handle the same axle loads as the timber viaduct at Wickham Bishops. This means, the heaviest locomotive on the railway is probably a GER R24 but not a S56. The Y14 is lighter than a R24.

I have built the A6 point and I don't have much enthusiasm to build it again, and both points use code 124 rail. This leaves me to find out a sensible sleeper spacing for the plain line using 70 lb/yard rail represented by Kalgarin code 100. If I never find out this spacing I'll go for 33 inches, being a little more than the usual (for want of a better word) 30 inches.

Edit: I am undecided on the rail length, but this will be 30 feet unless I find a reference. Whatever the Mid Suffolk used would be a fair model to copy.
 
Last edited:

Richard Gawler

Western Thunderer
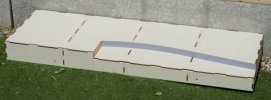
I finished the baseboard today. This is from a kit by Grainge and Hodder, 1200 x 400 mm.
Well, not quite. I spent last week altering the baseboard. The basin is now broad enough to take a full-size model of 60 foot barge from the Chelmer and Blackwater Navigation, and the baseboard top is deep enough to let me plant my waiting shelter on the passenger platform.

Personally I wouldn't as it would make the baseboard larger and more awkward to store. I'd try and keep within the 1200 x 400mm.
I do agree with these sentiments, but I want to keep the model on show and I think it is worthwhile to try to make it blend into the domestic setting.

Here are some photos of the new work. The main thing is, I am trying to make something light enough to carry in one hand, rigid enough to hold the track and the scenery, and strong enough to withstand normal handling. I don't want to stand on the model.
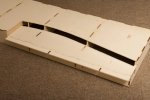
DSC_6082.jpeg
I have cut a strip off the baseboard top to move the rear of the basin backwards, and added the offcut from the front of the baseboard to bring the front of the basin forwards. The total increase is barely 45 mm but the basin now has more stature. It doesn’t look like something of nothing any more.
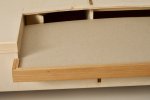
DSC_6142.jpeg
I also cut some slots into the frame underneath the rear edge so I can slot in a sheet of something to represent the water. The front trim (to be fixed later) is from a picture frame bought in a charity shop. I could never do a mitre corner this good!
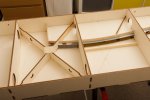
DSC_6084.jpeg
The bottom of the basin is the cardboard artwork from the same picture frame.
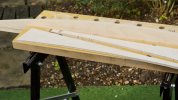
DSC_6095.jpeg
The rear extension is from two pieces of 4 mm ply, these glued together on the waste side, then cut to line with the jigsaw and planed smooth. The offcuts (glued together forever) are in the foreground.
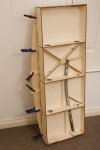
DSC_6112.jpeg
The top panel is 20 mm broader than the bottom panel. The top panel is pinned and glued onto the top of the baseboard, and packing pieces are glued in underneath it.
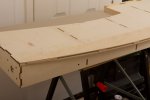
DSC_6127.jpeg
Then the bottom panel is glued into place.
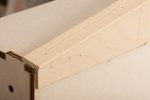
DSC_6139.jpeg
The construction is completed with a strip of D moulding pinned and glued.

I borrowed this sort of cellular design from an extremely heavy P4 baseboard I saw years ago, but I used thinner materials and enclosed the voids on all four sides. The result does seem to be much stronger than its individual parts.
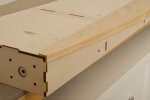
DSC_6148.jpeg
I am hoping a curving backscene will give the model a more gentle appearance; it might end up in the living room one day. Meanwhile, the curve does not have sharp corners to snag on clothing, and this will be useful in the hobby room where the model sits with its front facing a wall, no backscene and its back overhanging the furniture.
 

Yorkshire Dave

Western Thunderer
I must admit I do keep looking at your layout/diorama with a view to plagiarism for a small O scale opertating diorama :).

The only thing which keeps putting me off at present of the use of baseboard kits is their use of apparent heavyweight materials and construction to withstand earthquakes. With this in mind I always keep looking at aircraft wing design and construction to see if I can build strong lightweight baseboards.

I do agree with these sentiments, but I want to keep the model on show and I think it is worthwhile to try to make it blend into the domestic setting.

Yes it can be turned into a nice piece of furniture. With this in mind, and to match the pine edge mouldings have you used, have you considered using iron-on wood veneers for the fronts, outer ends, and rear of the baseboards to hide the ugly burnt (to me anyway) laser cut joints to finish the outer edges?

Wood Veneer 200mm
 
Top