You are using an out of date browser. It may not display this or other websites correctly.
You should upgrade or use an alternative browser.
You should upgrade or use an alternative browser.
The Heybridge Railway, 1889 to 1913
- Thread starter Richard Gawler
- Start date
Threadmarks
View all 121 threadmarks
Reader mode
Reader mode
Recent threadmarks
Water column, second attempt NSR low-sided open wagon (c.1880) GER wool wagon (1880) LT&SR horse box (1878) . . unboxing LT&SR horse box (1878) . . build ( Diversion : sixteen wagons at NEEGOG ) GER C53 (1903 onwards) The Beast of Heybridge NewOverseer
Western Thunderer
I have just started a new thread entitled 'Black and White Colour Rendition' to avoid clogging up Richard's thread with further discussion.I'm interested in this subject as it starts to explain done strange aspects of how early buildings photograph. I'm sure it would be of general interest to others but I suspect it's best discussed in a new thread rather than divert Richard's?
( Diversion : thoughts and reference sources for white paint )
Richard Gawler
Western Thunderer
Returning to model white for a moment . . .
Back in the 1980s, my father was still choosing “white” gloss for indoor woodwork because it looked more gentle than the new “brilliant white”. He used Wilko own brand, its weakness was a tendency to yellow. White paint only started to stay white quite recently, certainly well after the Heybridge Railway.
I suspect much of the white paint available to Victorians and Edwardians was more of a pale cream. Something like Vallejo Ivory seems to be a good starting point for this, adding their ‘White’ to freshen it up. I can live with the window frames on the waiting shelter but I'll put less white in the mix next time.
Interesting that you mention white /off white / cream colours. I tend to go a bit rogue when I'm painting and generally don't use black or white neat when painting scenic items. IMO they tend to look to harsh. I tend to use an off white, sometimes also followed by a light grey wash rather than a pure white. Similarly I add some grey or brown to black.
Back in the 1980s, my father was still choosing “white” gloss for indoor woodwork because it looked more gentle than the new “brilliant white”. He used Wilko own brand, its weakness was a tendency to yellow. White paint only started to stay white quite recently, certainly well after the Heybridge Railway.
I suspect much of the white paint available to Victorians and Edwardians was more of a pale cream. Something like Vallejo Ivory seems to be a good starting point for this, adding their ‘White’ to freshen it up. I can live with the window frames on the waiting shelter but I'll put less white in the mix next time.
Overseer
Western Thunderer
White lead (lead oxide) was the most common white pigment used in oil based paints during the Victorian and Edwardian periods because it was durable and formed a very good base for mixing with other pigments. There were many methods of manufacturing white lead pigment, most producing quite pure whites. If a brighter white was wanted a small amount of ultramarine was added. White lead will yellow if not exposed to sunlight so will yellow when used inside. Outside it will stay white unless the air has sulphurous pollution (not uncommon in industrial areas at the time) which will blacken it. Zinc white was also popular and does not yellow but it produces a more brittle paint film so can be less durable outside than white lead paint, it is also not poisonous so is still available.Returning to model white for a moment . . .
Back in the 1980s, my father was still choosing “white” gloss for indoor woodwork because it looked more gentle than the new “brilliant white”. He used Wilko own brand, its weakness was a tendency to yellow. White paint only started to stay white quite recently, certainly well after the Heybridge Railway.
I suspect much of the white paint available to Victorians and Edwardians was more of a pale cream. Something like Vallejo Ivory seems to be a good starting point for this, adding their ‘White’ to freshen it up. I can live with the window frames on the waiting shelter but I'll put less white in the mix next time.
There were a number of contemporary text books explaining how to make paint and when to use particular pigments etc. I have "Painters Colours, Oils, and Varnishes" by GH Hurst 1906, "House Painting, Graining, Marbling and Signwriting" by EA Davidson 1904, "Grammar of Colouring" by G Field and EA Davidson 1903 and some others which I recommend if you want more detail, or I could look things up.
Richard Gawler
Western Thunderer
. . . and some others which I recommend if you want more detail, or I could look things up.
I probably don't need to investigate white paint a great deal for the infrastructure of the Heybridge Railway; I expect most exterior paintwork will be dark colours, with fences and gates creosoted. But I can see a challenge will come when I build something like a horsebox with a white roof. So I will remember your kindly offer for when the time comes. I am glad I have thought about this now, before blazing ahead with a bottle of white paint.
Yard crane . . part 2 new jib and finishing off
Richard Gawler
Western Thunderer
The yard crane for Heybridge Basin is from the Peco kit. I have shortened the jib a bit so the model looks better in the scene, not for any prototypical reason.

I have based the jib on a crane preserved at Ellesmere Wharf on the Shropshire Union Canal. The steel girders provided for the jib in the kit are wrapped up inside the white styrene to represent a timber beam.
I have returned to the yard crane, this is the last scenic model in my backlog for painting.
I wanted to paint the crane blue to tie in with the present-day colour scheme on the Chelmer and Blackwater, but while the Victorians used blue paint on plenty of ploughs and locos, I haven’t found a single crane. So the model is mostly black, like the crane on Nellie the crane tank.
My paint jobs on the styrene-covered jib didn’t work out. The attempt at a wood effect was wrong, and overpainting it all in white looked too modern. So I decided to try real wood for the jib.
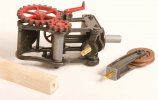
I bought this piece of maple from Monks Gate models, already machined and trimmed to size. The pegs are from 6BA screws, these screwed and locked into the plastic parts with CA glue and then secured into oversize holes in the jib with epoxy glue.
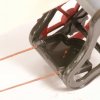
Then I added the assembly of the guy cables with the guide rollers. I know epoxy glue won’t stick metal to plastic but maybe it will hold onto acrylic paint, with the stiction of the paint doing the rest.
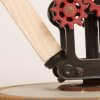
Somehow I let this gap open up too and overlooked it until it was too late to put right. So this gets the only filler in the model. The Peco mouldings are too good to need any filler.
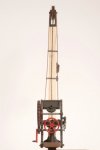
There are several angles to contend with but the rollers ended up reasonably parallel to each other and to the crane. They look okay from usual viewing angles. I can understand why Peco simplified this model for their kit - the moulded jib sections were impossible to get wrong. I am making things about as difficult as I can cope with.

Brass chain from Slater’s, 24 links per inch and dipped into Birchwood Casey 'Perma Blue' to add the colour.
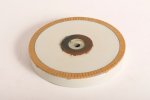
I had several goes at painting the concrete for the base. The first was too brown, the next was too grey and the third looked like dead flesh. This is the fourth version. I am pleased with the bricks.
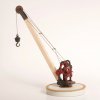
The brake wheel fell off a month or so ago and vanished. This week I tidied and cleaned all of the nooks and crannies in the room, I gained a 10BA nut and lots of fluff but no brake wheel. Peco can supply a spare sprue


The Meccano hook is heavy enough to stay put keep the chain taught and not blow around in the slightest breeze. I have omitted a “safe working limit” notice. I can add one if this is needed in 1894.
Halfords grey primer, Halfords 228 Volvo Dark Grey (as black), Vallejo acrylics (brushed), and Humbrol enamel satin varnish. The jib remains bare wood because attempts at adding colour made it different but not better.
Yorkshire Dave
Western Thunderer
If you have any wood left over I would experiment with applying diluted black/brown washes to reveal the grain and take away the 'brand new' look.
Start with a weak wash to see what it looks like and add washes until you reach the desired effect.
These are some tramway masts (7mm scale) I made up from ash and brass. Stained with washes and ultimately dry-brushed with a pale grey to highlight the grain to achieve aged effect I was after - the last picture was photographed on a well worn and weathered outdoor deal table


Concrete can be a difficult colour to achive as it all depends on the cement/sand/aggregate mix. Modern concretes tend to be grey whereas older concretes start off as a cream colour but weather to all shades.
I usually start with a pale yellow/cream colour and add tiny amouts of pale browns to mix the colour I'm after. I also add a very tiny drop of red.

All my painting and washes is done with acrylics.
Start with a weak wash to see what it looks like and add washes until you reach the desired effect.
These are some tramway masts (7mm scale) I made up from ash and brass. Stained with washes and ultimately dry-brushed with a pale grey to highlight the grain to achieve aged effect I was after - the last picture was photographed on a well worn and weathered outdoor deal table


I had several goes at painting the concrete for the base. The first was too brown, the next was too grey and the third looked like dead flesh. This is the fourth version. I am pleased with the bricks.
Concrete can be a difficult colour to achive as it all depends on the cement/sand/aggregate mix. Modern concretes tend to be grey whereas older concretes start off as a cream colour but weather to all shades.
I usually start with a pale yellow/cream colour and add tiny amouts of pale browns to mix the colour I'm after. I also add a very tiny drop of red.

All my painting and washes is done with acrylics.
Rob Pulham
Western Thunderer
I do like the patina that you have achieved on your chain Richard. I have done several in the past using metal black like you have but I don't think that my results turned out quite as nice as yours.
Richard Gawler
Western Thunderer
I do like the patina that you have achieved on your chain Richard. I have done several in the past using metal black like you have but I don't think that my results turned out quite as nice as yours.
Rob this is very kind. Really the finish on the chain is simply what I ended up with. I dipped half the chain into the Perma Blue and left it there until the colour changed, then a rinse in cold water. Then the other half. The chain was brand new and fresh out of its packaging so few if any greasy finger marks; maybe this helped.
Richard Gawler
Western Thunderer
If you have any wood left over I would experiment with applying diluted black/brown washes to reveal the grain and take away the 'brand new' look.
Start with a weak wash to see what it looks like and add washes until you reach the desired effect.
I feared I wouldn’t get away with bare wood here for very long.

For once in my life the tin of “English Light Oak” wood dye has actually produced something with a resemblance of oak. This follows umpteen test swabs of washes on the offcut, I did try! Anyway, I've lost the "new wood" look.
Coloron has lost its bite. The old stuff dissolved styrene, but a test blob on Peco’s finest just evaporated away and left a residue to wipe off.
I’ll leave any weathering until I have some of the surroundings in place. I cannot weather grass or water effectively, and I am trying to depict a newly-opened railway beside an established waterway. I’d like to begin the weathering with this, and I haven't built any of it yet.
spikey faz
Western Thunderer
Liking the crane Richard.I feared I wouldn’t get away with bare wood here for very long.
View attachment 218868
For once in my life the tin of “English Light Oak” wood dye has actually produced something with a resemblance of oak. This follows umpteen test swabs of washes on the offcut, I did try! Anyway, I've lost the "new wood" look.
Coloron has lost its bite. The old stuff dissolved styrene, but a test blob on Peco’s finest just evaporated away and left a residue to wipe off.
I’ll leave any weathering until I have some of the surroundings in place. I cannot weather grass or water effectively, and I am trying to depict a newly-opened railway beside an established waterway. I’d like to begin the weathering with this, and I haven't built any of it yet.
 Just one thing though. Should the chain run under the lower parallel stay rather than over the top? I'm probably in the wrong as my grasp on all things mechanical can be a bit wayward at times!
Mike
Yorkshire Dave
Western Thunderer
For once in my life the tin of “English Light Oak” wood dye has actually produced something with a resemblance of oak. This follows umpteen test swabs of washes on the offcut, I did try! Anyway, I've lost the "new wood" look.
Coloron has lost its bite. The old stuff dissolved styrene, but a test blob on Peco’s finest just evaporated away and left a residue to wipe off.
I’ll leave any weathering until I have some of the surroundings in place. I cannot weather grass or water effectively, and I am trying to depict a newly-opened railway beside an established waterway. I’d like to begin the weathering with this, and I haven't built any of it yet.
I've never used Coloron wood dyes to stain wooden models and just rely on thinned ink and washes. However, the before and after difference is noticable in your two photos.
I would retain the 'experimental' wood offcut for practising and developing weathering techniques.
Richard Gawler
Western Thunderer
Liking the crane Richard.Just one thing though. Should the chain run under the lower parallel stay rather than over the top? I'm probably in the wrong as my grasp on all things mechanical can be a bit wayward at times!

Food for thought!

The parallel stays are supposed to represent rollers. On a real crane, the chain is heavy enough to sag between the rollers in its unloaded state.
But now, the chain is neatly parallel to the jib. Maybe I have built some kind of mongrel crane, with features from too many prototypes

Richard Gawler
Western Thunderer

The lower gear gives a mechanical advantage to the brake wheel (when present) but I can't help thinking the winding drum should be on the higher axle with the large gear.
I had my doubts when I built this part of the model (six+ months ago) but I didn't really think it through as we are now and I meekly followed the instructions. Peco haven't left space for the drum there.
Of course, with the winding drum on the same axle as the large gear, the chain can pass over both of the parallel rollers in a fairly straight line . . .
Richard Gawler
Western Thunderer
The Peco crane kit was one of the very first models I bought for 7 mm scale, well over two years ago and before I had even built a brass kit. I think it is designed to appeal to a general audience who want a straightforward kit to build.
I made some changes to try to make a better model: a timber jib instead of a steel H beam; jib stays going all the way to the top pulley; rollers to support the chain; a chain instead of thread; a better hook.
Maybe I didn’t go far enough.
The plinth represents a peculiar construction and may get reworked before planting. I think it should be a circular brick wall infilled with concrete, not a concrete pad trimmed with brick.
Maybe it’s time to stop; accept it for what it is or put it into a display cabinet and tackle a “scale” model for the layout.
PhilH
Western Thunderer
Richard,
This is the former goods yard crane preserved at Ruthin, now apart from "Station Road" the only remnant of the railway in the town. Photograph courtesy and Copyright the Daily Post.
The chain is missing but would have been attached to the drum with the large gearwheel at the top. This is driven via the intermediate shaft with the slightly smaller gearwheel from a removable handle attached to the shaft visible in front of the bottom end of the jib. The brake comprises a steel band round the wheel on the intermediate shaft operated by a lever.
I pass the site quite regularly, next time in about a month, and if its any use I could take some detail photos and a few measurements.
There are several more views of the crane online, just type in "Ruthin goods yard crane". It made the news because its recently been restored.
Last edited:
Richard Gawler
Western Thunderer
This is the former goods yard crane preserved at Ruthin
. . . which takes me back to Col's message when I began . . .
Maybe this one... Railway crane at Ruthin Craft centre © John S Turner
. . . full circle.
Can’t understand why Peco would do that.
My best guess is, to help motorisation.
I sure know more about cranes than I did when I began.
Richard Gawler
Western Thunderer
I want to leave this model on a high note.
I asked Peco if they might have any spare mouldings, perhaps defects or seconds, which could provide a replacement brake wheel. They replied the next day: they could provide the sprue with the missing wheel on it as a spare, and please could I call them to place my order.

Peco charged me a very modest sum for the sprue and its postage and my crane now has its brake wheel, and a bonus spare hook.

I think, a sensible approach is to add this model to my layout. If I make a better crane, I can put it on the same pedestal.
I have been in touch with the Peco Technical Support Bureau maybe four times in my life, these occasions many years apart. Every time, the service has been first class; both prompt and helpful. Thanks Peco.
I asked Peco if they might have any spare mouldings, perhaps defects or seconds, which could provide a replacement brake wheel. They replied the next day: they could provide the sprue with the missing wheel on it as a spare, and please could I call them to place my order.

Peco charged me a very modest sum for the sprue and its postage and my crane now has its brake wheel, and a bonus spare hook.

I think, a sensible approach is to add this model to my layout. If I make a better crane, I can put it on the same pedestal.
I have been in touch with the Peco Technical Support Bureau maybe four times in my life, these occasions many years apart. Every time, the service has been first class; both prompt and helpful. Thanks Peco.
Threadmarks
View all 121 threadmarks
Reader mode
Reader mode

