The Heybridge Railway, 1889 to 1913

Bentall-style IC engine

Richard Gawler

Western Thunderer
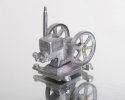
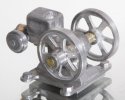
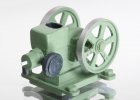
E H Bentall built numerous small internal combustion engines so I have built the kit by Duncan Models to represent one. This is the last of the three kits I bought from this firm at Kettering earlier this year.

I think I have made more posts than I have really needed (like the roof of the coach) so here is the build of one kit all in one post . . .

DSC_2756.jpeg
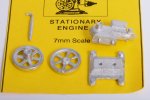
The kit cost just £4.50, I thought this was most reasonable and at a glance it seemed to have potential for improvement so a good buy.

DSC_2760.jpeg
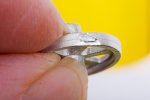
Both flywheels had flash but this one also had a shortfall of metal.

DSC_2770.jpeg
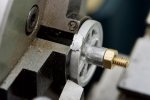
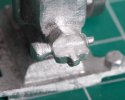
Blob of 145 degree solder to fill shortfall. Casting bored and tapped, and mounted on a 6BA bolt as a mandrel, then dressed to suit.

DSC_2783.jpeg
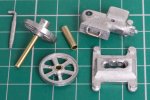
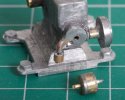
All parts prepared before final assembly.

The cast bosses provided on each side of the body to hold the flywheels were a bit approximate so I cut them off completely and drilled through the casting from side to side. I also remembered to drill a hole to hold the exhaust. The exhaust casting is unchanged.

I bored out the bosses of both flywheels 1/8 inch and pressed in short lengths of brass tube. Their axle is 3/32 inch rod and this will run in the loose piece of 1/8 inch tube. I put a slight flange on the pulley so any drive belt is more likely to stay put and not fall off.

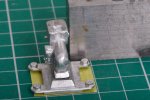
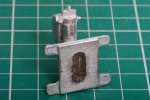
The body casting had two prongs to aid fixing but these didn't line up with the holes in the base so I cut these off too. I added the loop of wire to catch with some glue, and opened up a generous hole in the base. This hole was a bit too generous and the photo shows two the scraps of solder I added and filed down to hide the gap.

DSC_2788.jpeg
I placed the base on a piece of masking tape, filled the hole about three-quarters full with epoxy glue, and placed the body into position. Some Dark Forces went to work to pull the casting clockwise in the runny glue so I added the square to hold things in place.

DSC_2798.jpeg
The epoxy dried clear and has run around the loop of wire.

DSC_2802.jpeg
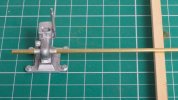
Bearing tube fixed into place with 100 degree solder. I now have a spare bit for the iron, dedicated to use with low temperature solder. I used this length of rod to check the bearing tube for a square assembly when I tacked it in.

DSC_2805.jpeg
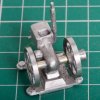
Simple things amuse simple minds and I can amuse myself by spinning the two flywheels.

I have seen Bentall's products (in 2022 and 2023) finished in bare cast iron and painted pale green. I am confident the pale green is authentic but I would like to find out when it came into use before I paint the model.

DSC_2818 (1).jpeg
Indulgent final photo, this was fun to build and I am pleased with the result:drool:
 
Last edited:

Richard Gawler

Western Thunderer
I think I have made more posts than I have really needed (like the roof of the coach) so here is the build of one kit all in one post . . .
Well, I tried :rolleyes:

DSC_2840 (2).jpeg
The trouble is, I started to think about adding a fuel tank and where to attach its fuel line, and realised I couldn’t comprehend the functions of the various appendages on the cylinder head. Especially with the exhaust pipe sitting where it was.

DSC_2845.jpeg
So I have made some alterations. These are much inspired by the photo posted by msjwr, this is perfect :)

The new exhaust system is from a disc of white metal and the new cylinder head is a 6BA nut and bolt soldered together and turned to size. The crimp on the end of the bit of wire is trying to represent the HT contact on the spark plug.

DSC_2852.jpeg
It is fortunate I left one of the flywheels loose on the axle. So I can still have the flywheel with the pulley on the same side of the machine as the exhaust, but now on the opposite side. This gives the imaginary operator better access to the equally imaginary carburettor.

I fear I am making this look easier than it was. Adding brass details to a white metal model is a bl**dy difficult way to go about model making and I resorted to glue to hold the cylinder head because my attempts at soldering undid the other details.

Still . . . I would have never tried to make a scale model of a specific Bentall engine because I don’t have enough source information and I would expect to find it too difficult. Yet I have started with a model of an unspecified prototype and ended up with an engine in the style of a Bentall one, and this is very pleasing indeed.
 
Last edited:

Richard Gawler

Western Thunderer
Blackwater visits the Ilford and Mid-Essex Club (7 May 2023).

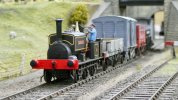
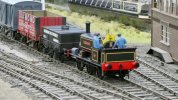
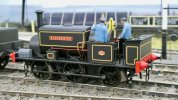
The Ilford and Mid-Essex Club have a glorious layout ‘Taw Magna’ based on WR practice in the 1960s. I went along to their open day on Sunday with ‘Blackwater’, my rebuilt brake van and four other wagons.

P1050109 (1).jpeg

P1050084 (1).jpeg

P1050105 (1).jpeg

This is the first time the tar wagon and the ex-MR box van have run on a layout. Blackwater never stalled, nothing fell off the track, and rather usefully I noticed how the train looks with a barge in the background. This particular one is standing inside a plastic box on a patch of empty baseboard behind some tall grass, there is no waterway.

Such a boat could capture the scene at Heybridge or the Basin better than a painted background. In 7mm scale, even a modest ticket office could block the view of the lack of space for much waterway. If this office building was in the style of the GER, I might even manage to depict East Anglia (if not quite Essex) as well. The little cog wheels for a first diorama are moving usefully for the first time in months.
 
Mixed trains and a possible fiddle yard

Richard Gawler

Western Thunderer
I have identified my first really Stupid Idea for the project so far. By stupid, I mean taking time and expense and effort on my part and bringing no benefit to me, anyone else or the the project as a whole. This concerns the coaching stock.

1. The original idea was to give the Heybridge Railway one brake third coach to handle all of the passenger and mail services in a compact formation - a sensible idea.
2. I made an impulse purchase of the saloon coach, "to give me practice and make a longer train for special days" - a good idea at the time.
3. I decided to build the brake vehicle as a private coach and this would run with the saloon to make a public passenger train.

The upshot of this is, as soon as the private saloon leaves the railway on its travels to distant places, I cannot run any passenger trains because I won't have a brake vehicle for them.

:headbang:
 

Richard Gawler

Western Thunderer
The break van is a little old-fashioned but not especially decrepit; the railway only bought its replacement in 1906(*). From then onwards, the original van became the Chief Engineer's Inspection Saloon, just like the prototype at the Mid Wales Railway and Elan Valley dam project.

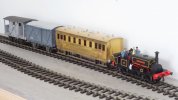
The book on the MSLR by Nicholas Comfort has a few inspiring photos of mixed trains, even one with bogie coaches and BR J15 65447 in charge! I'll admit, the BR loco does have a train brake but the idea and general arrangement is the important thing.

DSC_2886.jpeg
Train for Witham market days. Van with sliding doors for market produce, guard's van for secure carriage of the mail. All aboard!

(*) This second van will be like the single-ended design by G R Turner which they supplied to the Midland Railway and later the MSLR. I have a Slaters kit to make this. "1906" is written into an excruciatingly detailed Excel spreadsheet which tries to record the provenance, traffic and dates of operation of every item of rolling stock. Available on request but it is more detailed than the "timeline" which I posted up for a while with the history of the line.
 

Richard Gawler

Western Thunderer
Well I reckon I've got a quorum - this is excellent, a passenger train approved for daily use.

The private coach will be a few millimetres shorter than the two vans here, so the longest defined passenger train on the layout will never be longer than this train. Also very good to know.

So . . . if I give the fiddle yard a 600 mm traverser this will hold 'Blackwater' plus either passenger train; or a rake of four wagons plus brake van.

Screenshot 2023-05-11 16.25.19.png

Suppose I give the fiddle yard four headshunts, all able to hold the Y14. These will also (just) hold a Sulzer Rat should friends bring round blue boxes or I want to use the fiddle yard for a completely different project. I could build this fiddle yard on a 1150 x 500 mm frame: large enough to be useful and small enough to move around inside the house single-handed. I haven't measured but it ought to go into the back of a Yaris as well. The goods shed (only two walls, with useful hidden siding inside) would be a scenic break for shows and photography, and kept elsewhere at home. I can even build this using some lengths of Peco track a pen-friend sent to me.

Historically, every layout I have built has been short of fiddle yard space, so one of the traverser roads could be a lift-out cassette.

I know this new layout is still undefined, but supposing it includes one end of a run round loop and a siding to the goods shed, does this look sensible?
 

Richard Gawler

Western Thunderer
Your logic is sound Richard! The lift out cassette sounds like a pragmatic approach to having flexibility
I wonder if I could have a lift-out traverser deck and a second identical deck. This would be awkward at a show (nowhere to put the second deck) but it might work at home. If the locos are in their headshunts, the weight of ten wagons on the deck would be just over a kilogram, very manageable as long as there are gates to constrain them.

There is appeal in building the fiddle yard to a good standard, and then a disposable diorama as a learning project to hang on the end of it before tackling the final layout.
 
Painting highlights and shadows

Richard Gawler

Western Thunderer
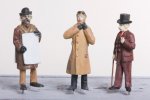
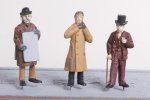
I have had a first go at painting figures in 7mm scale. These are two white metal ones from Omen Miniatures (bought though eBay from France!) and one of unknown origin. This has taken me a few goes so here are two photos.

DSC_2902.jpeg
I thought I had finished them. I was happy with the shading on the clothing but the faces and some details looked really ragged.

DSC_2909.jpeg
Take two.

I had a couple of goes putting on the lipstick but the layout needs a few really tiny anachronisms for those who are paying attention.

The main thing for painting them was to imagine the sun is immediately above the figure, and paint on highlights and shadows to suit. I saw this method on a video for painting Warhammer. I had a lot of goes at the the face of the sandwich board man and then all of a sudden the dark wash seemed to sort it out. His message remains to be decided but perhaps "ROYAL VISIT" or "MORE DRIVER MENACE".
 

Herb Garden

Western Thunderer
Yeah the Warhammer method of painting on the shades and the highlights is great isn't it. Especially as they make the paints to match

IMG_20230513_190302810.jpg

One never can have enough Warhammer miniatures.....
 

Richard Gawler

Western Thunderer
On the face of it the Warhammer technique is absurb for a model railway where we buy carefully-mixed shades of authentic colours. But it works really well and really easily, and these are words I rarely associate with painting.

DSC_2910.jpeg
Tamiya don't do a "Bentall Light Engine Green" so this is Cockpit Green. I have mixed some with a little white and highlighted the edges of the spokes and some of the horizontal surfaces.

I need some time before I start adding highlights and shadows to my locos and rolling stock, but the invitation to try is clear.
 

simond

Western Thunderer
I bought a couple of military modeller type painting-and-weathering books, it’s all very impressive, but I get the impression it can all get a bit caricature-ish, theatrical even, if you’re not careful.

Needless to say, I’m not going to give examples of the wonderful work I’ve done having read the books…
 
Top