Been a bit of a quandary of late about how next to proceed, and I admit there’s been more thinking than doing.
That said, only the earliest part of the week is available for projects these days, so the pondering didn’t interfere too much with the doing. And of course, the limited space in my workshop and model room, especially with boards of this size, has only exacerbated matters, especially when it came to the next stage of making the side beams.
To cut a long story short, I decided that the primary task at this juncture was to ensure a fixed distance between the end beams of this centre section (as at is from this section that the outer boards will be constructed) as shown previously. After much faffing (or is it phaphing?) I decided that the best bet was to screw the beams to the ply track base which would be at the distance required. This was performed by screwing each corner from underneath, a bit of a dance which involved turning the structure (with great difficulty in the restricted space of the model room: the workshop was even tighter!) in a circular fashion (as did necessitate the rest of the construction, to say nothing of the clambering on and over the work bench, at one stage having got myself stranded, having to ring my wife to come out and help me down……when did I get this old exactly?).
Anyway, my aim was achieved, so it was out with the mire saw to cut the necessary lengths of strip and blocks required, my intention being to build the side beams with the end beams fixed to the base as described. Problem was however (isn’t there ruddy well always?) the ply track base was warped (like all the other darned wood I seem to acquire these days), so that idea was put on the back burner, as a flat bench to work from is essential. I reckoned that do so would require a bigger area and bench, one that allowed me unrestricted access to both sides for drilling/gluing/screwing and old uncle tom cobbley n all. Dream on.
So I thought, ‘rowlocks!’ and considered I might as well make the most of my time by unscrewing the beams and reattaching the ply track base above where it should go. But how to maintain the distance between the beams? In the end, I cut up some of the PAR intended for the blocks and screwed them each side. In this way, the board could be removed (in a circular fashion as before, whilst praying that the whole ensemble wouldn’t twist or worse… I really hate this hobby at times….), while keeping the beams at the required distance apart. Incidentally, a thought crossed my mind before doing so: drill the beams with the ply base attached before unscrewing so that, theoretically, the base can be reattached to the top using these holes for the screws. A 200mm long drill was duly ordered for fast the task, and arrived pronto via the online retailer bearing the same name as the jungle. It proved a bum decision, as most of my ideas are: drills of this fine-ness (is that even a word, Dave?) tend to bow when drilling through five inches of knotted wood, despite the use of a drill guide. So that was that. Luckily, I’d had the presence of mind to mark the beams and ply base appropriately, which made the fitting only slightly easier, by simply drilling and screwing from above, which I carried out earlier this morning before collecting my granddaughter from nursery.
A morning’s work was more than enough on this project anyway.
Enough waffle; some piccies:
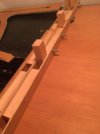
Loosely placed for lining up witness marks to ensure correct fit:


In the following shot, you can see how the beams warp when not bolted together, thus initially, only the outside uprights were fixed, the inners being so only after the beams were fixed together with bolts to ‘pull’ them outwards (I still need to go shopping for more washers and wing nuts):
Side beam

appar
My knees just in (lower) shot as evidence of my poor mountaineering skills:


I shaln’t ‘narrate’ the above any further as am experiencing difficulties uploading and adding text. Apologies for the jumbled appearance.
At the next visit, it will be back to addressing the side beams. The only solution to making the task easier, is to fabricate an external bench, one from a section of loft flooring (chipboard) - back to the timber merchant - the only source of ‘flat wood’ I know of currently, which will form the bench top of required size, stretched across two wooden workhorses, and the whole ensemble assembled beneath a mini marquee for shelter, as it never seems to cease raining these days…….
Will we ever get to play trains…….
Till next time.
jonte
Edit: the beams will be glued, and screws countersunk once the boards are completed.
 ) the path of a loco facing the terminus buffers, that backs out onto the mainline, runs round the ‘loop’, and finally back into the terminus facing forwards (in order to depart at the head of a train) again:


)")


") .
.


