Liver & Fry's workbench

Liver & Fry

Western Thunderer
A good day was had today at Workshop Wise 2024 with @Herb Garden

Was good to see Skeetsmere in action and working as intended!
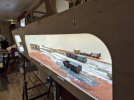
20241026_085823.jpg

Was good to catch up with @Rob R too - We took the opportunity to compare scales and suffice to say he made my wagons look tiny!
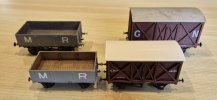
20241026_141519.jpg

Not sure the photo does it justice mind you...

Also met @Chris Veitch - Always good to put faces to names!

For my part, it was a daunting experience as I've never done any demonstration work before (and, without any intent of fishing for compliments, I simply don't see myself as being good enough to do so!) but the organisers and fellow exhibitors were lovely and made me feel welcome!
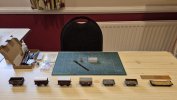
20241026_085730.jpg

My wagon building exercise saw me make progress on the LDEC open and although I didn't get as much done as I thought I might, I feel I made good progress:
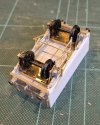
20241026_160542.jpg

Tomorrow it's a visit to Shildon and then I'm back home Monday where it'll be business as usual (hopefully with the M&GN brake van...)

- James
 
LDEC 6 plank wagon New

Liver & Fry

Western Thunderer
After a day of travelling south I have returned from my sojourn in the North East. As such tonight's update is a short one, but I've cropped and folded the corner plates for the LDEC wagon and it's changed the look of the thing already!

20241028_213448.jpg

Looking forward to detailing this over the next day or so, with the rest of the body strapping and solebar detailing to do before painting can be considered. I must also measure up and order some transfers...

- James
 
LDEC 6 plank wagon New

Liver & Fry

Western Thunderer
Tonight has been a very fruitful evening!

All the strapping and additional ironwork has been added to the LDEC wagon and I feel it's is really looking the part now!

20241029_223720.jpg20241029_224102.jpg

Transfers have been ordered, so I do believe the next job is to paint it. I may leave it for a day or two and crack on with other projects however, as I can't lie, I'm quite enjoying looking at it in this state!

- James
 
LDEC 6 plank wagon New

Liver & Fry

Western Thunderer
Not content with yesterday's efforts, I decided to add more brasswork to the LDEC wagon this evening; namely internal strapping by the doors and, using the original Slaters part as a guide, making an end door hinge out of some brass wire and a few spare strips:

20241030_205856.jpg20241030_210014.jpg20241030_210046.jpg

Transfers arrived today, so I really do need to stop fettling and get painting...

- James
 
GER C53 New

Liver & Fry

Western Thunderer
Back in April, I posted about my repaint of a Rapido J70 into GER crimson as C53 No.126. At the time I said the only thing missing was a set of etched numberplates. Well, that has now been rectified thanks to @Herb Garden

20241102_150040.jpgScreenshot_20241102_150205_Chrome.jpg

In fact, I've finally been able to complete a trio of locos, including another Rapido C53 and an Oxford Rail K85, as Nos. 139 & 1002 respectively.

No.139 was started before No.126 using transfers originally made available through another forum, but now supplied by Fox Transfers (who, somehow, have ended up with a photo of No.139 to advertise the product despite no one ever asking me...). The Transfers were colour matched to Revell 51 Ultramarine and the loco very much represents an ex-works GER livery, given how bright it is:

20241102_153610.jpgScreenshot_20241102_150440_Gallery.jpg

Together they make for a delightfully vibrant pair!

20241102_145428.jpg

- James
 
GER K85 New

Liver & Fry

Western Thunderer
So, having mentioned the existence of No.1002, I feel it deserves its own post.

Oxford Rail released the loco in GER grey with the later style "Train Control" numbers on the side of the tanks. This is a feature heavily associated with the GER grey era and, for many, is the only GER livery suitable for the K85 batch of locos. That was, however, until this photo surfaced (unfortunately I do not recall the source to be able to give credit):

Screenshot_20211018_085424.jpg

Here we see GER No.1002 with GER on the tanks. There are also a few detail differences between this and the Oxford Rail model. Therefore I could not resist the opportunity to correct my model of No.1002!

20241102_151014.jpg

This work included fitting clack valves, removing the left hand whistle (as the model came with one each side of the safety valve), removal of some of the pipework on the right side of the boiler, removal of the handrail from the rear of the bunker, adding coal to the bunker, fitting a GER area code plate to the back of the cab and of course, lettering and numberplates.

Originally I had fitted a set of plates from Narrow Planet/Light Railway Stores, but @Herb Garden identified the incorrect font used by them (and the less said about their GER plates and their customer service, the better...). This can be seen in the comparison below (LRS top, HG bottom):

20241101_102653.jpg

The new plates look far superior! Here's some additional views of the loco and the work done:

20241102_153136.jpg
20241102_152415.jpg

I'm not aware of any other examples from the K85 batch carrying GER lettering. L77s No.1000 and 1001 did, but No.1000 was in "photographic grey" and No.1001 was the only member of the class to carry GER ultramarine - I'd like to model No.1001 one day, but there are some unique features such as the cab that would need figuring out first!

- James
 
LDEC 6 plank wagon New

Liver & Fry

Western Thunderer
Meanwhile much progress has been made on the LDEC wagon, with painting pretty much complete now:

20241102_220742.jpg

LDEC wagon livery is an interesting topic. A 1906 edition of The Locomotive Magazine makes reference to the body colour as "chocolate", and this idea has been perpetuated elsewhere. However, in his 'Liveries of the Pre-Grouping Railways' books series, Nigel Digby states this is incorrect and that the wagons were painted grey; the shade he uses in his illustration being very close to the Midland shade.

My main source of evidence however, is the reference photo I've been using of one of these wagons as built:

Screenshot_20240805_095035_Gallery.jpg

As such, I have used Midland grey as the main body colour for my build of this wagon.

Another point of note is the style of lettering used; the LDEC had a peculiar lettering style by which the 'LDEC' letters were backslanted on some (but not all) wagons. Thankfully this batch of 6 plank opens had a more standard lettering style which will make my life easier when I come to do these next.

- James
 
LDEC 6 plank wagon New

Liver & Fry

Western Thunderer
I spent yesterday away from my bench to look at other people's modelling efforts at the Spalding exhibition. It's an annual jaunt for me and I had a good time but it meant the LDEC wagon saw no further progress until tonight.

However, I have spent a solid few hours on it and the lettering is now all done!

20241104_221431.jpg

I went for the first of the batch (No.1637) as it is the one I've been using as reference for the build. Considering this went from a kit bash to the majority being done from scratch, I guess the next step is to attempt a fully scratch built wagon?

That's one for 2025 though, I have too many things on the go that need finishing first!

- James
 

Lyndhurstman

Western Thunderer
I spent yesterday away from my bench to look at other people's modelling efforts at the Spalding exhibition. It's an annual jaunt for me and I had a good time but it meant the LDEC wagon saw no further progress until tonight.

However, I have spent a solid few hours on it and the lettering is now all done!

View attachment 226885

I went for the first of the batch (No.1637) as it is the one I've been using as reference for the build. Considering this went from a kit bash to the majority being done from scratch, I guess the next step is to attempt a fully scratch built wagon?

That's one for 2025 though, I have too many things on the go that need finishing first!

- James
That's some lovely work, James. And an interesting account of the build. Well done.

Cheers

Jan
 
D2054 New

Liver & Fry

Western Thunderer
What's this? A post about something that isn't pre-grouping? Madness I tell you!

I don't talk about it much, but I do have a soft spot for the diesel era, particularly in post-beeching Norfolk, where several branches were relegated to freight only operations and left to fall apart, but still saw regular pick-up freight operations through the weeds.

One branch that has stood the test of time is the short stub of the Lynn and Dereham railway which runs to the sand pits at Middleton (Middleton Towers to all you post-1924 folk!).

Whilst I was at the Spalding show last weekend, my Dad pointed out a white Bachmann 03 with a camel on the cabside, commenting that that was the logo for BIS and we pondered if it may have seen use at Middleton. I had no Internet signal but when I checked later after leaving I realised to my pleasant surprise that the real loco had indeed been based at Middleton in the early 80s (possibly late 70s too) so I went hunting and sourced one from the Class 37 Locomotive Group (C37LG - Owners of D6703/37003 - Yes, this is a shameless plug!).

So, here is the Bachmann model as purchased:

20241109_140206.jpg

Quite a cute loco, but devoid of the industrial add-ons from BIS. My first port of call was the rear of the cab:

20241109_140837.jpg

The real loco had both an orange hazard light and a lamp affixed above the top electric lamp bracket, so my first job was the make some 'wiring':

20241109_143319.jpg

The shorter wire would allow me another contact point for the hazard light, whilst a small hole was drilled above to take the lamp:

20241109_153143.jpg

Brass strips were then cut and used to make roof extensions (well, you wouldn't want sand getting in would you?) Before these were painted grey to match what appears to be their original colour. A lamp was also added, as several photos online show one in this position:

20241109_154249.jpg20241109_155820.jpg

Turning to the front, the other hazard light and lamp were fitted accordingly:

20241109_170626.jpg

I have also worked on making a shunters pole for the front left set of steps (again, as per some online photos):

20241109_174301.jpg

The loco will need weathering at some point, but as this was an extra project, I'll leave it at this for now and return to those which are already on the go!

- James
 
M&GN brake van New

Liver & Fry

Western Thunderer
Speaking of ongoing projects, earlier in the week I attempted to fit the w-irons supplied with the M&GN brake van kit to find that unfortunately they don't fit:

20241106_205351.jpg

Thankfully I had some spare w-irons of the same profile (as they were spare from the M&GN 3 plank builds), but these have a narrower base which fits fine (thus the choice and inclusion of the wider ones perplexes me a little).

20241109_182112.jpg

With these now fitted, attention can turn to underframe detailing, which will hopefully be tomorrow's job!

- James
 
M&GN brake van New

Liver & Fry

Western Thunderer
I feel like this one is going to fight me because I said it should be a quick build... But that said, I have made some decent progress today!

Initially the 3D print springs decided to shatter on me, but having made some repairs, I got them fitted OK. Then I turned my attention to the brake gear. The etch provided is for an 11ft wheelbase  wagon and so aside from the correctly spaced brake shoes, there is little else of use or relevance for the builder to utilise. This included the lack of any representation of the handbrake arrangement on the underside of the van, which I decided to have a go at myself.

I drilled a hole in the underside of the van, and inserted a short length of brass rod to represent the handbrake shaft coming through from above. I then drilled 0.5mm holes in the ends of two strips of brass, and a hole at each end of a third to replicate the linkage connecting to the cross-member of the brake rigging.

V hangers (not supplied) were sourced from a 51L Midland wagon etch.

I then capped off today's efforts (literally) with a chimney drilled through into the roof.

20241110_195617.jpg20241110_195527.jpg20241110_195601.jpg20241110_195937.jpg20241110_200520.jpg

I still need to do the footboards, bufferbeam, handrails and lamp brackets before any more decorative additions. It's getting there...

- James
 

simond

Western Thunderer
James,

sorry to pee on your parade, but it rather looks like your handbrake will pull the brakes off. Pulling up will turn the shaft anticlockwise as seen below.

The brakes on the other side of the van will be applied. The links this side should be parallel to the other side, I think.

1731271173490.jpeg
 
D2054 New

Liver & Fry

Western Thunderer
Whilst I confess to being a little disillusioned with the M&GN brake van, the main reason for not continuing work is that I'm waiting on some more supplies before I try again.

In the meantime, D2054 gained its shunters pole; precariously positioned as per a real photo set:

20241111_204030.jpg20241111_204609.jpg

It's the little details, and all that...

- James
 
M&GN brake van New

Liver & Fry

Western Thunderer
Having had a good chunk of time to dedicate to modelling today, I decided to tackle the M&GN brake van and right the wrongs identified in my last post on the subject:

20241117_180720.jpg

The offending shoes were simply cut out and turned around! I had planned to try and gently take it all apart and re-laminate them but practicality took over, especially given they'll be hidden anyway (more on that further down).

I then detailed the ends of the van, with buffers, drawhooks and lamp irons:

20241117_161451.jpg

... Before turning my attention to making up some footboards. These were fiddly blighters to cut and line up but I'm happy with how they've turned out (and that was when I realised the brake shoes will be pretty much hidden despite the work to get them correct!):

20241117_203733.jpg
20241117_203847.jpg

So, all in all, were back on track and I feel reinvigorated to get this one done!

- James
 
M&GN brake van New

Liver & Fry

Western Thunderer
No major progress to report, but last night I added weight to the underframe in the usual manner that I do, as this needed doing before I paint the underframe black. I've also ordered some side lamps from West Hill Wagon Works which I will modify on arrival to make them appear more like the M&GN style ones.

- James
 
Top