Back to the build now, and thankfully the second bogie hasn't taken anywhere near as long to (nearly) complete as the first! It's also a bit of a milestone moment, as the loco is plonked on to both bogies for the first time:

It looks quite imposing from this angle! It also shows the rippled sides, slightly, which I'm hoping to highlight with the painting and weathering that I'm not really looking forward to.
The threaded ride height adjustment has already proved its worth - the loco now sits more or less level on the bogies, before it would have been leaning towards the camera in the above shot. I've had to lift the side closest to the camera by roughly 1.5mm to get it sitting right. It does still sit a bit high but nothing a bit of:

won't cure

(As an aside, I reckon this has to be the most cost effective way of buying lead - OK, it did cost 23 quid, but there's enough lead there to last me for ages, possibly a lifetime!)
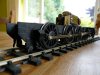
Looking a little closer:

The mechanism is fairly well hidden and the gears aren't that obtrusive. The white plastic visible in the pic above will be toned down with permanent marker, to disguise it. A couple of the primary springs need a slight tweak, to get them sitting right as well.
I've also turned up my own encoder for centre axle of the No.2 end bogie (on the opposite side to the speedo), this was something that was only fitted to the refurbed examples. I did umm and ahh about doing it, but decided that I'd only regret not doing it. The dimensions were worked out from photos and brass rod turned to the correct diameter, with a small piece of brass section soldered on for the square bit.

This angle does highlight the lack of brake gear, which is something I will be addressing soon, once I've cast the necessary bits in resin.
There now follows a most unlike me embrace of technology - I've filmed the bogie in action and have uploaded it to Youtube! It's not powered, but I hope it gives an idea of how effective the suspension is in action:
It should be able to cope with the worst track imaginable, which is just as well as I've imagined some pretty ropey track for the eventual layout that the loco will run on. I think the powertrain may be a little noisy once it's all under power, but a bit of running in may help with that. If it doesn't, I'll just have to turn the soundchip up louder!
Does anyone know if there's going to be an S7 test track at the Bristol show? I can temporarily bodge it together to run on DC if so - it'd be nice to give it a run somewhere to see if it actually works. I still have to work out how I'm going to retain the bogies though, there isn't enough room to put a nut on the original studs cast into the chassis. I'm toying with the idea of using wire rope retainers - I've got something from Eileens that should be suitable, but it's going to take a bit more thought.

")
 ) as to the real parentage of the Dia 98, so far no one has any actual proof of a true B Set !!
 . What I would say with the technique I explained is to degrease, warm and blacken all in one session. Hope this makes sense.
 ...........but are the tyres painted (if thats the right term) or just the front & back faces of the wheels on your 42xx ?