JLTRT 37/4 in S7

S

Simon Dunkley

Guest
Pugsley said:
The first motor assembly is nearly finished, just the wheel/axle/final drive gear part to sort out now.  Here it is, loosely bodged together, to give an idea of how it's going to work:
The back to backs have been set to the correct measurement (ish) in the pic, which shows that there's not a lot of room down there!
The threaded axles haven't really worked as planned, so plan B is to have full length continuous axles.
Good work - looks promising! (And cheap!)
I'm currently thinking about how I'm going to press the wheels onto the axles, but will probably cobble something together that uses the lathe or mill to provide the necessary force.
Something like the GW models wheel press for 4mm scale would do fine - in fact, if you have access to one, it may be all that you need.

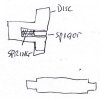
Failing that, a couple of discs on stubs (side profile of a T shape, if you get my drift. However, you may need to be able to locate the wheel centres accurately, so will need a couple of short stub axles a thou or so less than the real axle diameter. These really need to be spring loaded, with a spigot passing down the centre of the spring, so that there is a positive stop when the axle is pressed home fully.
The alternative - and it may be too late for this - is to have the wheel bores less than the axle diameter, with the ends of the axles turned down to fit, and the centre section used to set the back-to-back.

The extremely crude sketch appended hopefully makes this clearer, or at least less obscured.
 

Attachments

  • Disc and spigot.jpg
    Disc and spigot.jpg
    57.5 KB · Views: 77

Ressaldar

Western Thunderer
Hi Pugsley,

for what it's worth, the ABC version of the traction motor has 'force fit' wheels, it might be the 'only' solution.

I'd forgotten that I had taken this picture, which may or may not help your cause Ian


Attachments

  • IMG_0133.JPG
    IMG_0133.JPG
    192.2 KB · Views: 43

Pugsley

Western Thunderer
Thanks for the hints and tips Simon, that's given me some good stuff to go on. Sadly I don't have a GW wheel press, nor access to one, but should be able to knock up something suitable. The units do work out quite cheap - it's hard to put an actual figure on it with the etching costs, but it's around ?6.00 per axle, which is extremely cheap compared to the ABC units!

Thanks Mike - as you say, it is the only way I think, I just need to figure out how to do it for the best.
 

Pugsley

Western Thunderer
I must confess that I hadn't thought of that and wish I had before. I think I'm going to go with the continuous axle for the time being, but may give that a go on future builds.
 

Steph Dale

Western Thunderer
Pugsley,

Forgive the intrusion on this thread - I'm still enjoying a gentle amble around the forum to see what's here.  I'm really intrigued by what you're doing here, but after following your thread it seems kind of obvious; why have a Delrin chain drive in such a kit as the JLTRT.  The ABC stuff isn't for everyone, although I still have a hankering to use a set of their traction motors in an MMP class 60 - it would make a bit of a change from the Southern stuff I usually build!  I've got the motors (half a dozen Escap 1616) here in case I manage to drum up the necessaries for the 60...

But, I digress.  ::)  I've had a look at your etch and your description and I thought I should perhaps drop in this enquiry now, just in case there is an error in the geometry you're employing - the holes in the bogie sides equally spaced between the wheels rang alarm bells... :eek: :scratch:

So, with the scanner currently N/G, but the camera handy I did a little sketch.  I can't quite see how you're going to articulate/equalise/load the axles from the sideframe, but if you're using a 'four beam' approach it's worth checking the geometry:


Attachments

  • IMG_7773.JPG
    2.5 MB · Views: 11

Pugsley

Western Thunderer
Thanks for the pointer Steph, but I'm not springing this using the CSB method - the holes in the frames are where the bogie crossmembers bolt on to the main frame.  The cosmetic sideframes will be drilled to accept the screwheads at this point.

Effectively the loco will be sprung using functioning coil springs on the bogies, so these will be equalised using the beams on the bogies, just like the real thing  ;)

There's a little more info on RMweb here:
http://www.rmweb.co.uk/community/index. ... __p__98407
Which covers the design of the motor units.

The ABC motors were too big (and too expensive) for my liking, and wouldn't have allowed each individual axle to be separately powered, compromising what I wanted to acheive with this model.  Each axle has its own motor, hung on the axle, and only linked to the bogie cross-member with a torque reaction link, which is pivoted, to allow for individual movement of each axle (subject to the equalising beams)

Don't worry about the egg sucking thing, I'd rather someone pointed out deficiencies in my design than me finding out the hard way when it's built!
 

Steph Dale

Western Thunderer
Pugsley,

Dokey oaks - I'm pleased it was taken in the spirit it was intended (much more 'constructive' than 'critical').

The functioning coil springs and beams is a great idea; you'll already have noticed that the main springs on an EE 6-wheel bogie are positioned pretty much as per my sketch; so you should be fine.  I hope the build continues to go well, I'll be interested to see how it gets on.

Steph
 

Pugsley

Western Thunderer
I've managed to make a little more progress with the springy bogies, but have identified a few parts that need tweaking before the final, final, artwork gets sent to the etchers.  The biggest difference is that the axlebox guides will now be a separate part, which is soldered on to the main frame with a spacer to pack it out to the required dimension, other alterations are just tweaking existing parts to aid fit, or ease of assembly.

This image shows how the secondary spring hangar mounts to the bogies cross-member, which will be bolted between the main frames.  A rod from the secondary spring will project from here, through the cross-member and bear on the top plate of the bogie, which incorporates the pivot.


Attachments

  • IMG_1261web.jpg
    442.8 KB · Views: 15
  • IMG_1262web.jpg
    632.1 KB · Views: 6
  • IMG_1263web.jpg
    570.5 KB · Views: 7
  • IMG_1264web.jpg
    656.5 KB · Views: 7
  • IMG_1267web.jpg
    701.7 KB · Views: 6
  • IMG_1266web.jpg
    533.6 KB · Views: 10
  • IMG_1265web.jpg
    478.3 KB · Views: 9

Pugsley

Western Thunderer
I thought it was about time I updated progress with the 37.

The supplied sideframes and equalising beams have been attacked with a custom tool to make the mounts for the springs.  In the same manner as Chris Pendleton did with his 4mm Deltic, I drilled the centre of each moulded spring 1.5mm, for a stud turned to 3.3mm OD with a 1.5mm tail to fit.  This then guided the cutter, which was made from 3/16 silver steel, drilled 3.3mm, with teeth filed into the outside edge.  The parts were mounted in a vice and milled to the same depth.


Attachments

  • IMG_1273web.jpg
    814.5 KB · Views: 18
  • IMG_1483web.jpg
    610.7 KB · Views: 22
  • IMG_1482web.jpg
    875.1 KB · Views: 16
  • IMG_1481web.jpg
    720.4 KB · Views: 17
  • IMG_1284web.jpg
    763.9 KB · Views: 14
  • IMG_1282.jpg
    333.6 KB · Views: 14
  • IMG_1281.jpg
    343.3 KB · Views: 13
  • sb3.jpg
    702.1 KB · Views: 13

28ten

Guv'nor
Very clever  :thumbs: you must be pleased with how its turning out, its always a bit of a risk with that amount of modification, and I like the pipe unions - nice touch
 

Pugsley

Western Thunderer
Thanks everyone  8) 8)

Cynric - Yes, I am rather pleased with the way it's turning out and it's nice to feel that I'm actually making progress!  In some ways I'll be glad when this project is over.
 

28ten

Guv'nor
Pugsley said:
Thanks everyone  8) 8)

Cynric - Yes, I am rather pleased with the way it's turning out and it's nice to feel that I'm actually making progress!  In some ways I'll be glad when this project is over.
I know what you mean  :) its a TTA next then?? Im sorely tempted to do my Catfish in Dutch livery  :eek:
 

Pugsley

Western Thunderer
Thanks Ross  8)

I'm not sure what's next, Cynric.  I do have plans for a TTA (not of the conventional sort though  :D ), but might do something simple next - I have a PRMRP VDA van to build, although I will have to modify it slightly to spring it, it's nowhere near as big a job as the TTA, or the 37!  I will be going back to 4mm scale for a bit before that though, I've still got a 455 and a layout to finish!

The Dutch Catfish sounds good  8)
 

Pugsley

Western Thunderer
Another quick update - I've now assembled the first of the traction motor/axle units completely, all set to the correct back-to-back measurement.  It all works as designed!


Attachments

  • IMG_1492web.jpg
    703.1 KB · Views: 15
  • IMG_1493web.jpg
    579.4 KB · Views: 9
  • IMG_1494web.jpg
    630.9 KB · Views: 13
Top