You are using an out of date browser. It may not display this or other websites correctly.
You should upgrade or use an alternative browser.
You should upgrade or use an alternative browser.
Steph Dale
Western Thunderer
Pugsley said:<snip>I'm doing some tanks in 4mm scale at the moment.</snip>
Erm, is that the armour plated variety on those suitable for carrying liquids? Static or mobile?
I feel the world probably needs to know these things... :scratch:
Steph
Scale7JB
Western Thunderer
Pugsley said:In a word, no. I've been taking a break from it for a while, I'm doing some tanks in 4mm scale at the moment. Progress should abound once it gets a bit warmer ;D
And when Telford starts to get a bit nearer.. only 8 months to go !!
JB.
Pugsley
Western Thunderer
It probably doesn't ;DSteph Dale said:Erm, is that the armour plated variety on those suitable for carrying liquids? Static or mobile?
I feel the world probably needs to know these things... :scratch:
It's fuel tanks that are on the bench ATM, 4 45 tonners and 1 102 tonner, for the slowly forthcoming EM layout.
Pugsley
Western Thunderer
Arrgh! I'm seriously hoping it will be ready for this years Telford show, there is a good chance as long as I don't get too distracted, because there isn't that much left to do, the hardest bits have been done (I hope!)Scale7JB said:And when Telford starts to get a bit nearer.. only 8 months to go !!
JB.
Pugsley
Western Thunderer
Absolutely!CME & Bottlewasher said:after the gales let's hope that spring is on the way

Pugsley
Western Thunderer
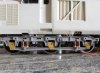
It works!
[attachimg=1]
Well, it doesn't look wrong, anyway!
[attachimg=2]
I couldn't resist plonking the body on top of the trial assembly, and I'm pleased with the way it all looks. The trial has confirmed that I'll need to add a fair bit of weight to the body to compress the springs to the correct ride height, or soften the springs in some way.
I haven't tried it under power yet, I've still to work out exactly how I'm going to do the pick-ups, but it's a giant leap forward.
Attachments
lancer1027
Western Thunderer
That looks very impressive Pugs 
Rob :wave:
Rob :wave:
Dan Randall
Western Thunderer
Nice work on the bogies Pugs. Refresh my memory - will you be fitting a sound chip and/or smoke unit in due course? ")
Regards
Dan
Refresh my memory - will you be fitting a sound chip and/or smoke unit in due course? Regards
Dan
Pugsley
Western Thunderer
Thanks All 8) 8) 8)
JB - I'm thinking phosphor bronze wipers attached to Veroboard, possibly located on the cross members, possibly on the inner frames. I haven't decided which is the most practical in the end.
Dan - Sound yes, smoke no. I'm not convinced by the smoke units, it just doesn't look right.
Diki - Yes, it is plastic and there is a risk of deformation, but it seems OK at the minute. I guess it may be possible to reinforce it with a metal strip glued and pinned on the reverse if it comes to it. Ultimately I'll probably replace the spring mounting plates and equalising beams with metal parts cast to my design, so the springs can pivot like the prototype. That's a long way off though!
Pugsley
Western Thunderer
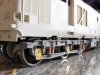
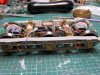
Oh dear, past the 120 day mark again! Still. progress has been made, and I've now reached the point at which i can say, with confidence, that the whole ridiculous thing is going to work as intended! It's also starting to look like a 37 bogie now.
I've assembled the first bogie almost completely now - the sideframes need gluing in place, as do the end cross-members, but the whole ensemble is held together nicely by the spring pressure, and the location of the bearings in the axle guides, for the time being. The bogies moves freely, with the minimum of pressure, so I think that driving the finished loco is going to be interesting - firstly it'll have a fair bit of added weight in it to make the suspension work properly, but most importantly it'll have it's own inertia with the ability to coast.
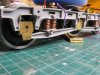
A quick test indicates that I can run the bogie over an obstruction of roughly 2mm, and all wheels stay in contact with the ground, as demonstrated in the photos below:
[attachimg=1]
[attachimg=2]
The bottle of flux was just to add a bit of weight on the pivot, to make sure that it was an indicative test with a load, approximate to the final loco weight, on the pivot of the bogie. I'm quite impressed with the way that the whole assembly sits level:
[attachimg=3] ;D
;D
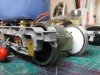
The motors need wiring up, and I also need to add pickups before starting to add the brake detail from the kit. Unfortunately, the method I've used to retain the motors in position means that I can no longer remove the wheels - a better piece of design work required there for the Mk2 version, still got to finish this set yet! An overview of the semi-completed bogie:
[attachimg=4]
It looks like it will be ready for inspection at the S7 meet at Mark - finally one of my elastic deadlines has been met!!!
I've assembled the first bogie almost completely now - the sideframes need gluing in place, as do the end cross-members, but the whole ensemble is held together nicely by the spring pressure, and the location of the bearings in the axle guides, for the time being. The bogies moves freely, with the minimum of pressure, so I think that driving the finished loco is going to be interesting - firstly it'll have a fair bit of added weight in it to make the suspension work properly, but most importantly it'll have it's own inertia with the ability to coast.
A quick test indicates that I can run the bogie over an obstruction of roughly 2mm, and all wheels stay in contact with the ground, as demonstrated in the photos below:
[attachimg=1]
[attachimg=2]
The bottle of flux was just to add a bit of weight on the pivot, to make sure that it was an indicative test with a load, approximate to the final loco weight, on the pivot of the bogie. I'm quite impressed with the way that the whole assembly sits level:
[attachimg=3]
;DThe motors need wiring up, and I also need to add pickups before starting to add the brake detail from the kit. Unfortunately, the method I've used to retain the motors in position means that I can no longer remove the wheels - a better piece of design work required there for the Mk2 version, still got to finish this set yet! An overview of the semi-completed bogie:
[attachimg=4]
It looks like it will be ready for inspection at the S7 meet at Mark - finally one of my elastic deadlines has been met!!!
Attachments
Dan Randall
Western Thunderer
Tasty, very tasty. 
Regards
Dan
Regards
Dan
Ressaldar
Western Thunderer
Hi Ian,
truly excellent work, could you not have saved yourself some work and shorted the wheels out on one side (opposite) of each bogie and used the metalwork in the frame to take the power up to the bogie swivel point at each end, that way, there are no pick-ups and you decrease the amount of wiring as well.
cheers
Mike
Dan Randall
Western Thunderer
Ian? :scratch:
Regards
Dan
Regards
Dan