7mm Dikitriki's Dark side: A WD 2-8-0

Dikitriki

Flying Squad
Hi

Well, change of plans......

I reckoned the 42ft vans would be a quick diversion. Unfortunately work got in the way, and spare time went out of the window between December and March, by which time Heyside had taken preference. So, they are on the back-burner as I try to get the stock ready for the Manchester show.

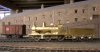
To that end, I have been working my way round the Aspinall A adding the detail, and have arrived at the stage where it's looking pretty complete, and I have got down to preparing my list of final items. Since I had the camera  out for the layout, I grabbed a couple of shots of the model as is:


Attachments

  • P1010016.JPG
    P1010016.JPG
    675.7 KB · Views: 62
  • P1010019.JPG
    P1010019.JPG
    748.6 KB · Views: 66

28ten

Guv'nor
That looks good, but I am a little worried about the roofs on the terrace, how do they keep the tiles on the roof?  :scratch:
 

Dikitriki

Flying Squad
Hi Cynric.

When I first saw the layout, I thought they'd never do roofs like that. I couldn't work out how they could cope with all the angles and keep everything watertight.

I was watching the layout at the Wigan show (I'd gone up to buy it) when I found myself next to what I presumed was a son and his elderly mother - she must have been in her 70s. Her first comment on seeing the layout was to turn to her son and say they had houses on the layout with sloping roofs, just like she used to live in years ago.

On my return home, I consulted the bible (Jeffrey Wells books on the Oldham Loop), and sure enough at Royton Junction and elsewhere there they were. I'm used to them now, of course, but I do remember how odd they first looked to my eyes at least.

Richard
 

Dikitriki

Flying Squad
Gosh, the better part of 10 months, and nothing constructive to report. That just shows how much the layout has eaten up the time.

I'm still working my way round some ex LMS (1F tank and 2F) and L&Y (saddle tank and Aspinall A) locos and all are nearing completion, but I keep getting bogged down in final detail research. I hate not knowing what was there, but I'm going to have to take a view or they will never be finished.

However, the immediate task on hand I think is of interest. I bought some of the very competitively priced MTH LMS coaches. I thought they looked pretty good, and with a little tweaking, could be very good layout coaches. The big drawback was the LIMAesque recessed windows, but JimG and the Heyside gang hatched a cunning plan. I dismantled a coach and gave the carcass to Jim who played around with various thicknesses of glazing material on his computerised milling machine, and who gave me the first batch of windows on Saturday.

So I am now ready to start. The idea is to do a quick and dirty upgrade, and then see what I think. If I wanted a really good coach, I would of course build the Sidelines version, but I think after I've finished, these will look good.

The detaling list involves:
*remove and replace the roof vents - the pattern is wholly incorrect IMO - respray roof,
*take 1mm off the tables so I can get the interiors in and out past the glazing, paint the interior,
*add corridor suspension, paint the ends black,
*replace dynamo with Sidelines version,
*remove bogie mounting for 3R couplings,
*flush glaze,
*replace couplings with Premier Components,
*paint wheels and weather,

Compare with original and see what else needs doing! It shouldn't be a major task, but my record on 'quickies' is not sparkling.

Tomorrow, it's out with the camera to show you the starting point and the glazing, and then to see whether I have everything I need in stock.

Richard
 

Dikitriki

Flying Squad
Hi

Where does the time go?

I have now got stuck in to the MTH upgrade, although plans have been altered slightly, more later.

First off, a couple of pics of the out of the box coach, taken to emphasise the thickness of the sides. Incorrect pattern of roof vents which I believe should be over the centre of each window. Also too close to the centreline, but I shall check that when I come to fit the new ones.

P1010238r.jpg

P1010242r.jpg

A pretty decent start for some £108.

The next pictures show the new milled glazing, courtesy of Jim G.

The whole coach

P1010247r.jpg

A 4-strip and a 3-strip for the 2 separate areas.
P1010248r.jpg

P1010249r.jpg

and the doors, lavatory and luggage windows

P1010250r.jpg

Getting the roof off is tricky. The 4 screw are obvious (and in the instructions). What is not mentioned is the 3 lugs each side that need the careful application of a flat screwdriver to ease the top of the sides away from the roof.

Next is the lighting strip, which, to be honest, I'm not really bothered about.

P1010235r.jpg

and finally, the roof stripped of vents.

P1010233r.jpg
I did think about trying to use the original ones, but they proved to be far too well glued in. I took the existing ones off with some Xuron cutters, filed the nubs back, ran some glue over them in case they decided to drop out later, primed (Halford's primer which applied lightly did not affect the paintwork) and filled. That's where I am up to, waiting for the filler to harden.

The change to the plans is in the glazing. I am not going to use the strips, I am going to use individual panes which won't take much longer to fit, but will mean I don't have to adjust the tables.

By the way, any marks on the glazing are tape residues where it was stuck down for milling, not yet cleaned off.

JB, yes the sprung bogies are being done at the same time.

Cheers

R
 

28ten

Guv'nor
You might need to run some black marker round the window glazing, it helps to reduce the prismatic effect. at £108 it looks pretty good VFM if you can work out a process for tweaking them. In many ways it is what a Heljan MK1 should have been....
 

Phill Dyson

Western Thunderer
They are very impressive for the money Richard, were they heavily discounted or is £108 the RRP ?

The flush glazing will transform them :cool:...........as Cynric says black marker may reduce the prism effect but doing the same around the window frames will actually highlight the body thickness on dark coloured sides(I hope I'm not teaching my granny to suck eggs ) ;)
 

Dikitriki

Flying Squad
Hi Phill

They came as a set of 4 vehicles - 3 open 3rds and a full brake. The RRP was £430 (ish, I can't quite remember), so £108 was not a discounted price. You could buy the vehicles individually, but they were a bit more at about £115!

Next year should see production of the brake 3rds and either a compo or all 1st. Unfortunately, MTH only make in batches to order, so there may not be many spares floating around at the moment.

This evening's work has seen me take out the corridor connections and start work on the gangway suspension.

Here's a pic of the real thing which I am using to make my 'quickie' representation.

LMSgangway.jpg

Richard
 

Compton castle

Western Thunderer
Ive been thinking about a set of these, Do you know if the replacement windows will be available commercially?
I will continue to watch the detailing with interest.
 

Ressaldar

Western Thunderer
the full brakes in any of the BR liveries are quite tempting - and there are less windows to deal with and no doubt some lost their corridor connections when in Departmental use.

cheers

Mike
 

Dikitriki

Flying Squad
Ive been thinking about a set of these, Do you know if the replacement windows will be available commercially?

The best answer I can give is 'maybe'. But, given the nature of the process, it is time-intensive and relatively costly. The windows were produced by a member of the Heyside group for the coaches owned within the group, sort of as an intellectual challenge and as a favour. If they become available it will be small scale and probably around the £20 per coach mark.

the full brakes in any of the BR liveries are quite tempting - and there are less windows to deal with and no doubt some lost their corridor connections when in Departmental use.

We're going to move on to the full brake after I've proved the all 3rd. As you say, fewer windows, so much easier. As I have a set of spare windows, I shall take a brake apart and see whether any of the windows are the same size. You never know, we might be lucky!

Richard
 

Dikitriki

Flying Squad
Hi

I've sussed where I'm going on the gangway suspension, and here is a pic of the component production line.

P1010252.JPG

You can see a couple of the suspension brackets on the left, and on the right a couple of the completed suspension units made from wire, angle, 16BA nuts and home-wound springs. Not very sophisticated.

This is very much in the way of a proving exercise. I have in mind to do a better job next time and have the components cast as I have a fair few to do, and they will be useful on Westdale and Sidelines coaches, and a retro-fit to all my others. The design is such that they are attached only to the coach so you can still use concertina card gangways, they will just look better.

Richard
 

Simon

Flying Squad
Great work.

I know those coaches have some shortcomings as supplied but they are very good looking and well finished pieces of stock. When you get that glazing put in I think the result is going to be spectacular.

Simon
 

Dikitriki

Flying Squad
Very worthwhile mod Richard :thumbs:..........how did you secure the brackets to the coach ?

Hi Phill

I drilled a hole in the bottom of the bracket and soldered a .5mm wire pin in.
The flange moulded on the coach end was removed locally to present a flat surface for the back of the bracket, a corresponding hole drilled in the coach end for the pin, and the bracket was glued in with Loctite 480.

It is plenty strong enough to survive normal handling.

Richard
 

ant31117

Western Thunderer
Very interesting. I bought a full brake at Telford and was charged £110. Its going into blue when I get time, but you've got me thinking about the windows now!

Ant
 
Top