Breaking Ground - Finescale - of a sort

Eastsidepilot

Western Thunderer
Donning my sensible hat again - no, please, don't laugh - the focus has shifted back to the onerous task of shifting half a ton of topsoil!

Mr. O., had a day off work today, but seemed to be otherwise occupied, apart from offering to have a quick whizz with his wonderful electric hedge strimmer, to clear some of the deeply tangled foliage engulfing the boundary fence! I was both extremely grateful for his effort, and rather horrified at the same time. The wire netting is being pushed inwards by all the brambles and other debris, and is bulging far further than I had assumed. When the baseline was finally revealed, I found that I have notably more ground to play with than I first thought.

View attachment 187826

When calculating the maximum curve, I had made some allowance for all the nasty, prickly and snagging stuff... but by rather too much it would now seem.


Pete.
You could plant a Mulberry bush in the middle :D .....I'm gone.
 

Peter Insole

Western Thunderer
I know, I know! I comfort myself with the hope that at least some of my nuttiness is providing amusement?

If proof of insanity were really needed, the earnest easing job is underway...

Transition rails lifted and adjusted to revised alignment:

hhSAM_8572.JPGhhSAM_8573.JPG

That might sound easy enough, but it was actually a bit of a nightmare! My bending tool was carefully (?) designed to apply a curve - but not to flatten one out!

When set up on the workbench, the vice allows a 1.25M straight to be steadily worked, as the ends of the rails move out into my standing space. Reversing that procedure causes the ends to frequently conflict with the architecture and various other items of furniture in such a restricted area! Whilst I fully appreciate the comedic value that a video of my antics would have provided, I am somewhat relieved to say that none such was produced. Although you have all, dear friends, been denied the pleasure, I am at least spared the embarrassment!

It remains to be seen if the effort will have been worthwhile...?!

Lifting the earlier rail fixings was a stroll in the park, by comparison:

hhSAM_8574.JPG

The solid little hexagonal, "Postcrete" sleeper blocks hold very securely in the stabilisation mat, but a few smart smacks with a hammer will loosen most of them sufficiently to be prised out with an old screwdriver. There are always some awkward so-and-sos that have to be broken up with a chisel - of course?!

Onwards and downwards today...!!

Pete.
 

Peter Insole

Western Thunderer
Whew, what a day - as my wrecked knees will attest! Two newly aligned curves are now complete though!

Having laid the transition rails yesterday, and left the fresh "Postcrete" to harden overnight, I started things off this morning in the workshop by adjusting the bends of the first sleeper section, and re-setting them on the bench to make a new panel.

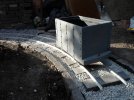
Then it was back down to the bottom of the garden to rake ballast out of the formation - sufficient to be able to lay out the new panel and mark the fresh alignment...

hhSAM_8575.JPG

At least ballast laid over a membrane is relatively easy to shovel out to expose the original workings, and with the levels already established, shifting the "kerbs" was fairly straightforward, if a little tedious!
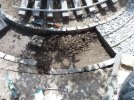
hhSAM_8577.JPG

I tackled the outer alignment first, which then provided the arisings for immediate backfilling of the inner ones.

One particular, and much abused tool that I have found absolutely invaluable for this work can be seen laying in the lower part of the above image. A brickies' pointing trowel was doubtless never intended to be wielded by a railway navvie!

I was quite pleased with the rate of brick shifting progress, despite the heat of the day, but it was shovelling back the ballast, and re-levelling it that took it's time and exacted a toll.

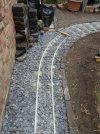
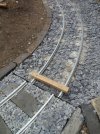
The evening shadows were lengthening before I was finally able to fishplate up the length, and do a test with one of the genuinely "troublesome" trucks!
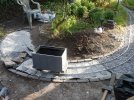
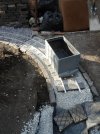
hhSAM_8578.JPGhhSAM_8580.JPGhhSAM_8581.JPG

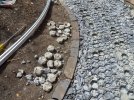
I have still got a few adjustments in the brickwork to do at the join between the path and sleepered section, as well as re-trimming the exposed edges of the membrane, but otherwise, I am very satisfied with the way it has turned out!

While it might only be a matter of an inch, or two, it doesn't half make a difference!

By great good fortune, the new radii curve will not only fit snugly between our boundaries, but has been arrived at by a nice and simple formula: The original outer rail radius is now the new inner, and of course, there is a new radius on the outer!

It not only "looks" much better... it works much better too!

Whew!

Pete.
 

Peter Insole

Western Thunderer
I forgot to mention last night that my younger sister visited, late in the afternoon, ostensibly to deliver a birthday card for my granddaughter, but also to inspect, on behalf of my brother-in-law, the bags of topsoil on offer.

She declared herself to be not merely satisfied, but said that there was a desperate need on their, and fellow's allotments and gardens - for as much as I could provide! What is more; there is even a trailer available for them to collect it all!

However, upon her visit I was the only one at home, so she had to come right down the garden to find me. This was the first time she had seen Mr. O.'s potting shed!

"Oh wow, that's lovely... it would make an absolutely perfect Tea Rooms...!" she excitedly exclaimed, then went on:

"Windows hinging upwards, a great big tea urn, some glass domes with sandwiches, buns and cakes underneath"...

"I would be quite happy to do the catering you know!"

Poor Mr. O.! It looks like he is about to loose his facilities?!

Pete.
 

Tom Insole

Western Thunderer
It was rather wonderful dropping in today for a rather brief visit to the line.

With the P. Way gang in full swing I saw very little line activity but did come to the conclusion that the two tiny bits of rolling stock out with the gaffer posed the perfect photo opportunity that almost mimics a run of slate filled wagons from the Welsh valleys!

So with handing the youngest to my dear mum whilst he got a little grizzly as he was tired bless him.. I dashed to the car to grab my flat cap and eagerly passed my phone to my eldest.
For being only the grand age of 3 and half years of age she impressed me with her instant skill of taking said photograph...
IMG_20230603_143153.jpg
Such a clever girl. Now I just need go make up a little plaque for the last wagon and see how far down the line I could have rolled the two ballast filled wagons!

Looking forward to the next visit and seeing how far along the loop link gets.

Much to Mr O's dismay maybe even a mug of tea and a delicious slice of Aunties cake?

Tom.
 

Boyblunder

Western Thunderer
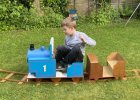
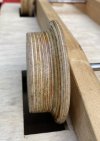
Pete, I'm a little late to the tight radius party having been otherwise engaged and with only a couple of minutes a day to look at WT lately. The grandsons came over last weekend and after a visit to the Leighton Buzzard Light Railway we assembled part of the wooden 7.25" garden Thomas railway while dinner was cooking. The 9 year old is a bit too big to fit in the "cab" now although he had some fun for a few minutes until I got called away. It reminded me that I had the same problem with the trucks running in reverse, even more friction with wooden wheels on wooden track. The solution was as you suggested in your original post on the subject - cone the Flanges. You can probably see what I did including making a rounded rim to the flanges. It worked.
Robin

9Years_Thomas.jpg7.25_Thomas_Coned-Flange.jpg
 

Peter Insole

Western Thunderer
Thanks so much for posting that great pic Tom! I am sorry that nobody got a ride on the train yesterday - what with services suspended due to engineering works!

Thank you too Robin for showing your grandson's splendid railway. Having heard so much about it over the years, it is really good to see some images! While the young man may only briefly play with it - before something else grabs his attention - I am quite sure that when he gets older, he will recognise the enduring quality of his grandad's imagination and workmanship in the creation of such a wonderful toy!

The wheel profile looks so close to what I have become familiar with, I have absolutely no doubt that it is the perfect solution!

While still trying to remain fully focussed on the thoroughly grotty, gritty and grimy work of the permanent way extension - as the weather holds at least, I have nonetheless been occasionally pondering the issue of making some form of mandrel. I am guessing that it might not be particularly straightforward, considering the moulded in, ball-race bearings in the centres?!

Pete.
 

simond

Western Thunderer
Pete,

can you not chuck the wheels by the tread, and get in with a round nose tool?

if there’s not enough room, then I guess a bit of bar a bit bigger than the bearing outer diameter, in the chuck, with a suitable threaded hole, and a big bolt with a big washer, and clamp on the faces?

cheers
Simon
 

Peter Insole

Western Thunderer
Thank you Simon for your helpful suggestions. I am quite sure you are correct. The problem is that I don't have a lathe - and neither would I know where to begin if I had access to one. I fear my complete ignorance in the operation of such devices might be the cause of some serious damage or injury!

Having said that, I was thinking along the lines of using my good old, trusty, and much abused drill press - and after testing to find the appropriate speed, perhaps a nice, sharp file would be enough to knock the corners off with?!

An arbor, with precisely sized washers that sit very snugly into the central recess on both sides of the wheel, (which should hopefully help prevent a shift off-centre) and a heavy nut on a thread firmly clamping the outer ring faces of the bearing is the sort of thing I have in mind?

All a bit dodgy, and could get very messy, I know, but a sense of 'triumph over adversity' if it turns out to work would be incalculable!

Pete.
 

simond

Western Thunderer
Pete,

there must be one of our number with a lathe who’s near enough. I’d happily help but I’m in Folkestone!

you could do it with a drill press, but I think you will need a significant cone, rather than just the corners knocking off

atb
Simon
 

Boyblunder

Western Thunderer
If I was around I could have a go but I’m on my way to the USA right now by train and ‘plane and then Belgium by boat so it will be mid-July before I’m restored to normal operations. Sorry Pete.
 

simond

Western Thunderer
Pete

please give me these measurements:

Tightest radius of outer rail at the gauge line
wheel tread diameter
wheel flange diameter

I’ll do you a drawing for the flange coning

atb
Simon
 
Top