Nick Dunhill
Western Thunderer
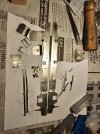
So...... The story begins when I made the splasher assembly. I worked out what diameter the boiler would be and compared it to how wide the inner faces of the sandboxes would be. I used my extensive knowledge of geometry (I drew it!) to work out how close the inner faces needed to be to give me a flat of about the right height.
I rolled the boiler and cut out the bottom of the firebox and was able to solder some curved strips inside the boiler where the flats would be. I had already drilled a couple of holes through the boiler where the flats would land and was able to solder the curved strips through the holes. Plug soldering?
The flats were then made with a disc sander, adding more solder as I went. It took a while but looks OK I hope.
The boiler was then ground away for the driving wheel splasher bit by bit until the boiler sat in the correct place. I had some extra circular formers to solder inside the boiler to stop it trying to unwrap as more material was removed. When in the correct place, the boiler was soldered in place and all the extra formers taken out.
I had to be careful as the smokebox was only attached to the rear footplate and cab by a thin strip under the footplate and the slide bars and motion brackets. Attaching the boiler made the whole body stable.
It took all day to sort it out. I did make some cutting templates to help with the whole thing. It's a bit weird making a boiler then cutting half of it away!
All good now though.
I just need to add the handrails, make a draw bar and the splashers inside the cab. I'll have to wait until after Christmas to get the cab controls and injectors I need to finish it.
It's been a very taxing job so far. The complex shapes have been a challenge.


")
)")