You are using an out of date browser. It may not display this or other websites correctly.
You should upgrade or use an alternative browser.
You should upgrade or use an alternative browser.
Nick Dunhill's Workbench - GNR Stirling Single
- Thread starter Nick Dunhill
- Start date
oldravendale
Western Thunderer
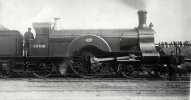
That is probably the most beautiful locomotive ever built, Nick. (IMHO!) But only one?
Brian
Brian
Nick Dunhill
Western Thunderer
Only got an order for 1 Brian, so yes.
john lewsey
Western Thunderer
There was a 4mm etch kit years ago
oldravendale
Western Thunderer
There was a 7mm kit until quite recently - in fact it may still be available. Sorry to say I've forgotten who created it although I considered adding it to my stash and thought better of it when I realised that I'm 76 and have about 30 kits or so still to build.  That's why I have a notice hanging in the workshop which reads... "God put me on this earth to finish a certain number of projects and right now I'm so far behind I will never die".
Anyway, I think we can be certain that it would never have met Nick's impeccable standards.
Brian
 That's why I have a notice hanging in the workshop which reads... "God put me on this earth to finish a certain number of projects and right now I'm so far behind I will never die".
Anyway, I think we can be certain that it would never have met Nick's impeccable standards.
Brian
david duxbury
Member
Swanage Models? now gone i think.
Rob Pulham
Western Thunderer
It's now with William at ACE Products.Swanage Models? now gone i think.
simond
Western Thunderer
I believe the acronym is ”SABLE”, as in “Stock Acquired Beyond Life Expectancy”.There was a 7mm kit until quite recently - in fact it may still be available. Sorry to say I've forgotten who created it although I considered adding it to my stash and thought better of it when I realised that I'm 76 and have about 30 kits or so still to build.That's why I have a notice hanging in the workshop which reads... "God put me on this earth to finish a certain number of projects and right now I'm so far behind I will never die".
Anyway, I think we can be certain that it would never have met Nick's impeccable standards.
Brian
I fervently hope that’s not the case, and you manage to still be building when you’re 106! And that I, at a mere 95, will still be taking the mickey…
ianlbsc
Western Thunderer
I thought it was a STABLE - STock [or STash] Aquired Beyond Life Expectancy?? Either way, I have one and must make more of them up as I continue to design and make new Craven stock using the more modern technologies. I am just finishing off an ex Peter Korrison -Fettleworth Harbour layout - which is an ex Meteor kit. This arrived to me in a roundabout way but I remembered seeing his stock sold off on the GOG E&T at my first 7mm show - at Halifax. I managed to buy some goods stock and now have the loco to pull them! I have also recently aquired another, unbuilt, and it is the same etches etc but now sold by William through Ace Products. It has the later Marsh style of castings in the kit, so I shall be substituting my own 3D resin ones to backdate it to just after it was built condition. The actual kit seems to be one that is okay, and certainly, if I was modelling a Marsh varient, I could use the majority of the castings supplied. So, back to the workbench! Cheers, Ian Mac in Blackpool
Hobbyhorse
Western Thunderer
Interesting build, I scratch built some many moons ago. Some of the pitfalls I encountered was having clearance around the bogie with the splashers, and obviously weighting to enable reasonable haulage.
Simon
Simon
john lewsey
Western Thunderer
I remember seeing those,they were stunningInteresting build, I scratch built some many moons ago. Some of the pitfalls I encountered was having clearance around the bogie with the splashers, and obviously weighting to enable reasonable haulage.
Simon
Nick Dunhill
Western Thunderer
Hi Ozzy. Certainly not my first kit, just an aid to scratchbuilding. If anyone wants sets of etches though they're welcome. Let's build one first and see if there are any issues.
Nick
Nick
Tim Watson
Western Thunderer
Tricky engines for going round corners. In S7 you would need to do fancy things (as I did in 2mm), in Finescale O the sloppy wheel / rail relationship should help. Look forward to seeing it. There are many variations in them (needless to say) but they were effectively built in pairs.
Tim
Tim
Nick Dunhill
Western Thunderer
Yes Tim, I'm not too worried about that. As you say the wheel to railhead slop in FS is your saviour, and also the loco is very short so the bogie won't have to move much anyway. I'm more worried about it being able to pull things! I'm building 1008 (as above) because I have drawings for it in this state and a couple of decent pics.
Nick Dunhill
Western Thunderer
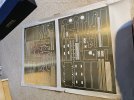
It's sometimes easy to look upon a tender as being an afterthought, and I seem to have only built one other loco with a tender recently. I think I fell down that rabbit hole. The tender is going to take a bit more time than I would have liked, but at least the etches are very good for this build, no mistakes so far except for ones of my own making. This brings me on to the castings for this project, most of which have been produced by Mike Hopkins at Scale-Factor and look very good.
I noticed that the real tenders have an inner chassis rail running from end to end just behind the wheels, with the well of the water tank sitting just inside. Adrian Rowland at Northstar design, who produced the CAD for the etches, extended the inner chassis etch down a little to incorporate the sides of the water tank that are visible through the lightening holes in the tender chassis frames. I thought building a little extra detail between the frames, such as the water tank, would be a good way of disguising the 'O gauge' tender inner chassis and showcasing Mike's castings at the same time.
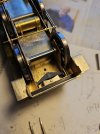
First Mike pointed out that the drag beam I had made was wrong, and should be much shorter with a wooden plank between two plates. I built this, using a plastikard beam (at the request of the painter,) and shortened the inner chassis to suit. I also made a more detailled drag box using a left over 3D printed tender spring from a previous job that just happened to fit.
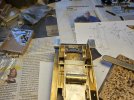
I closed the water tank and made the vacuum reservoir/tank that is attached to the bottom of the water tank well. There were no etchings for the brake hangers, but there are parts for the pull rods. I made the hangers and got Mick Davies to print brake blocks.
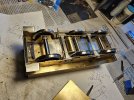
I'll complete the chassis and tender underframe when Mike's castings arrive.
I moved on to build the tender body and the tender front.
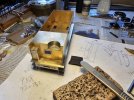
Not all of the tenders have the tool cabinet on the tender front so there are no etches for it. It is, however, quite an easy thing to scratchbuild. The flares are always quite tricky to form. There were thin, half etched, strips for the flares provided in the panel of etches. They were curved by laying them on a strip of old conveyor belting, placing a rod of the appropriate diameter on top and jumping on it. Attaching them to the tender in the correct orientation and height is tricky. I made a little jig so I could position the strips accurately on the tender sides. The last job was to make a tender top. I didn't bother making the coal space the correct shape, as the brief is to fill the tender with coal.
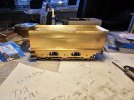
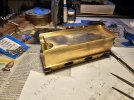
More next week when the castings arrive from Mike. I seem to have Paul O'Grady and Lucy Mangan watching my every move.

I noticed that the real tenders have an inner chassis rail running from end to end just behind the wheels, with the well of the water tank sitting just inside. Adrian Rowland at Northstar design, who produced the CAD for the etches, extended the inner chassis etch down a little to incorporate the sides of the water tank that are visible through the lightening holes in the tender chassis frames. I thought building a little extra detail between the frames, such as the water tank, would be a good way of disguising the 'O gauge' tender inner chassis and showcasing Mike's castings at the same time.
First Mike pointed out that the drag beam I had made was wrong, and should be much shorter with a wooden plank between two plates. I built this, using a plastikard beam (at the request of the painter,) and shortened the inner chassis to suit. I also made a more detailled drag box using a left over 3D printed tender spring from a previous job that just happened to fit.

I closed the water tank and made the vacuum reservoir/tank that is attached to the bottom of the water tank well. There were no etchings for the brake hangers, but there are parts for the pull rods. I made the hangers and got Mick Davies to print brake blocks.

I'll complete the chassis and tender underframe when Mike's castings arrive.
I moved on to build the tender body and the tender front.

Not all of the tenders have the tool cabinet on the tender front so there are no etches for it. It is, however, quite an easy thing to scratchbuild. The flares are always quite tricky to form. There were thin, half etched, strips for the flares provided in the panel of etches. They were curved by laying them on a strip of old conveyor belting, placing a rod of the appropriate diameter on top and jumping on it. Attaching them to the tender in the correct orientation and height is tricky. I made a little jig so I could position the strips accurately on the tender sides. The last job was to make a tender top. I didn't bother making the coal space the correct shape, as the brief is to fill the tender with coal.


More next week when the castings arrive from Mike. I seem to have Paul O'Grady and Lucy Mangan watching my every move.
Nick Dunhill
Western Thunderer
mickoo
Western Thunderer
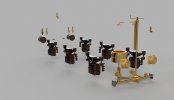
Not my artwork (it is very good thoughthe picture of all the castings looks like Mickoo's over done the invisible solder
Ken
 ) I'm afraid to say, I'm inundated with work right now (some much so I've had to close the shop door for a good 12-18 months) so had to sadly pass on this project, save the few bits here and there Nick needs as pure 3D prints.
Nick Dunhill
Western Thunderer
This week began by adding the beading that goes up the front of the tender, along the top of the flare all the way round, and down the front at the other side. Luckily the rear corners are slash cut, and not rounded, which makes the job a lot easier. The etch had some coal rails thereon that were added next. They were fixed in place using 1.4 mm rod, laid on the top of the flare, as a spacer. Half round brass was planted on the coal rail etch to match the bead round the flare.
I modified a pair of Slater's buffers to be self contained, and added bolt details. They were attached to the rear buffer beam with some guard irons cut from scrap nickel silver sheet.
A great big bag of castings and 3D prints turned up JIT. I revisited the tender chassis to finish the brake rigging and add some vac and water pipework details.
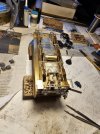
The hand brake and water valve handles were added to the tender front and the buffers on the front drag beam. Some of the lamp irons were fitted. These were the ones with lining over the cloverleaf base. The outer and upper lamp irons lie over the lining on the rear of the tender and were left off. I had a discussion with the painter first to find the best way forward to paint the rear of the tender and therefore what to make detachable to facilitate this. You can see in this picture where I have lightly scored the position of the lining and drilled holes to locate the lamp iron castings.
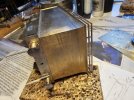
I fixed the tender top and division plate in place. The brief is to fill the tender with coal after paint, so I didn't bother making the coal space and then plating it over! Mick Davies 3D printed me a nice water filler to finish the tender top. He'll be making a tool box soon too!
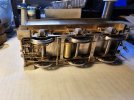
The last job was to assemble and fit the axleboxes and springs. I had alternative brass or 3D printed parts and elected to use the cast brass springs and hangers as they were much more sturdy than the 3D printed ones. I used 3D printed axleboxes though as they needed a slight modification to the rear. It's much easier to file away resin.
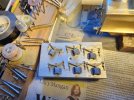
Apart from the aforementioned water fillers and brake blocks all the castings came from Mike Hopkins at Scale-Factors. They are of the highest quality in brass and resin form. Mike has been developing a range of GNR parts for a while, and I lucked-out finding him at a show before I began the project. He had castings ready to go.
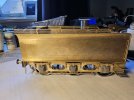
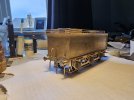
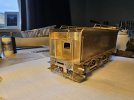
So here's the finished tender waiting for me to build the loco. The vacuum pipe staunchion finishes short to avoid conflict with a Kadee coupler pocket to be added post paint.
I modified a pair of Slater's buffers to be self contained, and added bolt details. They were attached to the rear buffer beam with some guard irons cut from scrap nickel silver sheet.
A great big bag of castings and 3D prints turned up JIT. I revisited the tender chassis to finish the brake rigging and add some vac and water pipework details.

The hand brake and water valve handles were added to the tender front and the buffers on the front drag beam. Some of the lamp irons were fitted. These were the ones with lining over the cloverleaf base. The outer and upper lamp irons lie over the lining on the rear of the tender and were left off. I had a discussion with the painter first to find the best way forward to paint the rear of the tender and therefore what to make detachable to facilitate this. You can see in this picture where I have lightly scored the position of the lining and drilled holes to locate the lamp iron castings.

I fixed the tender top and division plate in place. The brief is to fill the tender with coal after paint, so I didn't bother making the coal space and then plating it over! Mick Davies 3D printed me a nice water filler to finish the tender top. He'll be making a tool box soon too!
The last job was to assemble and fit the axleboxes and springs. I had alternative brass or 3D printed parts and elected to use the cast brass springs and hangers as they were much more sturdy than the 3D printed ones. I used 3D printed axleboxes though as they needed a slight modification to the rear. It's much easier to file away resin.

Apart from the aforementioned water fillers and brake blocks all the castings came from Mike Hopkins at Scale-Factors. They are of the highest quality in brass and resin form. Mike has been developing a range of GNR parts for a while, and I lucked-out finding him at a show before I began the project. He had castings ready to go.
So here's the finished tender waiting for me to build the loco. The vacuum pipe staunchion finishes short to avoid conflict with a Kadee coupler pocket to be added post paint.


