You are using an out of date browser. It may not display this or other websites correctly.
You should upgrade or use an alternative browser.
You should upgrade or use an alternative browser.
dibateg
Western Thunderer
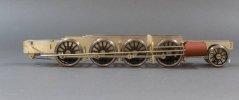
Its quite nice to be doing some commercial work again - for a friend. This chassis needed an overhaul. I fitted new pick ups and fettled it.
I stripped out the leading set of short wire pick ups.
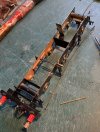
There wasn't enough depth in the frames to fit Slaters plungers. Fortunately, there was already some pcb glued to the inside of the frames. That allowed me to drill though and fit my home made pickups made from tube with a 1mm plunger. The frames are counterbored to give a clearance gap for the carrying tube and the next size up is used to align it in the hole to avoid shorting whilst soldering the carrying tube in place. The advantage of these is that the plungers can be replaced without having to take the wheels off.
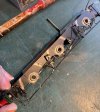
All in place and working, just needs a track test now.
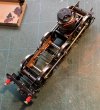
I do like mending things!
Merry Xmas everyone!
I stripped out the leading set of short wire pick ups.

There wasn't enough depth in the frames to fit Slaters plungers. Fortunately, there was already some pcb glued to the inside of the frames. That allowed me to drill though and fit my home made pickups made from tube with a 1mm plunger. The frames are counterbored to give a clearance gap for the carrying tube and the next size up is used to align it in the hole to avoid shorting whilst soldering the carrying tube in place. The advantage of these is that the plungers can be replaced without having to take the wheels off.

All in place and working, just needs a track test now.

I do like mending things!
Merry Xmas everyone!
dibateg
Western Thunderer
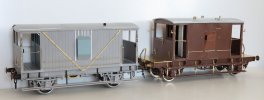
The sequence showed that I need yet more brakevans, so a delve in to the cupboard turned out two more kits. A Parkside LMS D1657 - I added the extra beading that was put on to cure draughts around the ducket and the later 'V' strapping that came in the kit. I have plenty of standard BR brake vans, so made the Slaters kit in to an early LNER version with open solid doors to the compartment

dibateg
Western Thunderer
I had a bad reaction to using the MEK in a rather ( unwisely ) unventilated space. It's nice to tuck yourself away on a cold day in a nice warm room to make models, but it's not good for your health using solvents in that situation. I have been using Limonen for some plastic construction projects, but for others - MEK and Butatnone are the best tools for the job - especially track. I have 20 turnouts to make up for Bala Junction...
So I've made a fume extractor - the wooden panel plugs in to the fanlight window space, and it can all be done from the inside! Its a 12v AC fan off Amazon and the speed can be varied with a multi output AC adaptor.
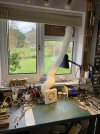
So I've made a fume extractor - the wooden panel plugs in to the fanlight window space, and it can all be done from the inside! Its a 12v AC fan off Amazon and the speed can be varied with a multi output AC adaptor.

Last edited:
dibateg
Western Thunderer
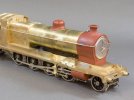
In between poisoning myself, I thought I'd tackle a few jobs on the O4. ROD engines seemed to have a different roof rib layout, with the rearmost rib set forward, so I tackled that.
A search through the bits box turned up a lubricator that was similar to and not unlike the one on the O4. In true DLOS fashion, I cut it up, filed bits off it, drilled it and it came out something close to what was required. It's all plonked together at the moment.
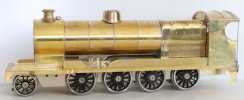
A search through the bits box turned up a lubricator that was similar to and not unlike the one on the O4. In true DLOS fashion, I cut it up, filed bits off it, drilled it and it came out something close to what was required. It's all plonked together at the moment.

Dan Randall
Western Thunderer
Your extractor is a good idea and it’s a nice view from the office window too!
Regards
Dan
Regards
Dan
dibateg
Western Thunderer
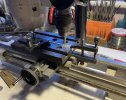
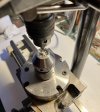
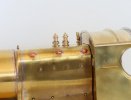
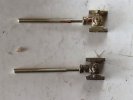
I've been progressing details on the ROD and I wanted to replicate the safety valves. In the early days there appears to be a cover over the mounting flanges. Later on that was removed and shorter valves fitted. I didn'y have any suitable castings in stock. I thought - 'what would DLOS do?', he would have made them of course.
So with my rusty machining skills, I set to.
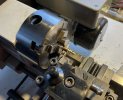
Close, but no cigar, they look the same, but they are not... so I need another shot at it.
So with my rusty machining skills, I set to.

Close, but no cigar, they look the same, but they are not... so I need another shot at it.

Last edited:
Rob Pulham
Western Thunderer
Hi Tony,
In situations like this, I put a scriber point in the drill/mill set it going and use that to make a controlled impression to start the drill.
In situations like this, I put a scriber point in the drill/mill set it going and use that to make a controlled impression to start the drill.
dibateg
Western Thunderer
dibateg
Western Thunderer
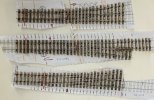
At last I'm back on this build ( the constant rain keeps me indoors ) and the 28 4mm turnout are now out of the door... . So I've been trying to get the upper works complete. I turned up my own safety valves on the Unimat. I also needed to add the forward washout plug - I had forgotten to put those in earlier. Everything went wrong with the smokebox door, it was dented, I cleaned off the rivets, so remade those, I broke off the hinge, so have had to fabricate a new one... Talking of breaking things, I managed to bend the whistle to 90 degrees... that was never going to come back. So I snapped it off, straightened it and managed to drill a 0.6mm hole up it to remount it on N/S wire. The roof has been reworked with the rear flange further forward.. We are still at the serious metal bashing stage!
With the body mostly done, attention was turned to the crossheads and slidebars. I cut off the piston rods and turned up some new ones from 2mm N/S rod. The have a distinctive reduced diameter section adjacent to the crosshead. Is that common on GC locos, or just peculiar to O4s? Still more work to do on these...
It won't be as refined as Mr Davies's...!

With the body mostly done, attention was turned to the crossheads and slidebars. I cut off the piston rods and turned up some new ones from 2mm N/S rod. The have a distinctive reduced diameter section adjacent to the crosshead. Is that common on GC locos, or just peculiar to O4s? Still more work to do on these...

It won't be as refined as Mr Davies's...!
Dave Holt
Western Thunderer
The reduced diameter piston rod design doesn't appear to have been used on the C13 (9K?) tanks although, to be honest, the GA drawings are a bit unclear in that area. Wouldn't really be visible anyway, unlike your external rods.
Lovely looking model and coming along nicely.
Dave.
Lovely looking model and coming along nicely.
Dave.
dibateg
Western Thunderer
Working on relationships... It looks like the cylinders will have to be permanently attached to the frames ( 3D printed components are new terriotory for me - on the telly the other night, some fella made a 3D printed gun - which was test fired by the firearms officers, so it must be ok! ) but I want to be able to get the leading drivers out. So, I've added a flange to the slidebar bracket so it can be screwed to the frames. I've added an extra ring to the piston gland so that it is a good fit in the recess in the rear of the cylinder. The con rod seems a little short, so that needs addressing. The slidebar bracket should not be vertical, but in anycase most of it will be hidden behind the step plating. So, a day of problem solving - good for the brain
Now I've resolved how it will all work.... I'll add the brakes..
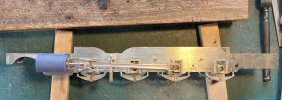
Now I've resolved how it will all work.... I'll add the brakes..

mickoo
Western Thunderer
Tony, you're slide bar bracket is a little high I think, if you stuff a length of suitable rod into the cylinder then the other end should hit the dead centre of the driven wheel, then you can adjust the slide bar bracket so it's central above and below the rod.
If you do that then you can just sneak the Slaters Allen key over the top of the lower slide bar to get to the screw head.
This should hopefully explain what I'm blathering on about.
Interesting about your connecting rod, mine was pretty close, at BDC the cross head should be in the middle of the slide bars, not the whole slide bar but the running surface...which on the ROD is offset to the rear. The connecting rod should be 10'-10" between centres (75.80 mm roughly) and I'm now going to have to add the brass cover plate to big end aren't I
If you do that then you can just sneak the Slaters Allen key over the top of the lower slide bar to get to the screw head.
This should hopefully explain what I'm blathering on about.

Interesting about your connecting rod, mine was pretty close, at BDC the cross head should be in the middle of the slide bars, not the whole slide bar but the running surface...which on the ROD is offset to the rear. The connecting rod should be 10'-10" between centres (75.80 mm roughly) and I'm now going to have to add the brass cover plate to big end aren't I


Last edited:

