Rivermead Central

John R Smith

Western Thunderer
Nice work, Martin. This reminds me of the sort of conservation issues we used to deal with at work, with Roman pottery and similar artefacts.

Interestingly, a dark grey version of this Carette wagon sold on eBay on Sunday, I don't know if you spotted it. But it was in a shocking state compared to yours.

A similar conservation project has just landed on my kitchen table workbench. But this is a much later (probably 1930s to 1950s) wooden model of a MR six-wheel brake van - it looks at first sight to be in fairly good condition but needs a little TLC. Something to keep me busy for a few evenings!

John
 

40057

Western Thunderer
Nice work, Martin. This reminds me of the sort of conservation issues we used to deal with at work, with Roman pottery and similar artefacts.

Interestingly, a dark grey version of this Carette wagon sold on eBay on Sunday, I don't know if you spotted it. But it was in a shocking state compared to yours.

A similar conservation project has just landed on my kitchen table workbench. But this is a much later (probably 1930s to 1950s) wooden model of a MR six-wheel brake van - it looks at first sight to be in fairly good condition but needs a little TLC. Something to keep me busy for a few evenings!

John
Hi John

Yes, I did see the grey version of the Carette wagon. But there was nothing that could be done with it. Repainting extensive areas of lithographed models totally changes their character, however well it is done. Beyond rescue, I thought.

Is your MR brake the BL model that was offered before and after WW1?

Martin
 

John R Smith

Western Thunderer
Is your MR brake the BL model that was offered before and after WW1?

Hello Martin

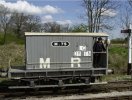
Well, I have only just unpacked it and given it a once over. But I don't think it has anything to do with Bassett-Lowke. It is a model of one of these -

MR 6W Brake-Van.jpg

This is a preserved one which lasted into the 1960s, amazingly. Mine has a wooden body, solebars and headstocks - I think the roof may also be of very thin wood (or perhaps card) -

Midland 6W Brake 01.jpg

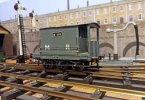
All the detailing is in brass - handrails, footboards, and buffers. The drop-link couplings are standard steel items.

Midland 6W Brake 02.jpg

The axleguards are white metal and the wheels are turned steel. As you can see, it needs a bit of work but it is basically all there.

John
 

40057

Western Thunderer
Hello Martin

Well, I have only just unpacked it and given it a once over. But I don't think it has anything to do with Bassett-Lowke. It is a model of one of these -

View attachment 266502

This is a preserved one which lasted into the 1960s, amazingly. Mine has a wooden body, solebars and headstocks - I think the roof may also be of very thin wood (or perhaps card) -

View attachment 266503

All the detailing is in brass - handrails, footboards, and buffers. The drop-link couplings are standard steel items.

View attachment 266504

The axleguards are white metal and the wheels are turned steel. As you can see, it needs a bit of work but it is basically all there.

John
I think it’s Milbro. Heavily modified, but started life as a Milbro product.

Martin
 

40057

Western Thunderer
It would be nice if it was, Martin. Looks like a fun project, anyhow.

John
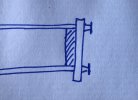
The buffers are definitely Milbro. If Milbro built the body, there should be a separate reinforcing wooden piece behind each headstock, the full width of the wagon between the frames, shown hatched here:

A8F845BB-5BC6-4EC4-923C-A246A8B251F7.jpeg

Martin
 

John R Smith

Western Thunderer
The buffers are definitely Milbro. If Milbro built the body, there should be a separate reinforcing wooden piece behind each headstock, the full width of the wagon between the frames, shown hatched here:

Hello Martin

I have now had a proper look at the underside, and sadly there are no reinforcing pieces -

Midland 6W Brake 03.jpg

So not Milbro, it would seem. The wheels are a bit strange - they are not spoked, but have six holes. They were absolutely filthy, so the van has certainly seen some use in the past.

John
 

40057

Western Thunderer
Hello Martin

I have now had a proper look at the underside, and sadly there are no reinforcing pieces -

View attachment 266548

So not Milbro, it would seem. The wheels are a bit strange - they are not spoked, but have six holes. They were absolutely filthy, so the van has certainly seen some use in the past.

John
As you say, not a Milbro underframe.

Difficult to decide what your brake van is. The scribing for the planking, the cutting out of the end windows, the coupling slots, all appear to be professional standard. But drilling holes in disc wheels to make them look spoked I would say is the approach of an amateur builder. One possibility there would be construction during WW2 when almost nothing in the way of parts was available, so use what you have got.

Martin
 
Last edited:

John R Smith

Western Thunderer
But drilling holes in disc wheels to make them look spoked I would say is the approach of an amateur builder.

Martin

I think that you are absolutely right on this - the holes are intended to make the wheels appear to be spoked at a casual glance. And I think that they are an original part of the build, because I thought about removing them but that would be very difficult the way that the van is constructed. You would have to remove one of the footboards (which is soldered to its supports) in order to slack the axleguards off on one side and get the wheels out. Considering the amount of work involved in the rest of the wagon the holes seem an odd thing to do, unless the correct spoked wheels were not available. So perhaps during WW2 or immediately after as you suggest. Looking at the van more carefully, I have now spotted that it originally had 3-link couplings, and all the smaller handrails are more recent additions. The roof is definitely (very thin) wood.

John
 

40057

Western Thunderer
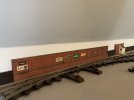
Very slow progress with the layout at present due to other demands on my time. However, my wall with adverts, last seen in post #928, is finally properly installed on the layout. Back in April, with considerable difficulty, I managed to get the wall screwed down — but I wasn’t happy with it. It turned out the wall of the room behind ‘my’ wall was slightly convex, whilst my wall was slightly bowed in the opposite direction. Hence the coping in the centre of my wall was in contact with the wall behind (instead of c. 2 mm in front of it), the returns at each end not touching the wall behind as they were supposed to. I left finishing fastening down the wall with adverts whilst I debated whether to live with it as it was. In the end, yesterday I undid the fastening screws, inserted some packing between my wall and the room wall and I have now put my wall back but with a slight convex curvature matching the room wall behind. No-one else would have noticed, but I think it looks better:

CA50E4C1-3E2D-41A0-8A51-5892BF11AAD4.jpeg

B77B8F75-F4D3-442B-A434-ECE7069EE132.jpeg

73AE663F-A63E-46FF-96F0-D03DB5DAE350.jpeg

As seen in previous posts, there is a 4 mm thick strip of wood painted ‘base-board grey’ in front of the wall. This hides the right-angle metal brackets that are holding the wall in position and upright. Each bracket is fastened down by a screw countersunk into the covering strip of wood — just visible in the photos above. The wood strip also covers the bottom edge of the wall ensuring it sits ‘in’ rather than ‘on’ the ground. The other — unplanned — benefit of this wood strip is that it brings the level of the ground up to the bottom of the sleepers of the track in front. Normally, because of the battens under the track panels, the ends of the sleepers are floating in mid-air. Undoubtedly, having the ends of the sleepers apparently ‘resting on the ground’ is a considerable visual improvement. I may now insert 4 mm thick wood strips between some other tracks, if I decide the benefit in appearance merits the extra work.

Martin
 

John R Smith

Western Thunderer
Martin

The completed wall looks very good. That whole area of the layout now has a much more finished look!

Normally, because of the battens under the track panels, the ends of the sleepers are floating in mid-air. Undoubtedly, having the ends of the sleepers apparently ‘resting on the ground’ is a considerable visual improvement.

You have probably noticed already, but on my own effort I have been experimenting with a smilar idea to hide the "batten gap" between the ends of the sleepers and the trackbed.

Engineer's Special 01 Web.jpg

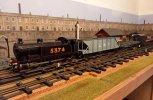
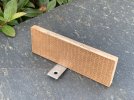
You can see here that I have been using cork "expansion strips" from my local DIY store, which just tuck in under the sleeper ends and are pinned into place. As the track is all laid on a 3mm cork sub-base they blend in quite well - this is just a try-out at the moment, but I may extend it a bit further in due course. Our 5374 is on an engineer's special, which adds a bit of operational interest to the timetable!

John
 

40057

Western Thunderer
Martin

The completed wall looks very good. That whole area of the layout now has a much more finished look!


You have probably noticed already, but on my own effort I have been experimenting with a smilar idea to hide the "batten gap" between the ends of the sleepers and the trackbed.

View attachment 267075

You can see here that I have been using cork "expansion strips" from my local DIY store, which just tuck in under the sleeper ends and are pinned into place. As the track is all laid on a 3mm cork sub-base they blend in quite well - this is just a try-out at the moment, but I may extend it a bit further in due course. Our 5374 is on an engineer's special, which adds a bit of operational interest to the timetable!

John
Hi John

I hadn’t noticed your cork strips but I think they are a good idea.

With post-war Scale Permanent Way, the sleepers are much higher off the ground than with Lowko Track. The overall height (ground to top of rails) is almost identical for the two track types — which is fortuitous from my point of view since I will have at least three Scale Permanent Way to Lowko Track transitions. However, the sheet metal Lowko Track rails are much taller than the drawn brass rails, the Lowko Track battens much thinner.

I expect I will want to reduce the ‘floating sleepers’ look at Cavendish Goods when I start laying the Scale Permanent Way track there.

I have never had any plans for ballasting the track on Rivermead Central, on the basis, for example, there was no ballast on the Sherwood Section. I believe some experimental ballasting was tried on Paddington to Seagood, but whether that resulted in ballast being generally applied I don’t know. I have thought of a way of adding ballast to Lowko Track and I might try it out to see how it looks. I would glue ‘ballast’ (see post #154) to strips of card the same length as the sleepers which could be slid under the rails between the sleepers.

Martin
 

40057

Western Thunderer
A test fit of the next section of wall covering heading south:

2580457B-F4A9-478D-8337-8B5CBB8F91F1.jpeg

Unfortunately, what this showed was that the wall of the room is convex here too, and to a greater degree than behind the model wall with the adverts. I don’t think it will be possible to install the next section of model wall, in its intended position south of the short length of sleeper-built fence, as designed with the short return at both ends up against the room wall.

My solution (I hope) is to insert an additional short length of model wall so that the bulge in the room wall will not be in the centre of the much longer piece I intended to put south of the sleeper-built fence. The construction of the additional short length (just over 4.5 inches long) was largely completed today:

DBB653B3-96F3-4BF6-8306-0D1B3337F21E.jpeg

This time I have used English Bond brick-pattern MDF from Monk’s Gate Models. I will only add the coping after the bricks + mortar are painted. There will a 4 mm thick piece of strip wood in front of the wall to cover the right-angle metal bracket.

Martin
 

40057

Western Thunderer
The additional short section of model wall is painted (but not weathered). The length of strip wood to go in front of the wall and cover the metal fixing bracket is cut to size with the thinned section underneath (which fits over the bracket) made:

13B28E28-65BC-43CA-9305-BCC25BFAA1D6.jpeg

A comment based just on this one small piece; I found the Monk’s Gate brick-effect MDF easier to paint than has generally been my experience with the material from LCUT Creative. I think because the mortar courses are more deeply cut.

I’ll do a test fit on the layout to see if this piece does indeed solve the issue of fitting my cosmetic walls neatly in front of a room wall that isn’t straight. Then fit the coping and add weathering.

If this short piece doesn’t work as a solution to the bulge in the wall of the room, I’ll still finish it. It can be used elsewhere.

Martin
 

John R Smith

Western Thunderer
Hello Martin

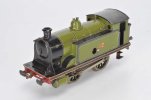
Just a quick update - I won the auction, and I am now the proud owner of this little 112 -

Bing for B-L No 112 0-4-0 01.jpg

Of course, I haven't got it yet. I expect it to arrive in the post over the next couple of weeks, so wish me luck that it actually works as Bing intended. The same auction (SAS) produced a couple of what I thought were remarkable results - a Bing Birdcage (refinished) went for £1,690 including premiums, and a Marklin Jubilee for £3,640 inclusive. So I won't be planning on getting either of those anytime soon . . . .

John
 

40057

Western Thunderer
Hello Martin

Just a quick update - I won the auction, and I am now the proud owner of this little 112 -

View attachment 267627

Of course, I haven't got it yet. I expect it to arrive in the post over the next couple of weeks, so wish me luck that it actually works as Bing intended. The same auction (SAS) produced a couple of what I thought were remarkable results - a Bing Birdcage (refinished) went for £1,690 including premiums, and a Marklin Jubilee for £3,640 inclusive. So I won't be planning on getting either of those anytime soon . . . .

John
Hi John

Congratulations! The 112s — in their numerous versions — are lovely things. I would accept that the scale proportions are closer to reality in the Gauge 1 and Gauge 2 models (which have the same body except for the wider spaced cylinders in Gauge 2). But my personal preference is for the 0 gauge version. The GNR livery on yours looks excellent.

A couple of weekends ago, when visiting a friend’s Gauge 1 garden line, an LNWR 112 was doing around 130 feet on one winding whilst hauling four wagons. Not too fast either.

I bought one lot in the SAS auction. A Marklin Precursor. Not a Precursor tank, the 4-4-0 tender loco. I already have one of these. Actually, dating from c. 1907, the oldest loco I have. But I don’t have the tender — except I do now. The tender-less Precursor I bought years ago is in much better cosmetic condition — really very good — than the one I bought on Wednesday. But it has a broken ratchet so doesn’t run. So, for me, the important elements in the lot just purchased are the tender and a working motor. Which will allow my ‘original Precursor’ to be returned to service. I’ll try to do that in time for its 120th birthday next year.

Martin
 

40057

Western Thunderer
I have carried out a test fit on the layout with the short length of wall shown in post #1,034. And tried the longer length of wall shown in post #1,033 in position next to (south of) the short length. In this position, the longer piece of wall does now fit against the wall of the room as the convex bulge in the room wall is close to its north end. Problem solved!

So I shall finish the short length of wall and fix it in place on the layout. The coping is now fitted:

53DEB0E6-8890-41D4-9C2B-EC00BACA0C3E.jpeg

The coping with the angled top is wood from Monk’s Gate Models. It is painted with Phoenix Precision ‘weathered concrete’. This piece of wall is shorter in height than the wall and fence either side of it, so the ends will not be visible — hence no attempt to represent brick work. I will fill in the tiny gap between the coping and the brick work and add some general weathering.

Martin
 

John R Smith

Western Thunderer
I bought one lot in the SAS auction. A Marklin Precursor. Not a Precursor tank, the 4-4-0 tender loco. I already have one of these. Actually, dating from c. 1907, the oldest loco I have. But I don’t have the tender — except I do now. The tender-less Precursor I bought years ago is in much better cosmetic condition — really very good — than the one I bought on Wednesday. But it has a broken ratchet so doesn’t run. So, for me, the important elements in the lot just purchased are the tender and a working motor. Which will allow my ‘original Precursor’ to be returned to service. I’ll try to do that in time for its 120th birthday next year.

That is a really interesting project, Martin. You now have a tender and a mechanism for your original purchase - so, the obvious question is, how does the cosmetic condition of the tender (on its way) match up with the very good condition of your original engine? I have read that while it is relatively easy to replace a mainspring on our clockwork motors, having a ratchet die is very bad news. So the new motor will be a (relatively) easy solution to this problem, providing that all the mounting points match up - which they should, of course. It would be great to see some before/after photos of this rebuild as you progress.

John
 

40057

Western Thunderer
That is a really interesting project, Martin. You now have a tender and a mechanism for your original purchase - so, the obvious question is, how does the cosmetic condition of the tender (on its way) match up with the very good condition of your original engine? I have read that while it is relatively easy to replace a mainspring on our clockwork motors, having a ratchet die is very bad news. So the new motor will be a (relatively) easy solution to this problem, providing that all the mounting points match up - which they should, of course. It would be great to see some before/after photos of this rebuild as you progress.

John
Hi John

Yes, a project many years in the making — essentially starting with the speculative purchase of a Marklin Precursor with a broken motor and no tender. Quite a gamble in that it isn’t a common model, so no guarantee I would ever find the motor or tender needed. It wasn’t cheap, either. I have probably had the broken Precursor for close to twenty years, with no sign of a replacement motor or tender at any point. Then both turn up in the same auction lot in combination with a rough loco that I wouldn’t want because of its condition. Perfect! But a long wait.

The tender I have just bought, on the basis of the auctioneer’s photos, appears to be in much better cosmetic condition than the loco that is coming with it. Comparable with the loco I already have, I think. I can see the coal rail has been re-soldered on one side, but apparently with little paint damage. The rear coupling is not the original. The buffers are Marklin but I don’t think they are original either — much later, I would say. Nothing that can’t be sorted.

I am pretty confident the tender I have just bought is the correct type for a Precursor — but not 100% certain. The tender is clearly Marklin, LNWR and early — and it is paired with a Precursor, so most likely the original tender for the loco. But I have never seen another 0 gauge Marklin Precursor that would confirm the tender type. Also, the type of tender supplied when new might have changed over the production period. This is a very early model. Marklin’s Gauge 1 version (much more common than the 0 gauge model) has a tender with a break in the frames; front axle in a fixed position, but the sections of the frames holding the middle and rear axles are actually a bogie without looking like one. There were examples of this in 0 gauge too reflecting the then current standard curves. So I have slight doubts as to whether the 0 gauge Precursors should have a similar arrangement, at least for the earliest production. I would very much like to see another example of the 0 gauge Precursor to confirm the tender fitted and, if the same as my purchase, what buffers and coupling my tender should have.

The Marklin 0 gauge Precursor was included in the Bassett-Lowke catalogue from c. 1907. The B-L catalogue listing was for the Gauge 1 Precursor made by Bing exclusively for Bassett-Lowke. But there is a small inserted picture (engraving, I think, not photo) showing the (much less accurate) 0 gauge model that was also available. B-L did not sell the Marklin Gauge 1 Precursor which was much inferior to Bing’s model. Something else I must try to establish is when the 0 gauge Precursor ceased to be offered. I’m guessing once the George the Fifth model came out (so 1910 or ‘11).

Martin

 
Top