4mm Monks: perhaps NOT a Classic Minories - for a grandchild.

jonte

Western Thunderer
Jon,

I've been looking at that derelict and cobwebbed window - it occurred to me that the acquisition of a resident spider for your layout might be an asset.........:cool:!

Merry Christmas to the residents of Monks from those of Whatborough Yard :)!

:)

If you look too closely at the metal overall roof, probably several pages ago now, you’ll see the remnants of several 1:1 cobwebs amongst the rafters, Roger ;) If the creators have somehow migrated to the beams located thereon, then perhaps that part of the distressing process may already have been solved!

Unfortunately, residents are rather thin on the ground at Monks at the minute, Roger, so on behalf of the prospective Birkenhead based population, may I forward the warmest Greetings of the Season to their counterparts at Whatborough too. And of course, it’s creator ;)

Cheers, Roger.

Jonte
 

jonte

Western Thunderer
Been playing around with a variety of artists media and methods, fellow Westerners, in an attempt to find the right recipe for old train shed wood that I’m happy with for the front fascia of the roof.

As I mentioned, I plumped for a Vallejo set of acrylics to replicate old and new wood effects, but somehow, they don’t ideally represent the odd colour photo or two I’ve seen of old stations etc. (that said are any two worn wood effects ever exactly the same?).

Here are sample of some to give you an idea of how I’m getting on:

12A57431-E193-49D0-B6B2-349FE6237B79.jpeg 70B1D6CB-152E-4056-9D95-C7F7E870AF85.jpeg B59470E4-6EB7-49A9-BD39-4A3EF592E856.jpeg 5FA7EB04-9EF7-4524-B7DB-D0EE89279334.jpeg 4F6C947A-CE63-4EF1-B812-9B390C1E8B7D.jpeg 66D58A5E-3953-4B7F-BFCD-3F55F1444026.jpeg 7BA73349-12C2-4FFF-8298-F9950DED4478.jpeg

The odd areas of grey here and there are just unpainted primer.

After all that, I’m leaning towards this:

080787CE-CF06-45F6-9C1C-7298D47E068A.jpeg

I liked the greys, but they needed warming up, so I added a brown in the form of an enamel: Humbrol 29 (Earth, I think; another one been in the paint box for yonx). Incidentally, it also features in several of the other shades/mixes shown, but was overpowered by the darkish tones which are perhaps a little too creosotey.

I used the following recipe:

Grey Halfords Primer, with a cheap Hobbycraft Beige acrylic painted over the top to form a base coat. Then Tamiya’s sky and mid grey acrylics were wet blended on in streaks using Tamiya thinners, but ensuring that some of the beige still showed through so as to present a mottled effect beneath further coats. Then Humbrol 29 was thinned almost to a filter with spirit and washed on, which makes it pool in places. Then I dipped a ball of tissue in spirit before dipping it into the thinned Humbrol 29. I then took off the excess on another bit of tissue and dabbed it over the surface. This imparts a sort of knotty effect and I think also adds to the mottled effect below. Areas that blot out the coat below can be removed by dipping a paint brush in spirit then applying to the area affected. The excess paint will then wick onto the wet brush, removing it from the surface.

When dry, coats of light grey and black powders (not sure of the make as had them longer than I care to remember; think they were picked up at a railway exhibition), were rubbed on with a finger - brushing on has near enough no effect I find- each coat being applied in turn. I think it ended up three of grey and three of black, but it’s easy to add or remove the powders if you’re unfamiliar with their use using water. Finally, a couple of squirts of Matt acrylic varnish fixes everything in place.

It’s now ready for the next stage which will involve misting on a ghost coat of white with the airbrush, perhaps to add a hint of grey, before re-sealing. Then onto the paint chipping process which will be done in stages, locking in each in turn to give the impression that the paint didn’t all fall off at once; that’s the idea anyway. Again, an airbrush will be employed here.

Another reason I opted for this shade was that it will be easier to show the contrast between areas blackened by the soot from chimneys of passing locomotives and those only affected by weathering. That said, I’m going to try again, but this time I’ll add a tad of black (Humbrol 33) to see what difference it might make.

It could be some time before I post those results however, fellow Westerners, as in truth, I’ve been lacking in motivation of late, so I’m going to take a break from modelling for now and hopefully return, if you would allow, reinvigorated.

Many thanks for reading and to those who’ve been kind enough to follow my rigours.

Jonte
 

simond

Western Thunderer
Jonte

enjoy your Christmas, keep healthy, and I look forward to catching up developments in Birkenhead in the New Year!

all the best
Simon
 

NHY 581

Western Thunderer
Hi Jonte,

Looking good thus far.

As an alternative, you may recall my efforts to turn plastic/resin into wood.

I tend to start with a base colour of Humbrol light oak which is a cream colour. I do so as I work on the basis that it would, at some point, been painted...........however long ago that may have been.

I then weather the painted finish, rather than the wood itself if that makes sense.

You may remember this building from my thread.


20210228_114940-02.jpeg


20210228_114857-01.jpeg


20210228_114932-01.jpeg


20210228_115022-01.jpeg

I tried to simulate a building not repainted since just after the grouping now in a ever advancing state of decrepitude in the mid to late 1950s. Had it made it onto a layout, much in the way of weeds would have subsequently appeared.

All done with powders applied to the original painted finish.

Rob.
 
Last edited:

jonte

Western Thunderer
Jonte

enjoy your Christmas, keep healthy, and I look forward to catching up developments in Birkenhead in the New Year!

all the best
Simon

Thanks, Simon.

And you too.

Many thanks also for your interest, encouragement and valuable advice to date.

Jonte
 

jonte

Western Thunderer
Hi Jonte,

Looking good thus far.

As an alternative, you may recall my efforts to turn plastic/resin into wood.

I tend to start with a base colour of Humbrol light oak which is a cream colour. I do so as I work on the basis that it would, at some point, been painted...........however long ago that may have been.

I then weather the painted finish, rather than the wood itself if that makes sense.

You may remember this building from my thread.


View attachment 153759

I do indeed remember it, Rob; there are so many nuances of colour, highlights and shadows and wealth of texture that it’s hard to believe it’s all created with a single coat of paint and some powder.

Forgive me for over simplifying your handiwork, Rob, as I know as do many admirers of your fine work, that the most ingredients are the skill in the use of your chosen media and an artists eye. As I wrote in my above recipe, the best I can achieve with powders is to simply dip my finger in and rub it over the surface. I’ve no idea if it’s too much, too little, just enough or any other clever way to apply it. I simply fly by the seat of my pants and see what I end up with :(


View attachment 153760


View attachment 153761


View attachment 153762

I tried to simulate a building not repainted since just after the grouping now in a ever advancing state of decrepitude in the mid to late 1950s. Had it made it onto a layout, much in the way of weeds would have subsequently appeared.

All done with powders applied to the original painted finish.

Rob.


I do indeed remember it, Rob; there are so many nuances of colour, highlights and shadows and wealth of texture, that it’s hard to believe it’s all created with a single coat of paint and some powder.

Forgive me for over simplifying your handiwork, Rob, as I know - as do many admirers of your fine work - that the most important ingredients are the skill in the use of your chosen media and an artists eye.

As I wrote in my above recipe, the best I can achieve with powders is to simply dip my finger in and rub it over the surface. I’ve no idea if it’s too much, too little, just enough, nor any other clever way to apply it. I simply fly by the seat of my pants and see what I end up with :(

Still, many thanks for the compliment and for taking the time to share your methods with me. It’s good to know that I started with roughly the right base coat - well, as near as beige can get to cream ;).

May I wish you a very Merry Christmas, Rob, and a Happy New Year.

Good luck with ‘X’.

Jonte
 

NHY 581

Western Thunderer
And a Merry Christmas to you, Jonte.

If it helps, I use cheap and nasty make up brushes from Amazon to apply the powders. Depending which ones you go for they're about a fiver.

716QQuB8qkL._AC_SX679_.jpg

This is the set I use. The various brushes give different shading effects. It's down to experimenting and working it out really.


Rob.
 

David B

Western Thunderer
Hi Jonte - I’ve just caught up with your thread. There’s some cracking modelling going on - I can already see how atmospheric this is going to be. Great work!

Happy Christmas
 

jonte

Western Thunderer
And a Merry Christmas to you, Jonte.

If it helps, I use cheap and nasty make up brushes from Amazon to apply the powders. Depending which ones you go for they're about a fiver.

View attachment 153774

This is the set I use. The various brushes give different shading effects. It's down to experimenting and working it out really.


Rob.

Thanks, Rob.

My, that’s a natty little set :thumbs:

A target for my Christmas fund ;)

Best.

Jonte
 

jonte

Western Thunderer
Hi Jonte - I’ve just caught up with your thread. There’s some cracking modelling going on - I can already see how atmospheric this is going to be. Great work!

Happy Christmas

I’m flattered, David. Many thanks!

It’s just something for my granddaughter and I to bond over - I do hope she likes it :) - but I am enjoying it all the same.

I just need a break from it at present but will continue as and when the mood takes me as this is one I have to finish ;)

I hope and trust I can maintain your interest, David, in the process.

Merry Christmas.

Jonte
 

jonte

Western Thunderer
It’s been a while, fellow Westerners, so I hope and trust I find you as well as can be.

I’m pleased to report that the mojo is gradually returning - albeit piecemeal fashion - but getting healthy again seems to take up most of my ‘spare’ time these days.

That said, a little progress has been made on my ‘hybrid’ version of Banbury’s train shed (not been near the layout itself since probably beginning of Autumn) which I’d like to share with you, in the hope it inspires me to make the final push to getting it completed so’s I can move on before my rapidly growing granddaughter gets too big to be interested.

I’ll just post the one for now- taken earlier this morning - as it’s still not completed, but if anyone would like to see a couple more of the inside, I’d be delighted to share them. Just don’t want to go back to my previous form of over-posting to the point of boredom:

DCA3E583-3016-43C3-A36B-3AD88C0284A2.jpeg

Cheers for now.

Jonte
 

jonte

Western Thunderer
Many thanks @Gismorail for your expression of interest and kind words; of course, I’d be delighted to share a couple more shots with you.

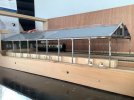
These are a couple of shots of the inside as things stand: first looking aft, second for’ard:

DA20CB9B-D4A8-407E-A470-97A91C83CDB3.jpeg94105D7D-C7D3-4C53-B7E2-F1BAB2F68016.jpeg

Here, I’ve just finished installing the longitudinal wires, a process made more difficult as the brass wire lengths weren’t long enough to straddle the full length, so had to be inserted in sections, butting up to each other inside the thin bearers in an attempt to hide the joins. They, and the transverse wires, have been acid etched and will be painted an earthy black colour.

Joining the thin, wirey construct of the representative wooden beams to the roof sections was a task I wasn’t particularly looking forward to, and I was right (a casualty of bean tin weight collapsing onto it in the process of the glue drying - I’ve still to reattach the transverse wire to its anchor points, but at least it wasn’t bent under the weight of the tin as first thought!):

847E56AD-598D-44BA-9AA8-115817B07D61.jpeg

Not wishing to expose the spindly structure to the same calamity once again, I decided to construct a jig of sorts, which is made up of some ‘lash’ two by ones which can be seen in the above photo, and which I knew I should have employed in the first place.

I also had a bash at representing smoke stains on the front portal, inside and out. Here’s the front during the process:

A9F4CDA0-2065-47F6-9837-4102A6B0400B.jpegE1B0DA41-EFB6-41DE-9BCB-9E25CFA99CA0.jpeg

There doesn’t appear to be a definitive for these stains, so my influence were those that once graced Ashburton (I think) and the shed at Didcot (this also influenced the soiled windows).

Yes, the worn wood below the architraving should by rights be of light stone in colour, however, as this is Liverpool based, I decided to replicate a worn white effect that adorned several city signal boxes and buffer stops, and which rather appealed. That said, I’m not sure whether my home concocted GWR shades are anywhere near authentic, and which I doubt would still have been sported in the period I’m modelling. I just liked it.

The rear:

1A087424-F9E3-4C2D-8201-F8C1A674790A.jpeg


Note that I didn’t replicate the window bars this side: wasn’t worth risking my sanity for a train set….

I’ve tried to show the exposed part of the beams and outside architraving in a lighter shade to the internal parts, to suggest the results of weathering by the harsh estuarine elements at this location. This was achieved by airbrushing on a coat of Tamiya plain white mixed with thinners, and consisting of mainly thinners. I hope it convinces.

Btw: apologies for the rather contrived looking roof line, but the Perspex material (all the model shop had left) had a tendency to fracture around the cut line, requiring further material removal to cover up the damage. Wish I’d not bothered and bought some sheets of styrene as epoxy was the only glue that would stick, and which itself is difficult to disguise with so many separate parts. The boards are just scribed.

I’ve still to attach one or two missing beams and there’s a beam that runs the full length atop the structure, which is currently in preparation, and which can be seen in a photo of the real thing several posts back.

Now it’s almost time to cut out and fix umpteen graph paper slates to the roof:

FA0C3CFE-66B2-464A-B371-9ACCED1416E4.jpeg

I would have preferred to use the York modelling slates, but for a structure of this length, the budget simply wouldn’t allow it.

So that’s where I’m up to.

Thanks for looking.

Jonte
 

jonte

Western Thunderer
And so the architraving was finally fitted to the fascia:

CAA5F890-7A97-424D-BEC8-DA427E01D705.jpeg18EA9764-D306-4891-913E-F9A9249C8FBF.jpeg26B18DCB-BB19-448D-8078-C89A03FD9C53.jpeg09D6FBD7-B1E7-4A6A-A7F2-D866C580FDA3.jpeg

…….and the lower sections manipulated in an attempt to suggest ‘movement………

1B78E97D-3ED1-4052-A029-952841FE8B10.jpeg


……..as per the real thing:

2913D2FA-ACCA-43DD-98EB-E82240D51046.jpeg

A trial fit:

Looking towards the station building:A538F06A-0156-4C8E-8EBA-99095906036E.jpeg

…..and up the tracks towards the fiddleyard:

F3EE8322-BBDB-4BF5-86E0-C99940972978.jpeg

A couple more:

BFAA9AD8-FEE3-432B-8688-425DFC128AAB.jpeg776D9E45-E776-449B-9771-9DA4DB9EA020.jpeg

The spindliness of this lightweight structure is apparent in its awkward ‘loose fit’ to the iron beam supports:

9E782CA4-98AE-475B-9113-076A1C6B1DAA.jpeg

…but that’s the compromise for its portability. Guttering attached to the beams with a token downspout might aid disguise, but I can accept it. Incidentally, the beams and supports will require removal and repainting; as much as I like the peeled paint effect, I can’t help feeling (the raised edges especially) it looks a little out of scale for a 4mm model.

I can now work out where the rear beam will be located, which will eventually provide some long overdue support to those end beams which have been sagging for far too long:

F23EF223-BD77-4A33-BA6B-885E9D643E4F.jpeg

Jonte

Edit: Just realised that one of the exposed beams behind the fascia, which I broke during the course of further construction last night is quite apparent and will need fixing. I can sort at the same time as adding the missing beams which are still in the course of being painted. Goes to show how fragile it really is. Jonte
 

Attachments

  • E08E2098-2BFC-4B06-8D85-8CB5A3815AFA.jpeg
    E08E2098-2BFC-4B06-8D85-8CB5A3815AFA.jpeg
    232.2 KB · Views: 3
Last edited:

jonte

Western Thunderer
Terrific stuff, very atmospheric and refreshingly "different" too.

Simon
Thanks, Simon. Hope my ignorance of the prototype isn’t too obvious although I can’t exactly say the same for my modelling skills :)

Jonte
 
Top