Finescale - of a sort?!

Peter Insole

Western Thunderer
Ah yes indeed Giles! Thank you again for clarifying an important point! I always understood it to be correct practice to fill my own little 16mm Merlin engine's "through type" lubricator right up to the hole - then remember to stand well back when that first charge shot up the chimney and delivered a load of it back !
My "arbitrary" comment was about the model shown in the image, rather than the prototype. I would have thought that a very simple jig for use when soldering the pipe into the chamber would have ensured a precisely consistent gap at the top. In the photo however, it just looks as if someone has either left a rough saw cut without cleaning up, or later attacked the end of the pipe with a coarse file to reduce it?!

I have been pottering on today, and even had a bit of fun with a ball game...
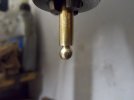
huSAM_yy1056.JPG

I started by drilling a hole down the centre of a length of rod and tapping it M3. Then set it in the drill chuck, and spun an almost complete sphere, taking great care not to cut right through to the hole - in order to avoid pinging it off, and all the hard won being inevitably lost to that otherworld!

It was easier to thread the ball onto the thinner lever shaft while holding the remaining stock bar, and when fully tightened up, I found that I could simply snap the ball cleanly off at that very slender waist section!
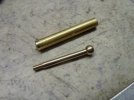
huSAM_yy1057.JPG

Mind you, by the time I had worked out how to get the job done, located suitable materials and completed the first lever, I found myself in breach of the "noise curfew"!

Mrs. I., had to descend the cellar stairs and personally insist that I desist with immediate effect!

In daring and dangerous defiance, I resolutely determined to remain at the "dungeon" bench... but avoided her direct displeasure by obtaining permission to quietly expose some photographs down there instead...
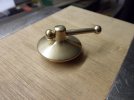
huSAM_yy1059.JPGhuSAM_yy1060.JPG

When both levers are done, I am thinking of permanently fixing one ball to each end with solder, and securing the opposites with a drop of thread locking compound.

It might be late in the day, but I really don't want to lose 'em!

Pete.
 
Last edited:

Peter Insole

Western Thunderer
Although previously unseen photographs of the little Horwich engines do surface from time to time, there are still precious few. Surprisingly, considering how publicity conscious the LYR appeared to have been, even fewer are of the early, "official" variety. It would seem that right throughout the history of the narrow gauge system, the only opportunities to examine and make a record of it was on occasionally organised group visits - and those mostly in the later years. There is perhaps one advantage for research in those circumstances, and that is in the numbers of different images, from varying angles, that can be positively identified as having been taken of the same subject on any given day. What this also clearly reveals is a slightly amusing, and persistent habit that over the years had been indulged in by each and every group of visiting enthusiasts; namely, a desire for a bit of spot cleaning... or the removal of any object that many photographers seem to have regarded as likely to spoil an otherwise perfect shot! There is not much wrong with that, apart from the fact that it does make historical research just a tad more difficult?!

One extraneous item that would be routinely whipped away and well hidden from the line of sight was an essential bucket of sand! It transpires that such a vessel was always carried on the leading headstock, and lodged under the smokebox dart handle of every locomotive, whenever it was out in service on the line. Fortunately, and for the sake of posterity, some individuals were less bothered by the appearance such an invariably battered and ugly intrusion to their view!

Here are a couple of the least common remaining examples, cropped from difficult to credit, but otherwise published images, and shown for illustrative purposes only:

huSAM_yy1026bcomhorwichwren 15d LMS-postcard-photo-Wren-at-Horwich.jpg

Including the most abused, and sad wreck of a specimen thus observed so far...

huSAM_yy1026ccomhorwichhudswell ZM9 s-l1600.jpg

where somewhat oddly, the usually vulnerable handle appears to be the only part to retain anything like it's original shape!

Ever since Giles posted that he had to make a similar item for his own 16mm scale loco, I have been occasionally considering how I would manage to do the same?

I do have a genuine, LMS marked, galvanised fire bucket here at home (in regular use as a handy waste paper bin) for measurements, and while assuming that the proportions were most likely to have been based on capacity, was reasonably content to produce a scaled drawing. Comparing the proportions to all of those precious photo's thankfully confirmed that theory. I was thus able to determine the precise size required for our little engine:-

75mm diameter at the rim, and 72mm deep.

During one of those all too frequent, online diversions the other day, I discovered that some "novelty" miniature, tin-plate pails are available. Albeit in a range of delightful pastel shades, the otherwise fairly convincing replicas come (quite obviously from a single manufacturing source) in three alternative sizes...

The middle option is quoted as:- 77mm and 71mm respectively.

Aw, come on! That is surely a bit of a no-brainer eh?!

There were several traders offering the same product at varying rates and postage, (although none provided an option for colour choice!) so at least I was able to find an agreeable price, and while keeping future availability in mind, happily (or maybe recklessly?) ordered a pair!

Mercifully, (as it subsequently turned out) they duly arrived by courier in a least shocking, "off-white" shade...

huSAM_yy1028.JPG

OK., I know the handle and it's brackets are terribly crude and way too flimsy, but as I intended to strip them entirely back to bare metal anyway, it should in the case of the former, be fairly straightforward to solder on something a wee bit more substantial.

Oh, me dearios! What paint... and what almost useless, "modern" (though dare I suggest; environmentally friendlier?) stripper?!

It did eventually manage to lift the upper, and presumably more thinly applied spray painted portions, but after many more repeated operations, has yet to barely touch the surface of a rather solid accumulation on the internal base.

huSAM_yy1081.JPGhuSAM_yy1082.JPG

It is true that I want to thoroughly "bash them up" - in a proper, prototypical fashion, and then fill 'em with some soft sand, (no, not the aforementioned, pipe bending purple blend!) but...

I hate to be beaten... especially with it being such a bargain.

Erm, is that a faint little voice I can hear coming from deep inside one of the many darker recesses of my brain, and desperately trying to remind me of something that I already know only too well...??

Pete.
 
Last edited:

Tom Insole

Western Thunderer
So - have you worked out how you're going to reduce the pail top diameter by 2mm? View attachment 227241
I should like to think that it wouldn't turn out like a well known father Ted episode...

Unfortunately since my last conversation on my last visit to see dad and his update on the progress I feel that it's a little too apt really that he might recreate said scene..
FcOB20aWAAElnsq.png
"Ya'know for a second there I thought I almost had it"

Knowing how beat up them buckets got..
(Sorry dad, if you haven't seen the scene just look up father Ted dent you'll see the clip). The 'ol bucket should soon get that 2mm removed with the 'ammer!


Tom.
 

michael mott

Western Thunderer
Pete, having been away from the site for a while I have just spent the best part of 3 hours catching up on your masterpiece! I love all the outside the box thinking and making. I just finished drinking the first 2 liters of colyte in prep for a gastric plumbing inspection tomorrow morning, so reading all about your plumbing adventures on the little loco kept me smiling

Cheers Michael
 

Peter Insole

Western Thunderer
I have been flitting about a bit with the various, although related tasks on the engine this week. Each time I have started something and then come up against a required decision, I find myself preferring to divert attention to the next item on the list! I don't ever seem to learn, for as often as not, the new part presents even more issues than the ones I deferred on!

Notwithstanding a desire to get to grips with sticky steam oil, stuffing pipes with soft sand, and some pretty serious bucket abuse, another nagging issue caught my eye again:

I finally realised that all the ideas for solving one particular problem had been around and rejected in my head so many times that it was getting tedious!

Oh, sod it, says I... Just grab a bit of brass offcut and damn well do something about it...

huSAM_yy1087.JPG

I was not at all sure if the experiment would work, but felt it was at least worth a try, so I started by drilling a hole for an M3 tap.

Then, after cutting a vee out of the sheet, and using two scrap cuts of ally angle and some clamps in the smooth jawed vice, I set up a joggle jig:

huSAM_yy1090.JPGhuSAM_yy1092.JPG

I preferred to use the soft aluminium angle, not only because it was immediately available to hand, but I feared that anything harder might shear rather than cleanly bend the brass.

It did a perfectly adequate job, but in the wrong place!

Choosing to take advantage of the sheer, brute force of the heavy vice to simply crush the bent piece over again in a revised position, rather than risk over stressing the brass by straightening it back out first, actually worked better than I could have hoped.

Heave!

Although a very slight witness mark was left from the initial pressing, the metal seemed to be absolutely fine and in good shape, so that was of little concern...

huSAM_yy1095.JPG
huSAM_yy1094.JPG

Botherations! When offering the second joggle up... I discovered that it still didn't quite align!

Believe it or not, I somehow managed to get away with a further bit of jiggling and gentle squeezing in the rig - and yet even after that third go at it, apparently everything is still sound.

Quite content with the result, I had a bit more fun drilling a second M3 hole, and then reducing much of the rectangular sheet into both a peculiar shape, and a pretty pile of glittery powder:

huSAM_yy1096.JPGhuSAM_yy1097.JPG

It is getting late, so I must apologise that for now the further development and ultimate purpose of this (naughty) little oddity will have to remain a mystery until the morrow!

Pete.
 
Last edited:

ovener

Western Thunderer
I have been flitting about a bit with the various, although related tasks on the engine this week. Each time I have started something and then come up against a required decision, I find myself preferring to divert attention to the next item on the list! I don't ever seem to learn, for as often as not, the new part presents even more issues than the ones I deferred on!

Notwithstanding a desire to get to grips with sticky steam oil, stuffing pipes with soft sand, and some pretty serious bucket abuse, another nagging issue caught my eye again:

I finally realised that all the ideas for solving one particular problem had been around and rejected in my head so many times that it was getting tedious!

Oh, sod it, says I... Just grab a bit of brass offcut and damn well do something about it...

View attachment 227610

I was not at all sure if the experiment would work, but felt it was at least worth a try, so I started by drilling a hole for an M3 tap.

Then, after cutting a vee out of the sheet, and using two scrap cuts of ally angle and some clamps in the smooth jawed vice, I set up a joggle jig:

View attachment 227620View attachment 227621

I preferred to use the soft aluminium angle, not only because it was immediately available to hand, but I feared that anything harder might shear rather than cleanly bend the brass.

It did a perfectly adequate job, but in the wrong place!

Choosing to take advantage of the sheer, brute force of the heavy vice to simply crush the bent piece over again in a revised position, rather than risk over stressing the brass by straightening it back out first, actually worked better than I could have hoped.

Heave!

Although a very slight witness mark was left from the initial pressing, the metal seemed to be absolutely fine and in good shape, so that was of little concern...

View attachment 227623
View attachment 227622

Botherations! When offering the second joggle up... I discovered that it still didn't quite align!

Believe it or not, I somehow managed to get away with a further bit of jiggling and gentle squeezing in the rig - and yet even after that third go at it, apparently everything is still sound.

Quite content with the result, I had a bit more fun drilling a second M3 hole, and then reducing much of the rectangular sheet into both a peculiar shape, and a pretty pile of glittery powder:

View attachment 227624View attachment 227625

It is getting late, so I must apologise that for now the further development and ultimate purpose of this (naughty) little oddity will have to remain a mystery until the morrow!

Pete.
Marvellous. I too find that sometimes you just have to give something a go and it (eventually) works out, usaully to my surprise! I can't wait for the big reveal....
 

Peter Insole

Western Thunderer
Prepare now for a blizzard of pics in this final part of the tale!

I had cut the "teardrop" section of the brass plate oversize so that once a stud and hex nut were soldered on I could shape the extra material down flush on four of the sides:

huSAM_yy1099.JPG

I did get a bit sloppy and accidentally applied way too much solder, but as it had run down across a flat surface it all cleaned off without much trouble!

huSAM_yy1101.JPG
huSAM_yy1103.JPG

Once I was happy with the general shape I cut off the remaining shank of the holding section of 4mm rod, and filed the plate smooth.

huSAM_yy1106.JPG

It was the usual faff and fiddle to make up yet another traditionally styled "compression" nut - even though it is actually a fake! (I don't have the appropriate tools to shape the innards, so have to rely on simply flaring the copper pipe ends to trap them in place!)

At the close of play yesterday I managed to get a test section of pipe fitting nicely in the end:

huSAM_yy1109.JPG

This morning I had a bit more of a fuss with the drill press - as I discovered that I had not got any brass rod of the required diameter left in the odds and sods collection, so was compelled to "spin" something larger down to size!

The finish on the slender M3 threaded pin did turn out a touch on the crabby side, but it only needed to be a functional, push fit for another bit of pipe...

huSAM_yy1112.JPG
huSAM_yy1114.JPG

I had been concerned about keeping as much meat on the plate for maximum rigidity... but after a trial fitting on the engine, and being less than happy with the visual impact of the taper leading from the nut, I determined to do a bit more shaping...

As this is a "naughty", additional and totally non-prototypical part, making the plate parallel helps it to look a bit more genuine and convincing - I hope anyway?

huSAM_yy1117.JPG

The next couple of images should at last put an end to this silly, secretive story... and make the true purpose of my attempt at a form of structural subterfuge more obvious?

No, I know none of that makes any sense!

huSAM_yy1124.JPG

When the boiler is lowered back down onto the underframes and running plates...

Voila!

huSAM_yy1128.JPG

Bottom fittings to secure the dangly, vulnerable steam brake plumbing!

I have still to do some tweaking, filling and shaping down the exposed section of aluminium tab to improve the subtlety...

huSAM_yy1133.JPGhuSAM_yy1140.JPG

Once the whole new bracket assemblage, plus the clumsy damage to the surrounding paintwork is covered in some nice, matching, thick, brush applied satin black, the dodgy, slightly set back "extension" wheeze should, I trust, be far less noticeable?

Pete.
 

Attachments

  • huSAM_yy1109.JPG
    huSAM_yy1109.JPG
    90.6 KB · Views: 1
  • huSAM_yy1101.JPG
    huSAM_yy1101.JPG
    156.6 KB · Views: 0
Last edited:
Top