Pencarrow
Western Thunderer
I believe this Macduff station on the other side of Banff Bay.
Great name for a Scottish diesel layout..
I believe this Macduff station on the other side of Banff Bay.
Thanks A.Yes-ish. Depends on which cutter you have.
I have the Chomas Creations Silhouette Cameo 4 Precision Tip" as I have the Cameo 4, while the item you referenced is reported to be appropriate for "Silhouette, Silhouette SD, Curio, Portrait, Cameo, Cameo 2, Cameo 3, KNK Zing & the Wishblade".
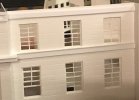
While I've got the "Post reply" window open, here's a more in-focus picture of the final window.
View attachment 176562
Thanks A.
this is a not-so-closeup of what I was getting with a Cameo3 and what I would describe as indifferent, flexible styrene, having to manually cut each pane out. just noticed the middle upper window may be back to front . Apologies for the thread drift.
Yes-ish. Depends on which cutter you have.
I have the Chomas Creations Silhouette Cameo 4 Precision Tip" as I have the Cameo 4, while the item you referenced is reported to be appropriate for "Silhouette, Silhouette SD, Curio, Portrait, Cameo, Cameo 2, Cameo 3, KNK Zing & the Wishblade".
While I've got the "Post reply" window open, here's a more in-focus picture of the final window.
View attachment 176562
Great work on the windows, always the bane (pane?) of any scratch build.
Is there a UK distributor of the engraving tools?
I did a quick search and found nothing in the UK. The well known auction site had some of the manufacturers tools, but predominantly from sellers in the US. Amazon had a competitors product, but it came in a set with stuff I definitely don’t want, and another two engraving tools that I possibly don’t need, which made it in comparison quite overpriced in my opinion. It did have a picture of the tool in a Cameo3 though.Thanks.
No idea about a UK distributor.

Very, very nice! Is that printed paper?After a couple of weeks, one wall with two windows is complete with quoins, lintels and sills.
View attachment 177932
Numerous walls and 21 more windows to go.
Very, very nice! Is that printed paper?


An interesting prototype detail that also may or may not be visible is the little window. At my estimates, it's low on the wall in the upper story, and would afford a view of the comings and goings at the platform below. The Banff station, first built in 1860, was originally the headquarters of the Great North of Scotland Railway (GNoSR), so perhaps this windows was for the use of the chairman to look down upon his minions. I'm guessing, of course.


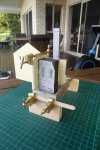
Very nice!I made a thing.
I cut some little bits of 10- and 20-thou plasticard ...
View attachment 187484
... and stuck them together to make ...
View attachment 187485 View attachment 187486
... louvres, which go behind the circular cutout made by the trophy shop ...
View attachment 187487
... to look remarkably like the vent on the end of the station building.