Beginners OO 1950's Banff

aardvark

Western Thunderer
Thanks to all for a rousing welcome.

Ian N has pretty much nailed gravity shunting at Banff. I've been around this topic a couple of times previously, but since I lit this fire, it's my duty to put it out.

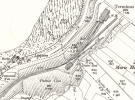
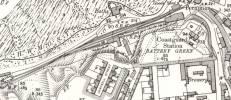
The existence of a goods loop seems to have been a myth perpetuated by later OS surveys, signalling diagrams, Ian Futers' Modelling Scotland's Railways and Greenock & Districts Inverboyndie. Ian Noble appears to have stuck with the prototype in his 2mm layout. Moreover, such a loop, had it existed, would have done nothing for carriage stock and further limited the usefulness of the restricted goods yard.

There are 2 videos on Youtube showing gravity shunting on Banff passenger–only services:
  1. Easter 1959 in Scotland 3 The line to Banff courtesy of Unseen Steam
  2. Scottish Branch lines- Banff with Steam Loco Cab ride (1964) courtesy of 52761b

So, "down" trains from Banff to Tillynaught would have run in standard formation: loco followed by a 1st/3rd non-corridor composite and a 3rd/brake with the brake at the rear. At Tillynaught, the loco would run around the carriages, so that the "up" formation was tender/bunker-first loco, 3rd/brake with the brake leading then the 1st/3rd composite.

Having arrived at Banff, the train would enter the covered platform, the passengers would disembark, then the carriages would be propelled back up the line/hill towards Tillynaught. Once past the engine shed siding, the train would stop, the guard's brake applied, the engine uncoupled and slipped into the engine siding. The guard's brake would then be released, and the carriages rolled back into the covered platform under the control of the guard and his brake, The loco would then return to it's rightful position at the head of the train, ready for the next "down" service, possibly having picked up any wagons from the goods yard for a "mixed" service, with the wagons at the head of the train..

There is a lengthy reply to the question of Banff operations in this thread over on RMWeb: 1950's operations at Banff, including tail-roping, where a wire rope from the loco coupling hook was used to move wagons. Also over on RMWeb is a discussion of the signalling at Banff: Signalling for Banff, Scotland.

For the model, I have a Replica Railways powered chassis which one day will find it's way into a carriage to replicate gravity shunting via a DCC consist. Similarly, a Black Beetle will go into a goods wagon or brake wagon. In the meantime, it will be the Hand-of-God, or a non-prototypical station pilot engine.
 

John Duffy

Western Thunderer
Gravity shunting was indeed the order of the day. This is a super layout of a wild and exposed location. I look forward to seeing it develop.

John
 

aardvark

Western Thunderer
I know you mentioned the RMWeb but have you some closer shots you could upload? What era are you modelling?
Hey Julian:
Although I might have preferred 1930's, I've gone with 1950's, simply for the availability of RTR locos and stock.

I don't have many up-close photos, mostly because there isn't much to see. What little rolling stock I have is RTR out of the box. Credit card modelling at it's best. My current attention is on the buildings: once I have these, then they can be positioned on the layout and I can move onto scenic-ing around them. Then I will start to have something to take photos of.

In the meantime, here's a couple of historical close-up photos.

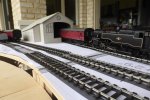
The resident Bachmann standard 4MT "shunting" a couple of Hornby carriages about the mock-up of the station building on loose track laid over a full-size print-out of the trackplan to help judge whether the whole thing jelled.
P1160338.JPG

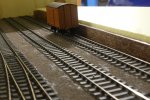
An unpainted/unbuffered Parkside wagon with a loose roof beside the yet-to-be-complete loading dock to judge the height of the latter. The track here is laid and painted, whilst the brads holding it in place have yet to be removed.
P1170016.JPG

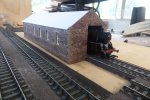
The resident Bachmann standard 4MT poking it's nose out of the engine shed, which had not yet been tiled:
P1170176.JPG
 

Crimson Rambler

Western Thunderer
@aardvark on the offchance you are unaware of it there was a short but informative article on Banff as a layout design which appeared in the March 1996 issue of Modelling Railways Illustrated - Vol 3 No 7, under the title Beside the Seaside Beside the Sea.

The magazine only ran for a short while but issues are available.

Included in the article are a good description and trackplans for c1900 and 1964 together with a reference to the crossover!


Crimson Rambler
 

Jordan

Mid-Western Thunderer
A bit late to this Thread, sorry. Firstly welcome to WT, which is an increasingly inaccurate description of the Forum these days - there's plenty of non-GWR/BR (W) modelling on here & it doesn't have to thunder!!
I'm a bit puzzled, though - the Thread title distinctly has the word 'Beginner' in it (ok "Beginners" for the pedantic), but from the photos so far I'm struggling to comprehend who that applies to? ;) :) there's no set track, no 8ft x 4ft board, no roundy-roundy.... :confused: :D
 

aardvark

Western Thunderer
@aardvark on the offchance you are unaware of it there was a short but informative article on Banff as a layout design which appeared in the March 1996 issue of Modelling Railways Illustrated - Vol 3 No 7, under the title Beside the Seaside Beside the Sea.

The magazine only ran for a short while but issues are available.

Included in the article are a good description and trackplans for c1900 and 1964 together with a reference to the crossover!


Crimson Rambler

Thanks, I was oblivious to both the article and the magazine. I see if I can get myself a copy.

I'm a bit puzzled, though - the Thread title distinctly has the word 'Beginner' in it (ok "Beginners" for the pedantic), but from the photos so far I'm struggling to comprehend who that applies to? ;) :) there's no set track, no 8ft x 4ft board, no roundy-roundy.... :confused: :D

Well, I did start with set-track in mind, but upped the ante a bit with guidance. I avoided building my own track or locos since I wanted something to be running in this lifetime, although I admit to having a DJH loco kit that I might get to, one day. Nevertheless, I do see the attraction of nailing some set-track to a door for an instant layout.

Mr Aardvark, if you need a copy of the signal box diagram, let me know.

Thanks John, but I do have a copy, and various experts were helpful deciphering it's meaning: see the Signalling for Banff, Scotland over on RMWeb.
 
Last edited:

aardvark

Western Thunderer
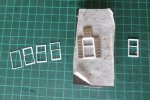
I spent a lot of time looking for windows that would suit my prototype, but without success, so I decided to invest in a Silhouette cutter and make my own to the required dimensions and design. Here's how I do it:

P1170231.JPG

(left to right)
1. 4 layers are cut from 10-thou plasticard using a Silhouette cutter
2. The layers are laminated one at a time in a "jig" (small magnets arranged on a steel block) using limonene.
3. Resulting window frame (21x12mm).

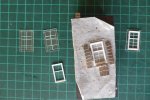
P1170233.JPG

4. In parallel, a layer of acetate is cut 4mm oversize and scribed.
5. The score lines are filled with paint to make them stand out a little better, and the frame is painted.
6. The frame is glued to the acetate in a "jig" using UHU.
7. The completed window, which is pressed into an opening from the back.
 

Ian N

Active Member
I spent a lot of time looking for windows that would suit my prototype, but without success, so I decided to invest in a Silhouette cutter and make my own to the required dimensions and design. Here's how I do it:

View attachment 176442

(left to right)
1. 4 layers are cut from 10-thou plasticard using a Silhouette cutter
2. The layers are laminated one at a time in a "jig" (small magnets arranged on a steel block) using limonene.
3. Resulting window frame (21x12mm).

View attachment 176443

4. In parallel, a layer of acetate is cut 4mm oversize and scribed.
5. The score lines are filled with paint to make them stand out a little better, and the frame is painted.
6. The frame is glued to the acetate in a "jig" using UHU.
7. The completed window, which is pressed into an opening from the back.
I do like the use of magnets to form the jig. In theory, much more accurate than my ageing Mk1 eyeball! I can feel the urge to buy some…
A couple of questions if I may…
What do you use as the barrier between plastic and the base plate - Tracing paper, baking parchment or something else?
Did you use the Silhouette to score the acetate? I’ve @40 of similar style windows to finish for a block of buildings on Princes St, and the scored acetate looks neater than the silhouette achieved for the internal woodwork between panes on the flexible plastic they were cut from. Thanks

cheers
Ian
 

aardvark

Western Thunderer
I have copy if you’d like It.

John

Thanks John, that would be most kind. PM follows.

What do you use as the barrier between plastic and the base plate - Tracing paper, baking parchment or something else?

Yes, kitchen variety baking paper.

Did you use the Silhouette to score the acetate? I’ve @40 of similar style windows to finish for a block of buildings on Princes St, and the scored acetate looks neater than the silhouette achieved for the internal woodwork between panes on the flexible plastic they were cut from.

Yes. I'm a big believer in the right tool for the right job, so bought an Amy Chomas scribe tool for the purpose. I played around a bit with this, and wound up using 3 scribe lines at 0.1mm spacing for a line that is something like 0.3-0.4mm wide. The thinnest I can reliably cut 10-thou plasticard is about 0.6mm.
 

Ian N

Active Member
Thanks John, that would be most kind. PM follows.


Yes, kitchen variety baking paper.


Yes. I'm a big believer in the right tool for the right job, so bought an Amy Chomas scribe tool for the purpose. I played around a bit with this, and wound up using 3 scribe lines at 0.1mm spacing for a line that is something like 0.3-0.4mm wide. The thinnest I can reliably cut 10-thou plasticard is about 0.6mm.
Thanks. An interesting company. Is this the tool you use - Chomas engraving tool ?

cheers
Ian
 

aardvark

Western Thunderer
Thanks. An interesting company. Is this the tool you use - Chomas engraving tool ?

Yes-ish. Depends on which cutter you have.

I have the Chomas Creations Silhouette Cameo 4 Precision Tip" as I have the Cameo 4, while the item you referenced is reported to be appropriate for "Silhouette, Silhouette SD, Curio, Portrait, Cameo, Cameo 2, Cameo 3, KNK Zing & the Wishblade".

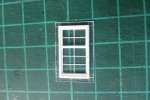
While I've got the "Post reply" window open, here's a more in-focus picture of the final window.

P1170234.JPG
 

Lyndhurstman

Western Thunderer
Yes-ish. Depends on which cutter you have.

I have the Chomas Creations Silhouette Cameo 4 Precision Tip" as I have the Cameo 4, while the item you referenced is reported to be appropriate for "Silhouette, Silhouette SD, Curio, Portrait, Cameo, Cameo 2, Cameo 3, KNK Zing & the Wishblade".

While I've got the "Post reply" window open, here's a more in-focus picture of the final window.

View attachment 176562
Lovely work. You could say ‘framing marvellous’ :rolleyes:

Cheers

Jan
 
Top