AJC
Western Thunderer
Well that wasn’t too bad at all.

Really looking forward to the fiddly bits that will complete it now.
Adam
Really looking forward to the fiddly bits that will complete it now.
Adam
Last edited:

Which kit is that then? Looks like you made a good job of it though!


Now, about the front end...


The 40 BR Ferry opens didn't have any support bars, although they could be sheeted in use.Building for durability. Now I've added a rib along the centreline to support a representation of the sheet bar. There's no need to model it 'properly', as it's invisible and I'm more interested in a stable model that will survive handling. You can't see here, but the rib overlaps the ends. Based on an excellent image from the Tim Mills' collection, I've learned what I suspected must be the case: these took a pair of sheets as, I guess, the accompanying Pipe wagon would have done (all of these were equipped with tie downs and those explicitly used in paper traffic must have been sheeted regularly).

Ok, so the open illustrated is almost certainly French, running with BR sheets (yes, you can tell!), but the same principle applies. Original post and discussion here: Prototype - Tim Mills' Photos. Thanks, as ever, to @oldravendale for sharing these pictures.
View attachment 254878
Adam
The 40 BR Ferry opens didn't have any support bars, although they could be sheeted in use.
Possibly popular model as the drawing was reproduced in Bartlett, P., Larkin, D., Mann, T., Silsbury, R., and Ward, A. (1985) An illustrated history of BR wagons, Volume 1 published by Oxford Publishing Company, 192 pages.
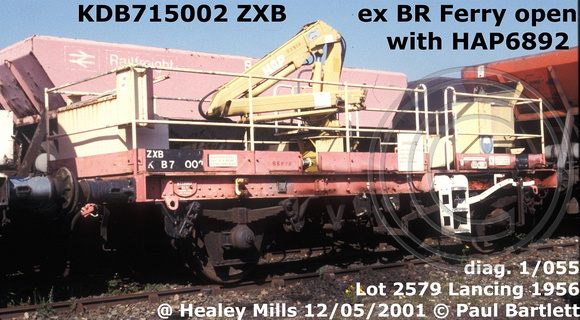
BR Ferry open OJX diag 1/055 and conversions ZDX ZGA RBX
BR built 40 shorter length ferry opens based on a much earlier SR design but with updated running gear. In later years some were reduced in height and other converted to platform inspection wagons for the Thameslink electrification. Some nice liveries and detail photos! Drawing in BR Wagons by...paulbartlett.zenfolio.com
Paul
Apologies, I didn't dig the book out before replying.The drawing in Bartlett et al, fig. 21 on page 71 (and the works photo contained therein immediately above it , plate 99), certainly shows that they did *as built*. They had, as you say, lost them by the time you photographed them (the earliest picture in your gallery is dated 1980, i.e., 23 years after construction), but they're also shown in the diagram books. The sheets shown in your images are the later nylon variety, tailored for this specific use. Thank you, as ever, for the images and your contributions to that book which is utterly invaluable.
Adam
