Mike G's Workspace.

Mike Garwood

Western Thunderer
I could not continue with the bunker on a slant. So, I un-soldered the lot and started again. In cleaning up the castings I must have done something right, because the bunker is now square. Having got over this hurdle, it appeared to me that adding a lot of the small detail would be a good idea before soldering in the main parts. Things like handrails and the such. The downside of this is that I sent for etches to PPD nearly a week ago and apart from an acknowledgement of receipt...nothing. There are quite a few upgrades on this artwork including steps for the cab and mid footplate and steps that go on the front of the water tanks. Bearing in mind there is a time constraint involved (the painting countdown has begun), getting these etches is a bit of a priority.

GWR 16xx WM build continues 1.jpg

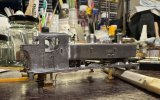
I glued the chimney on last night and deliberately over did it as you can see. I spread some Vaseline around the lower lip of the chimney, so that shouldn't prove too difficult to strip off. The rest will come off with with a fibre brush. The boiler and smokebox are just resting and not fitted as yet. The next step will be to fit even smaller detail - the lamp irons - from the Masokits range. Front, mid and bunker.
One of the problems that that has been really annoying has been the 0.5mm drills snapping when half way thru the process. Now I was hand drilling these and I'm now wondering if I should have used a high speed drill (Dremell) instead - thoughts? Adding the lamp irons will require drilling a number of small holes, before solder is applied.

GWR 16xx WM build continues 2.jpg

I did try a fit of the chassis to the body now that the buffer beams are in, no problems found. Also the lovely etch that Justin has done for the rear windows of the bunker have also been trial fitted. This wasn't quite so easy, especially as I had been so stupid to solder in the large lump of WM that represents the coal bulk head...and it needed thinning to get the etch anywhere near the rear of the cab. Out with the P4 modelling file and before too long I had a nice fit. So that's where I am now.

I would like to know if I'm right about the drills, so please don't hold back.

Stay safe

Mike.
 

Nick Rogers

Western Thunderer
I've always thought that modeling was about growing, either experience or knowledge.

These were something from the early 00's marketed by that good egg Gordon Ashton. They are a good sprung system, the County, 8f and Std 4 tank uses this - each wheel has it's own sprung unit. I'll put some photos up as I go along with the rebuild. Which reminds me to order some more from Gordon.

Mike.

Morning Mike,

Ah! Good old Mr Ashton! I will have to message him and see if he has any for me to have a go with. I do have a part-built P4 High Level 57xx chassis, which uses HL springing. I really should dig that out and finish it. Dear old Brian Pearce was quite a big advocate for sprung tender chassis. A part-built School's loco (a mixture of scratch-built and various kit parts) is in my care, and it has a fully sprung tender chassis, all scratch-built. It runs like a dream.

Best wishes,
 

45609

Western Thunderer
White metal does not get cleared by the drill flutes effectively, especially on small sizes. Slow and steady by hand with a little lubrication is the best approach. As soon as you feel the drill tightening (i.e. needing more effort to twist the chuck) back it out and clear the white metal swarf from the drill flutes. Of course, always use a sharp drill.
 
Mike,

I claim no expertise, but drilling WM I typically use a hand drill - Archimedes type - and lubricate the bit with a drop of spit.

and I seem to get away with it!

best
Simon
I agree completely: no overheating and no wobbling. It’s altogether different if you are drilling something hard, then high speed is needed - Dremel, or similar, in a drill press with 10000 to 20000 rpm and small drills (0.3 - 0.5mm) will go through etched kit bits like butter.
 
Last edited:

Mike Garwood

Western Thunderer
Morning Mike,

Ah! Good old Mr Ashton! I will have to message him and see if he has any for me to have a go with. I do have a part-built P4 High Level 57xx chassis, which uses HL springing. I really should dig that out and finish it. Dear old Brian Pearce was quite a big advocate for sprung tender chassis. A part-built School's loco (a mixture of scratch-built and various kit parts) is in my care, and it has a fully sprung tender chassis, all scratch-built. It runs like a dream.

Best wishes,
Nick
Gordon has no stock. And is not likely to reorder….l have a plan.

Mike
 

Captain Kernow

Western Thunderer
Mike,
One more voice to add to those advocating drilling by hand, with a sharp drill bit and spit lubrication.
On the subject of lamp irons, I always use 5 minute epoxy, with the more vulnerable ones additionally secured in place by soldering a tiny, discreet spigot of 0.4mm wire to the back of the lamp, which is glued into a corresponding hole, drilled into the bodywork. Epoxy is so much easier to make adjustments to the position, before it hardens, than superglue or soldering.
 

Mike Garwood

Western Thunderer
Life and work have a nasty habit of getting in the way of enjoying yourself. Here in S Wales it's half term - so no Grandchildren duties - but there's quite a healthy list of household repairs to be completed. Having got the list almost to zero, I can relax and have a few hours to myself.

The order from PPD has been delayed due to my own forgetfulness, having completed all the hatching, I forgot to assign an appropriate layer to the hatching. No wonder PPD couldn't proceed. :rant: Sorted now and I'm waiting for PPD to confirm the manufacture.

Today has seen a fair bit of soldering, the lamp irons have gone in on the front footplate and smokebox. The smokebox, half boiler and firebox have also been attached as has the rear of the bunker. The filling process has started, this is going to be a long and delicate process, if this models going to look like the prototype.

GWR 16xx WM build begins 3.jpg

I've used 2 different types of filler, good old trusty Milliput and Vallejo. Milliput is a quite stiff filler and needs to be pressured into position (as if you didn't know). Vallejo is quite runny and needs to be pushed into position. Milliput doesn't shrink on drying, the other does, so requires a touch up once completely dry. And I've just noticed that one of the handrails needs re-soldering.

GWR 16xx WM build begins 4.jpg

You can see where the Milliput has gone into the bunker seams. This needs a lot more work to be completed and a good appearance should show thru. The rear lamp irons have been made and as soon as this filling job is completed, to my satisfaction, then they will go in next. I've also been cleaning some of the smaller castings, the detail on these is really quite good.

And thanks to everyone for the drilling tips. :)

So here's hoping PPD can get the job done - without me having to do more remedial PC work. And get it delivered really quickly.

Stay safe

Mike.
 

Mike Garwood

Western Thunderer
For those of you that are interested in Gordon Ashton's springing unit, here are some details. I contacted Gordon a few weeks ago and these units are now unavailable...so,

GA springing 1.jpg

From left to right...

I call these mouses ears but they are the retaining etch soldered onto the bearing. The bearings have 2 options, The Perserverance square bearing or the MJT square bearing. Perserverance - gone (and I couldn't find anywhere on the web either), the MJT bearing is out of stock (and has been for some time). Fortunately, I found a new packet of 6 on flea bay...PHEW!
These should be soldered on with solder paste, mine went dry years ago and have never bothered to re-stock, so tinning it was. The main etch is provided with 2 lengths of springing, either 25mm and 15mm. I've always used the 15mm version. I was using this system right up until the intro of CSB's. The surrounds for the bearing are there to stop the bearing rotating. The set of MJT bearings were so good a fit with no horizontal movement (slop). You only really need one leg to stop rotation of the bearing.
The 'wings' of the main etch allow height adjustment (according to weight and height of the chassis and body) - I've always used the second hole down, using 10 thou steel wire (Ernie Ball guitar wire).

GA springing 2.jpg

Apart from the wire, this is the finished thing. This system has worked well for me in the past...and I'm hoping it will dig me out of a hole with the Grange chassis. :) I do have plans for something similar, but I need to speak with Gordon before going further, not that it will be a commercial thing.

Stay safe

Mike.
 

Mike Garwood

Western Thunderer
It's been a tough week, for one reason or another, keeping busy has been a huge help. The filling and filing continues at the rear of the engine. still not happy with it. The rear lamp irons have been glued in place. I think the middle one may need moving down.
But in other news the etches from PPD are on their way :) .

GWR 16xx WM build begins 5.jpg

I've started the injectors and then ran out of 0.8mm copper wire (Amazon to the rescue, should be here tomorrow evening) they still need more work. Fitting these should be fun as there are no markers on the footplate. Slow progress, but progress none the less.

Stay safe

Mike.
 

Mike Garwood

Western Thunderer
Well PPD delivered, the etches are great and now I can really crack on with the detailing and add the missing pieces to the body/ chassis. I've also added the injectors and I'm relieved to say that the water tanks don't need any remedial work to make these fit :) .

GWR 16xx WM build begins 6.jpg

If you thought that this was a normal Hawksworth 16xx, you'd be wrong. This is, in fact, the short lived GTX version, hence the incredibly long out let pipes...

I couldn't live with the rear mid lamp iron, so that has been sorted.

So, what you can see is : new large whistle shield, front steps (I had etched enough to add these to the side of the cab and remove the rather chunky WM jobs), lifting links, rear sand box (which folds up as designed - that's a first!), mid and rear steps for the footplate. So a fair bit of work to get on with this week...the date for painting this engine is rather set in stone!
The real fly in the ointment, is the handrail from the front to the rear. Making matching bends is something I've failed at consistently. So how do you form yours? Please let me know, I must be missing a trick.

Stay safe

Mike.
 

Captain Kernow

Western Thunderer
Hi Mike,

Re handrails, I use a scale drawing of the front of the loco and use that for the bends, having first checked that the basic dimensions of the body match. It's not a quick process when I do it, but I can't see any other way, certainly not doing it as the prototype did, by doing it in two halves with the joint on the top centre handrail knob above the smokebox door.

One other tip regarding handrails, when you put the tanks on, do check that the alignment of the handrail knob holes along the tank matches that on the cab side. I see you seem to have put a handrail knob in the hole on the cab side. I was glad that I hadn't done that, as I had to fill that hole and drill another one. I also thought that the line of the handrails along the tank sides might be a trifle low (but only a trifle, which is less than a tad), but I opted to leave mine as they were.
 

Mike Garwood

Western Thunderer
Been a busy couple of hours. The short lived GTX version has now been replaced, with the installing of the steps and is now beginning to look like a Hawksworth 16xx.

GWR 16xx WM build begins 7.jpg

It has to be said the etches have really added to the presence of the engine, I've still to add the supports from the pipework to the cab steps.

GWR 16xx WM build begins 8.jpg

The engine has also gone thru a cleaning phase and looks a lot better for it, as usual the cleaner Viacal has done it's job on the green remains of the flux. Looking at this photo those steps are destined for the bin.

At last a decent step forward, tomorrow should see the water tanks go on.

Stay safe

Mike.
 

Mike Garwood

Western Thunderer
Another busy day at the bench...

But first I'd like to say thanks to NMRS for a brilliant club open day on Sunday. Lots of different gauges and types of motive power on display, a really well planned and executed day.

The tanks are on and and a fair bit of detailing has been added as well. Lifting links, whistles and steam shield, support brackets for the injectors outlet pipe, to name but a few. Still some more filing to do at the front, plus the smoke box drain cock and the steps. I was going to put the steps on this evening. But, I can't make my mind up whether to solder or glue. Reason being I filled the gaps with solder and filled this back to get a good finish, I don't want to disturb the solder or if I lower the iron temperature further will that not happen?...something to ponder. Super glue is the preferred method ATM.

GWR 16xx WM build begins 9.jpg

You can see the filling that's already been completed, how 2 identical parts can be so different in length I will never understand.

GWR 16xx WM build begins 11.jpg

Chassis and body united, with the sandboxes peeking thru the cab steps. Really pleased the way these etches turned out. Still to do the sandbox operating gear - which is included in the chassis etch.

GWR 16xx WM build begins 12.jpg

And a quick photo showing the sandboxes soldered in place. I just hope that I haven't been too enthusiastic with xurons in trimming the rear brake rod!
Coming together nicely and for once I'm on target to finish the build by Thursday evening, ready for cleaning on Friday and you can guess what happens to the dinning room on Saturday.

Stay safe

Mike.
 

Attachments

  • GWR 16xx WM build begins 10.jpg
    GWR 16xx WM build begins 10.jpg
    135.4 KB · Views: 6

Simon H

Western Thunderer
Another busy day at the bench...

But first I'd like to say thanks to NMRS for a brilliant club open day on Sunday. Lots of different gauges and types of motive power on display, a really well planned and executed day.

The tanks are on and and a fair bit of detailing has been added as well. Lifting links, whistles and steam shield, support brackets for the injectors outlet pipe, to name but a few. Still some more filing to do at the front, plus the smoke box drain cock and the steps. I was going to put the steps on this evening. But, I can't make my mind up whether to solder or glue. Reason being I filled the gaps with solder and filled this back to get a good finish, I don't want to disturb the solder or if I lower the iron temperature further will that not happen?...something to ponder. Super glue is the preferred method ATM.

View attachment 251611

You can see the filling that's already been completed, how 2 identical parts can be so different in length I will never understand.

View attachment 251613

Chassis and body united, with the sandboxes peeking thru the cab steps. Really pleased the way these etches turned out. Still to do the sandbox operating gear - which is included in the chassis etch.

View attachment 251614

And a quick photo showing the sandboxes soldered in place. I just hope that I haven't been too enthusiastic with xurons in trimming the rear brake rod!
Coming together nicely and for once I'm on target to finish the build by Thursday evening, ready for cleaning on Friday and you can guess what happens to the dinning room on Saturday.

Stay safe

Mike.
Hello Mike,
I've been following the Pannier Tank build with interest, as I'm hoping to get back into some kit construction soon.
I was also at the NMRS open day on Saturday and couldn't agree more, what a friendly, welcoming and inspirational event! Our paths must have crossed at some point, as I was there for most of the day. I was the one who brought a micro layout (7mm NG, bare baseboard) in and popped it on one of the tables opposite the club's Abergavenny layout later in the day.
Cheers,
Simon.
 

Mike Garwood

Western Thunderer
Getting close to the end now...

GWR 16xx WM build begins 13.jpg

Steps (glued), steam and vac pipes and couplings in place.

GWR 16xx WM build begins 14.jpg

Rear part of the bunker and coupling added, steam and vac pipes in the morning.

GWR 16xx WM build begins 15.jpg

Sandbox operating mech added, still to do the other side. The other side is a breeze to fit...if that's not the kiss of death I don't know what is! I've also added more filler to the smoke box top and this will need smoothing out once its dry. So, still on target for cleaning Friday. The final job for tomorrow will be the handrail, dreading that.

Stay safe

Mike.
 
Top