29. Steps and Drain Cocks.
Once again we’re back to the fiddling bits, the things you shouldn’t put off or they’ll never get done. As an early version of an early kit, I think that’s right, the model was a tad spartan in the cylinder drain cock department. As always, more captions with the pictures:

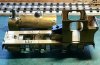
I was fortunate in having 4 spare drain cocks amongst my box of unused castings. It was simply a matter of marking out where to drill the locating holes. This was under the cylinder along the centre line of the end cover plate, the kit is designed to have the slide bars set further out to accommodate the crank pins with Finescale tolerances, and spaced apart by the drain cock operating bar. I tied a piece of white cotton, about 6 inches, to each drain cock before removing it from the sprue. This will give you a sporting chance if finding it before the carpet monster eats it. I tinned the spigot with an atomic sized piece of solder, flux on the hole, and press in with a hot soldering iron pressing on the drain cocks flange. Repeat three times.
Remove the drain cock operating bar, a spot of flux where it touches each cock and the bottom of the cylinder wrapper and make each joint with a dot of solder on your hot iron.

A minor disaster with fitting the first step, I mistakenly thought that I could solder it with my normal 145’. In this I was reasonably successful or so iI thought but the heat had allowed the bottom slide bar to move undoing all my work on free movement of the cross head. I then had to adjust the slide bar and, you’ve guessed it, the carefully positioned step fell off!
Ok then, low melt it is. Low melt solder won’t stick to brass or nickel silver but will stick to solder. You have to put no more than a stain of ordinary solder where you want to place the step, I then put a blob of low melt flux on the “solder stain” where the step is to be positioned, position the step, cut off a minute slither of low melt solder and touch the solder with my normal iron for literally 1 second. If it doesn’t melt try again for another second. The solder will melt and be sucked under the step by the flux. At 70’ the low melt didn’t disturb the 145’ holding the slide bars. It will take about 10 seconds to set so be patient. The molten solder is shiny and turns dull as it sets. Another snag is that the steps are horizontal and the bracket is slightly off vertical. You can allow for this with the angle where the step fits to the slide bar support bracket. The right hand bracket had only one stop.

While the left hand side had two. I must remember not to use really hot water when I clean up the model.


.jpg")


") . I hope they don’t delete mine, I have too much to move.
. I hope they don’t delete mine, I have too much to move.


.jpg")


 ) is there one in particular that you use? Enjoying the thread, it’s always interesting to see different build methods being used.