53. Fitting the Crossheads.
The first job is to reduce the thickness of the Slater’s crank pin bushes to suit the width of the conrod bosses. I’ve described this earlier when fitting the coupling rods. I’ve found, more by luck than judgement, that 10 thou play works well so I place the bearing flange down. A piece of 10 thou plasticard with a hole to just clear the bearing is placed on top and the conrod, face down, on top of the plasticard. The excess bearing is then filed flush to the conrod, the back taking any marks not the front. The 10 thou plasticard packing will give you the necessary clearance on the bearing.
For the small end/cross head I tap a 12 BA thread and fit a brass 12 BA screw. Snip the head off the back and solder the screw in the conrod, filing the remains flush with the back of the conrod. After cleaning up the recess for the conrod, slide the cross head into place. Fit the screw/small end through the cross head and place the nut tightening just a couple of threads so that it will all flop about. Remove the nut and washer from the centre wheel and fit the shortened bearing. Slip the conrod over the bearing and refit the washer and nut. Tighten the wheel nut and tighten the cross head nut but slacken only this nut by 1 flat. Test run the assembly to see where it may need adjustment. You may need to dismantle and reassemble this several times to make adjustments. I often find the conrod needs to be bent out slightly from the wheel, balancing this the other way behind the cross head and a small amount of slide bar may need to be removed between the slide bar supports to clear the rod at 12 and 6 o’clock. Remember that this assembly does absolutely nothing for the performance of the model and is purely decorative so there should be ZERO resistance! On final assembly place a small amount of oil on the conrod screw to lubricate the small end.
When you are satisfied with the adjustments, remove the small end nut and place a small piece of paper with a slit to withdraw it around the thread. Apply a minute amount of thread lock with a cocktail stick on the thread and replace the nut, tighten the nut until it touches the paper. Remove the paper which hopefully has stopped any thread lock getting onto the cross head. Tighten the nut and slacken by 1 flat. Leave for an hour for the thread lock to dry. When the assembly runs the nut should pivot very slightly with the conrod. Don’t forget to oil the big end on the wheel, slide bars and the piston rod where it passes through the cylinder. Just like the real thing, with apologies to Pete Waterman.

The L/H side was assembled first then the R/H side was started. The same method was used but problems were encountered gaining clearance behind the vacuum pump. I made a substantial bend to the conrod approximately half way along instead of at the boss and packed the small end inwards by fitting a 12 BA washer between the conrod and the cross head. I still needed to remove about 1mm from the inside lower rear of the vacuum pump.

The cross head vacuum pump piston rod bracket, now that’s a mouthful, needs to be fitted and permanent fixture will prevent the cross head from being removed at any time in the future. The method I used on 29 which proved to be successful is to attach it to the cross head with thread lock. When you’re happy with any adjustments, place a few dots of thread lock on the face of the cross head and slip the bracket over the thread and tighten the nut to hold it in place. Leave an hour to cure then remove the nut and repeat the process with the paper mask. If the assembly ever needs to be dismantled, a scalpel blade should separate them.
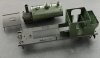
2195 CWM MAWR newly assembled motion. - YouTube
A short video of the motion.
The only thing to complete the build is the vacuum pump piston rod. Hopefully!


.PNG")