Side Lines LMS Coaches and Haywood GWR Coaches

Focalplane

Western Thunderer
This morning I sent an email to the company and just got a response that the server cannot be found. My last email exchange offered some hope that more cases might be made once the company closed down for retirement. It would appear that won’t be happening, which is indeed sad.
 

Focalplane

Western Thunderer
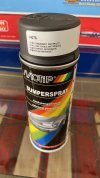
I managed to source one can of MOTIP brand bumper spray in anthracite to bring back. A very useful colour for coach roofs but also anything that can start out with a dark grey base. It is reliable and quite good value. 24 hour dry time recommended.

45238CC3-425E-4BFB-B80C-5A6EF700353C.jpeg
(No connection!)
 
Last edited:

Focalplane

Western Thunderer
The coach case and various additional boxes of coach bits are loaded for the journey north. I know this project is going to meet competition on arrival as the lawns need mowing, etc. I also need to organize a spray booth that will cope with 7mm scale coaches and various Riley car parts. I have the respiratory gear ready, just need a good extraction system and larger turntable. Also some good dry weather would be nice!

I have found some HMRS transfer sheets and they may save me some expenses. We’ll see. Other than that, a visit to Alton Model Shop is in order to buy more supplies, for the coaches mostly paint.

Off the radar screen for a few days!
 

Focalplane

Western Thunderer
I have resumed work on the Side Lines coaches today, setting up a workbench in the Motor House. The second bogie for the Period I brake third has been completed and will receive primer tomorrow, then both bogies will be sprayed satin black. This coach is in plain crimson and won’t be lined, so it may well be the first of the batch to be finished, with glazing, couplers and corridor connectors. That should spur me on to get the others done. The plan is to return all of them to Moor Street in September.
 

Focalplane

Western Thunderer
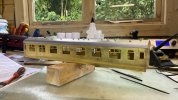
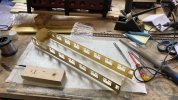
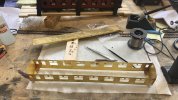
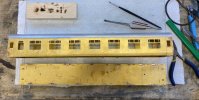
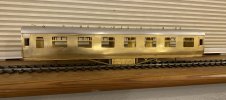
i started a Side Lines D1999 Open Third this morning. Most of the etched parts have been prepared (including tumblehomes) while the basic floor and sides/ends have now been soldered up. Not bad for a few hours work.

EE08BF5B-3DCB-40A4-80B0-A2446FE86AAF.jpeg

68066697-DC22-4D6E-BB22-A45C93F6F6BD.jpeg

I hope to keep working on this kit and take regular photos. I am following Malcolm’s instructions as close as I can.

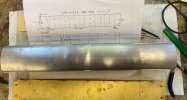
The next step will be to cut and trim the aluminium roof section and bond it to the sides/ends.
 

Focalplane

Western Thunderer
The larger parts of the kit absorb a lot of heat when being soldered and I find a gas torch to be essential for getting strong joins. An 80 watt iron works well but a gas torch is well worth having and makes the basic “box” a lot stronger.
 

simond

Western Thunderer
Paul

If you can find one, try a bigger, heavier bit on the iron

I have an old 80W iron with a bit about 50mm long x 10 dia, with a wedge end and it is pretty good for coaches - the Ersa is nominally the same power but lower heat capacity

Atb
Simon
 

Focalplane

Western Thunderer
I agree with you, Simon. The Ersa is a great soldering tool but larger bits won’t transfer the heat like an old iron. I use the gas torch a lot on other projects (the brass water tank for Moor Street as an example) and they can be a lot less expensive from a kitchen shop.

There is also something satisfying about seeing fluid solder run along a join. Hint, don’t try to do the whole join at once!
 

Focalplane

Western Thunderer
The roof section is an aluminium extrusion that comes with all Side Lines’ kits. It is not a perfect representation but it does make construction easier. It has to be glued in place and I prefer using CA glue, Roket Max being my choice. Fitting the roof requires some fettling of the coach ends and also the removal of some material at each corner of the roof. I use a chop saw capable of cutting aluminium to get a square trim. Otherwise it’s hacksaw time.

The kit comes with a template for drilling holes for ventilators, water fillers and grab rails. These are best drilled once the roof is glued down and the body screwed to the coach floor. Again the fittings need to be glued in place.

0E8C9066-EF2D-47FC-954A-286947508BE5.jpeg

10691207-9541-4BC5-826E-95DE20E64484.jpeg
 

Focalplane

Western Thunderer
The roof has been glued on and holes drilled. Yesterday was busy on other things so the CA glue had time to cure. The roof fittings are being applied this morning and if possible I can turn my attention to the under frame components while the roof fittings set and cure in place.

One departure from the kit that many people make is to substitute brass angle for some of the etches supplied. This makes for a stronger and more accurate assembly.

Another suggestion that can be made at this point is to start on the bogie construction. This is (in my opinion) the least enjoyable part of the build so is best not left to the end.
 

Focalplane

Western Thunderer
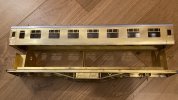
I have attached the queen posts and sole bars to the underside of the floor, making sure the queen posts are straight and soldered to both floor and sole bars. The next step is to test fit the floor to the body and line up the buffer plates.
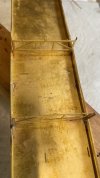
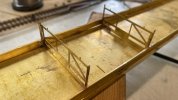
ED53C2F5-9629-4AD9-BFCE-33E7A5ED0100.jpeg1689D46F-6F6E-468A-8E5B-AE49DB527EBB.jpeg

The model is starting to take shape

4B6724EE-6AB9-4EE8-AC47-AA2C24CFB012.jpeg

One important reminder in the instructions - keep checking the body and floor are the right way round! This applies to brake ends but also in this case both toilets are at one end of the coach. An easy mistake to make when fitting the roof as well, water tanks are always associated with toilets.

The tumblehome on the sides makes the body a tight fit over the floor. It is therefore important to let the glue cure fully before attempting to put the body over the floor uprights as it is easy to undo the bond. (I know from experience). EDIT: It has happened again on one side.

Malcolm suggests fitting any lengthwise partition, such as in a corridor coach before continuing with the underfloor fittings. In the case of an open third I will leave the interior until later as it could get damaged.
 
Last edited:

simond

Western Thunderer
Paul

are you sure that CA is the right way to go for an alu-brass bond?

I think I'd be thinking of PU or epoxy. I don't have a great deal of experience with PU but it seems very effective, and slightly flexible, or at least, "not brittle".
 

Focalplane

Western Thunderer
I haven’t had a problem with Roket Max before but this coach seems to be “narrower” over the floor possibly because the tumblehomes are slightly over done away from the coach ends. Once finally in place there should be no stress on the bond between roof and sides.
 

simond

Western Thunderer
Hi Ozzy,

PolyUrethane, eg Gorilla glue. Very effective stuff, in my somewhat limited experience. I’d note that the H&S recommendations for using it at work are somewhat onerous.


interestingly, the second link is very enthusiastic about cyanoacrylate glues, as well as acrylics.

Paul,

brass & ally don't have the same coefficients of expansion! About 10-15% difference. I guess it’s only 18” or so long, but don’t leave it out in the sun!

cheers
Simon
 

Focalplane

Western Thunderer
Before I start on the bogies, a comment from experience. The holes into which the brake blocks are soldered need to be opened out to take the brass fittings. Do this before cutting out and folding the etches! Soldering the brake blocks is still not the easiest job but this advice makes things a bit easier.

I don't compensate the bogies, an option within the instructions. With decent track laying these coaches move very nicely without compensation. The one coach I have which Malcom Binns built himself isn't compensated, so I followed suit. Six wheel bogies might need some adjustment but I don't have any.

The buffers are sprung in a neat design using piano wire. Malcom suggests the same spring design can incorporate the coupler but as I use sprung couplers anyway I just adopt the design for the buffers. Using a cast guide to drill holes in the buffer's shank is a help as it allows about 2mm of movement on each buffer. Drilling the holes requires patience and a good drill bit. I hope to be working on all this in about a week's time so I'll show some photos then.
 

Focalplane

Western Thunderer
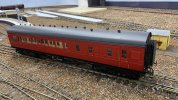
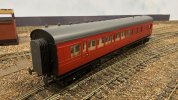
Now back in the railway room, France, I have been focussing on scenic matters but today I completed a Side Lines coach that was never on my original Midlander list. The Period I brake third was an unmade kit I bought from LarryG a few years ago when he decided to revert to modelling 4mm scale. Unlike my Period III rake, this coach has “old character” and was an interesting build. I painted it unlined crimson to match the GWR B sets for no other reason than it makes up a nice three suburban coach set that was typical of the shorter trains needed in the post war years. Let’s just say the coach was borrowed from the adjacent region of British Railways. Although a corridor coach each compartment had its own door, so it works quite well as a suburban coach.

Here are a couple of photos.

EB8BF0FF-2D60-4762-B2E3-ACCF5AD0C7F9.jpeg

A367F563-D336-44B9-8D8E-D6A154108234.jpeg

No number yet but otherwise a working model.

I will probably continue work on the D1999 Open Third coach next but will also consider completion of the Kitchen Car in between other priorities.
 
Last edited:
Top