Scenery & Dioramas

Podartist79

Western Thunderer
Interesting (and attractive) curvature to the cabinet front!
What scale reduction front-to-back have you used?
Thank you.
I’ve just edited the previous text as a result of your question.
There’s no mathematical rule as such, the reduction has been done by eye.
The buildings are 2mm scale, but as they recede the furthest has been put slightly lower in the scene with foliage added in front to suggest yet more distance.
Behind that building, it’s difficult to allude to what scale the trees and hills are. Essentially less than 2mm scale I guess.
Hope that’s useful.
Neil.
 

jonte

Western Thunderer
A real spectacle, Neil, beautifully presented. Congrats to all.

May I make mention of the backscene, which I’m guessing has been muted?

I’ve always been of the (humble) opinion that whether a traditional painted backscene is used or the latter photo type, the contrast between model and backscene is too stark and becomes a distraction, although the placement of a barrier say of trees can help reduce the effect. To that end, I’ve been considering using an acrylic varnish applied via a spray can to help tone things down a tad, or in my case, thinned Matt white paint applied via an airbrush. I’ve not used an aerosol for the process so can’t vouch, but if using an airbrush with thinned paint, it’s best done on the ‘flat’ to reduce the risk of ‘run’, or at least I’ve found.

I’d be interested to learn whether this method was used here.

Many thanks for sharing.

Jon
 

Tim Watson

Western Thunderer
Merging trees into a backscene is always difficult. A very skilled US modeller, Tom Knapp, photographs his model trees in situ and then uses a muted printed version behind the 3D versions on the backscene to take them into the distance.
IMG_8873.jpg
This is representing a Colorado logging line in Nn3, hence the gin-clear sky.

I think another consideration is to light up the sky itself to make it more dramatic, which also back-illuminates the layout. We do this on CF, but it is a rather larger scene.

Tim
 

Podartist79

Western Thunderer
A real spectacle, Neil, beautifully presented. Congrats to all.

May I make mention of the backscene, which I’m guessing has been muted?

I’ve always been of the (humble) opinion that whether a traditional painted backscene is used or the latter photo type, the contrast between model and backscene is too stark and becomes a distraction, although the placement of a barrier say of trees can help reduce the effect. To that end, I’ve been considering using an acrylic varnish applied via a spray can to help tone things down a tad, or in my case, thinned Matt white paint applied via an airbrush. I’ve not used an aerosol for the process so can’t vouch, but if using an airbrush with thinned paint, it’s best done on the ‘flat’ to reduce the risk of ‘run’, or at least I’ve found.

I’d be interested to learn whether this method was used here.

Many thanks for sharing.

Jon
Evening Jon,
Couldn’t agree more with your view on backscenes. Often they can be too stark/heavily contrasted - more so - the photographic variety.
The benefit with a painted scene as ours is, is you can adjust the colours whilst painting/after you’ve painted them. That’s what Paul’s done here.
So it’s not been lightened as you suggest with your technique, the distant quality has been generated through the painting phase.
However, your technique is a sound way of undertaking a similar look to the backscene.
Hope that’s helpful?
Neil.
 

Podartist79

Western Thunderer
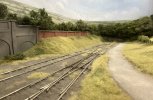
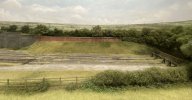
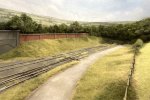
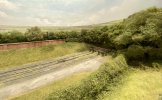
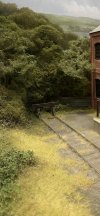
A project that I was involved with, some time back now, was ‘Weekend Yard’; the Gauge O Guild ‘Build a layout in a weekend’, a collaborative project. It took place during the GOG Guildex event Stafford.
It required finishing after the event in time for the Warley Model Railway Show, where it was to be displayed on the GOG stand. I took it on to push it to a conclusion, which entailed finishing the scenic work - that was my part of the collaboration anyway.
Posted here are the results of my scenic work.
Backscene - Paul Bambrick (Bambrick Studio)
Track and electrics (at Guildex) - Nige Smith and Kevin Wilson
*Check out the project on the GOG to find out more regarding suppliers, etc
IMG_6360.jpeg
IMG_6352.jpegIMG_6357.jpegIMG_6350.jpegIMG_6362.jpeg
 
Last edited:

Podartist79

Western Thunderer
Thank you All for the kind comments.

You’re absolutely right Tim! I ran out of time. Kevin Cartwright (who kindly collected it) had to prize it off me, haha!
 

Podartist79

Western Thunderer
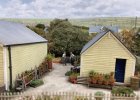
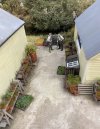
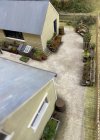
Just completed before Christmas, this plant nursery in 7mm scale.
The buildings, plant stands, crates and pots were produced by Monks Gate Models (buildings painted by MGM).
The figures Modelu painted by me.
I was also responsible for the ground surfaces, all the flora in the scene and the hand painting of all the plant stands, crates, pots and so forth.
A real pleasure to undertake - especially being a keen gardener myself.
IMG_6612.jpegIMG_6614.jpegIMG_6564.jpeg
 

jonte

Western Thunderer
Indeed Keith , i was going to ask Neil how the gravel finish was achieved.
There are several ways of achieving, what follows are three of the most popular methods:

1. Stippling using a short bristled brush;
2. Sponge (either hand held or clamped between tweezers;
3. Salt method.

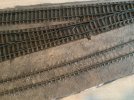
Although a smaller area than that shown in the photos above, this was achieved using the latter of the three,and several different shades of a similar colour:

IMG_1762.jpeg

It’s shown lighter than in real life.

jonte
 

Podartist79

Western Thunderer
Indeed Keith , i was going to ask Neil how the gravel finish was achieved.
Hi Paul,
It’s fine Chinchilla grit used over PVA, sprinkled through a stocking.
I try and make sure the glue isn’t too even, I make it patchy then that’s reflected in the chinchilla layer.
Various thin colour washes were used over the top.
Hope that’s helpful.
 
Last edited:

Podartist79

Western Thunderer
There are several ways of achieving, what follows are three of the most popular methods:

1. Stippling using a short bristled brush;
2. Sponge (either hand held or clamped between tweezers;
3. Salt method.

Although a smaller area than that shown in the photos above, this was achieved using the latter of the three,and several different shades of a similar colour:

View attachment 204967

It’s shown lighter than in real life.

jonte
Really interesting methods Jonte.
Thanks for posting.
 

simond

Western Thunderer
I keep reading about ”Chinchilla dust/grit” and went out to buy some to play with, and found it to be rather expensive sand. I presume this is something different?

if so, what? and do we have a brand or preferred source?
 
Top