Mike G's Workspace.

Mike Garwood

Western Thunderer
It's been a very busy few days, Grandparent duties and Mother's day, in between hours of non interrupted modeling.

Got the Mink D finished, but regrettably the weathering has been pushed to one side - again - as there's only so much you can do in the allotted time. The Mink also needs further attention...but this is where I am.

GWR Mink D 4.jpg

Honestly, the roof is way darker than these photos show.

GWR Mink D 5.jpg

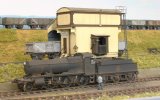
Work on the 94xx has been the main theme, for the last few days and I'm nearing the end of the chassis build. The parts you see in this picture have now been added and foolishly I'd thought I was done...until I remembered the brakes! So those will be attached in the morning. This will be followed by some grotesque butchery.

GWR 94xx 3.jpg
As you can see the bearings are locked into the chassis and the only way to get them out is to cut out the springs. Bear in mind that there are springs in the kit that go immediately behind these and these will act as the 'keepers' for the bearings once the wheels have been slipped onto the axles.

It's been a fun build, it all fits - as usual. There are some challenging bits with clearances. The compensation beams need to be spot (in width) on to allow the dummy ash pan details to fit, if you're going to build one of these - you have been warned!

In other news, my 3D printer is going great guns, so far it's produced Pokemon, a poke ball, Star Trek vessels (including 3 variants of the Enterprise) and an absolute belter of a model of the Prometheus ship. You'll notice the sad lack of railway track. That's because Grandchildren are giving orders...bless'em. Soon have it to myself. :) I have to say I'm well impressed with it. That doesn't mean I have not had failures!

Stay safe

Mike.
 

Mike Garwood

Western Thunderer
Quick update on the 94xx...

Wheels are on. Ultrascale...

GWR 94xx 4.jpg
GWR 94xx 5.jpg

No problems in putting the wheels on their axles. Once the coupling rods had gone on - which had to be further opened to 1.66 mm, I opted to use a 1.7mm drill bit). Gave it a push and I have a rolling chassis. RESULT! :) :)It's a little stiff, but with some oil that should pass. I did have to file down the width of the bosses so that the locking nuts would take hold.
Now begins the really hard work, taking apart the Bachmann model, drilling out the splasher sides and grinding away some of the footplate.

So this is how the wheels were placed on their axles...

This all hinges on the fact that the bearings are removed from the chassis.

Some years back Exactoscale brought out their own wheel system for engine, wagons and coaches. It was a small range of wheels and never covered the companies wheels that I was interested in. However, they did produce some useful back to back gauges that could be used. One was a big block of metal, that would accommodate the largest of wheels. Originally, the gap in the block was quite narrow. This has now been opened out to allow the boss on the back of Gibson wheels to fit. Why am I using this? The sides of the slab are completely parallel to each other, this will allow virtually all of the circumference of the wheel to sit flat against the gauge. In theory this will allow the wheel and axle to sit squarely with each other...and to date this has been my experience, no more wobbles! In a 6 wheeled chassis, this means that 2 axles can be mounted this way and the gear bearing axle has to be completed conventionally. I have been working on a system were even the gear axle will be able to adopt this 'other' method.

A picture is worth far more than words;

Wheel mounting.jpg

I haven't got any further with this since the weekend, as the dreaded spring lurghy has struck. Fortunately, I'm not on my own with this, as Mrs G has decided to become a dying duck as well.

Stay safe

Mike.
 

Mike Garwood

Western Thunderer
I should mention a little problem with the Ultrascale wheels. As most will know, you screw in the crank pins from the back of the wheel. I actually had a crank pin in my set of wheels that literally passed thru the hole! As soon as I put the screw driver onto the crank pin it went straight home. Fortunately, years ago I purchased sets of the crankpins for such an occasion...glad I actually had the for sight to do this, or there would have been another hold up. First time I've ever experienced anything like this in the 30 odd years I've using these wheels.

Cabside plates have been ordered from Fox 9437 from Neath (87A). Having been tied up with Grandparenting duties most of this week and Ben's third birthday yesterday, I was up early (ish) to get the house chores done and get some time at the bench.

I have to admit to have been putting this operation off for a while. That job being, taking the instruments of death to a perfectly good model and making the space for the P4 wheels to work. Most of the Bachmann 94xx is made from Mezak. Which is great, weight and strength combined.
First, a couple of measurements :
Width across the splashers - 21.3 mm
Width of a P4 axle - 22.9
That means removing 0.8mm of material (each side) to get the axles to fit, plus another 0.75/1.0 mm for side play. I think I'm being a bit mean with this. Out with the Dremell and add the grinding tool, of which, I have several sizes and shapes. I thought I'd start with the cone shaped one and then move up to something a bit more heavy duty later, once I'd got going and got a feel for how soft or hard this stuff was going to be. Fairly soft as it turns out. In post 913, Jeremy Good points out that he removed the sides of the splashers and replaced them with plastic card. I thought I'd try and keep the sides and see just how far I could push the grinding before holes appeared and in between passes... check the width.
I ended up with an overall width of 25.1 mm on all 3 axles, this means I have sideplay allowance of 1.1 mm. Is that enough? Short answer, I don't know.

GWR 94xx 6.jpg

On the 16xx, I had less than this and that little beast now runs like a Swiss watch on my plank and goes thru the turnout from Hell without problem. One little tip was given me a few weeks ago, which may be helpful to others who have to carve whitemetal or Mezak and that is to cover the exposed area with nail polish. Not the French red that Mrs G is so fond of, but black, my wife informs me that matte colours are available. First time in 40 years of marriage she's actually given me useful advice - to do with my hobby! I've had lots of advice on other topics :oops: .
The time taken for the job was way less than I expected and the mess wasn't as bad as it was with the 16xx.

So this is where I am now. And no that's not how the chassis sits, that's me being lazy by not pushing it into place before taking the photo!

GWR 94xx 7.jpg

All I need now is for Mrs G 'friends' to convene a meeting that has her out the house for at least 3 hours so I can get the chassis into primer. I've already run in the gearbox and motor. And yes I did have to bush the third drive to stop it from slipping out of gear. But you're never going to see a photo of that as it's a bodgy bodge job. It can be removed, but it actually works well.
As soon as the chassis has gone into primer I can mount the wheels and solder in the retaining springs. Then work out how I'm going to fix in the pick-ups...joy.

Stay safe

Mike.
 

Mike Garwood

Western Thunderer
So while I wait for Mrs G to leave the premises to get the 94xx chassis into primer...I had a good think about what I should do next. As with most modelers, theres shelves full of models all vying for attention. The one I choose is a pedigree kit...

Next project.jpg

Unfortunately, this kit does not cover the 63xx variant - which is the one I need. So I'm having to design the cabsides, cab roof and lots of other stuff. This is likely to be a long project.
Having looked at the etches the one thing that stands out is that only the 2 front drivers are compensated and the third driving axle is fixed. So I decided to go CSB. Fortunately the plot for the anchors are available on the CLAG website. (Central London Area Group - one of the Scale4 groups). Their website is full of some really cracking modeling and advice on a load of topics.
Using the High Level jig I marked out one of the frames, then soldered them together and the drilled the 4 locations.

GWR 63xx frames1.jpg

You might notice that there are 2 holes close together...I was holding the frames when I must have slipped as the drill went down, hence a second hole in the right place - I shall fill the lower one in due course. I have my last packet of Markits handrail knobs - anyone know if we are likely to see this business rise from the ashes?
Anyway, that's where I'm at.

I did go to Barrow Road yesterday, and a successful day has been had. The 16xx showed some real promise and my reluctant 56xx (5625) showed where the problems were...which I spent today fixing. The Mink D ran without fault. Thank you Robin.
On returning home I went down to the Newport club, in the evening, to run both engines. The 16xx was superb running the whole layout (being made for the S4 jubillee - this September) and showed up a tight point (we couldn't get the jig to fit, it was that tight). The 56xx just showed the same problems that it had manifested at BR.

And in other news...my Britannia is going on it's holidays. Mr Gilbert has taken it hostage and taking it North to run on some foreign metals, hopefully I shall have some video to share on his return.

Stay safe

Mike.
 

Mike Garwood

Western Thunderer
Hi John
The main difference is the cab sides and roof. The cab side has the window, but is the same width as the original cab sides. Firebox, boiler and smoke box remained the same. There may be slight alteration needed to the splashers to hide the vacuum pump on the R/H side. TBH I have not given the body etches a detailed examination.
This must be an old kit as the rods don’t allow for proto jointing/ knuckling.
Hope you and Steph are keeping well. How’s Worcester coming along?

Regards

Mike

After discussion with people who have a better concept of english - it appears that 6361 does not have cab windows. Thank you Justin, Morgan and John for pointing out my folly and saving me a lot of work...even though I've already drawn the new cab side!
 
Last edited:

Johndarch

Member
Hi John
The main difference is the cab sides and roof. The cab side has the window, but is the same width as the original cab sides. Firebox, boiler and smoke box remained the same. There may be slight alteration needed to the splashers to hide the vacuum pump on the R/H side. TBH I have not given the body etches a detailed examination.
This must be an old kit as the rods don’t allow for proto jointing/ knuckling.
Hope you and Steph are keeping well. How’s Worcester coming along?

Regards

Mike

After discussion with people who have a better concept of english - it appears that 6361 does not have cab windows. Thank you Justin, Morgan and John for pointing out my folly and saving me a lot of work...even though I've already drawn the new cab side!
You are most welcome Mike. Nothing much happening on Worseter, I'm afraid but Steph and myself are fine.
 

ullypug

Western Thunderer
Good luck with the mogul.
I had to set the cylinders slightly out in order to keep clearances etc but did use CSBs without any issues.
I did do a blow by blow build on my RMWeb blog but don’t think the photos survived the great outage
IMG_0437.jpegIMG_0945.jpegIMG_1024.jpegIMG_1025.jpeg
 
Last edited:

Mike Garwood

Western Thunderer

ullypug

Western Thunderer
What a great engine!! Did you put the cosmetic sides onto the chassis?

How’s the new building going?

Mike
Thanks. Built it exactly as per the Mitchell instructions so yes if it said so!

We’re 3 weeks into the build and it’s getting very exciting!
Andrew
 

AJC

Western Thunderer
Oh, I've got one of those (which I've only repaired and repainted - Roger Lycett-Smith built it), in EM - the instructions give good guidance on how to manage clearances:

churchward_mogul_006-jpg.187379


Adam
 

Mike Garwood

Western Thunderer
First an update on the mogul...the anchor points are in. The red box has been deployed, and the coupling rods fit the axle spacing given by the frames, so there's a good chance this will run. And that's as far as I've got.

The 94xx however, is a different story. Wheels are in, holding springs have been soldered into place (and the compensation still works), pick ups are in, balance weights have been glued in.
I did have an exciting moment with putting the wheels into the chassis...Having turned the chassis over to put the wheels in, I found the the first set of wheels had gone tight in their bearings and didn't move. I put the second set in and the same thing...I admit to being really puzzled, until the penny dropped. Left becomes right once turned over...DOH! Out with the 2 set of wheels, turn them round and no more stickiness. No fool like an old fool.

Today saw the coupling rods go into the chassis and tightened up, I also strengthened the basis of the pick ups. So they don't flop about.

GWR 94xx 9.jpg

GWR 94xx 10.jpg

Jobs left to do, renumbering, gluing the small pieces back to the body - including the rear sandboxes - some real coal in the bunker, fit the cab doors and fit the decoder.
Talking of which, once the Zimo MX 634 goes into this engine I shall be out of decoders. If you do have decoders in your engines what do you use? I texted Robin earlier today and he uses Zen decoders from Rails of Sheffield.
I do have to source a smokebox number, but that can wait a while. I hope tomorrow evening will see the beast with DCC capabilities and taken for a test run on the plank of death. And before I secure the chassis I need to restrain the motor and gearbox and I'm going to try and weather the chassis and wheels as well - just hope the high pollen count continues to block the sinuses of Mrs G once the airbrush gets going. Another job to the list...

Stay safe

Mike.
 

PeteT

Active Member
I'm very much sold on the motor control from Zimo decoders - very much my first choice.

Now being sold on sound - I had been skeptical for ages with the fact you only hear the loco, when in the real world the train is the overriding sound as it passes - but the fact you can properly use whistles etc does bring in a good opportunity for proper operation.

Some people prefer ESU for those, but there are also plenty of Zimo options for many prototypes.
 

James Spooner

Western Thunderer
I guess it is probably a case of each to his/her own. I have used a number of DCC Concepts decoders in a variety of locos (both converted RTR and kit built, usually with some form of Mashima) and never had any problem.

Nigel
 
Top