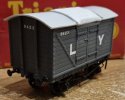
L&Y Dia.3 van
You are using an out of date browser. It may not display this or other websites correctly.
You should upgrade or use an alternative browser.
You should upgrade or use an alternative browser.
Liver & Fry's workbench
- Thread starter Liver & Fry
- Start date
Mario KESR
New Member
Hi. I always find this thread interesting. I was wondering if you brush or spray paint your models. If you do use a brush is there any brand or type you prefer? Regards Mario
Liver & Fry
Western Thunderer
Hi. I always find this thread interesting. I was wondering if you brush or spray paint your models. If you do use a brush is there any brand or type you prefer? Regards Mario
Hi Mario,
Thank you! I currently brush everything, although one day I intend to give spraying a go! I don't have a favoured brand as such, but I often pick up Revell Painta Luxus brushes for convenience as they are stocked in both my local model shop and the local branch of Hobbycraft. That said, I do like to pick up a flat brush if I know I'm painting a larger flat surface (such as a van side) and I tend to choose my brush style/size based on the job I need it for.
- James
Joe Keegan
Member
Hi JamesHi Mario,
Thank you! I currently brush everything, although one day I intend to give spraying a go! I don't have a favoured brand as such, but I often pick up Revell Painta Luxus brushes for convenience as they are stocked in both my local model shop and the local branch of Hobbycraft. That said, I do like to pick up a flat brush if I know I'm painting a larger flat surface (such as a van side) and I tend to choose my brush style/size based on the job I need it for.
- James
Would you be so kind to post a photo of the brushes that you use as a reference to the uneducated
Joe
Mario KESR
New Member
Thanks for the information. Regards Mario
Liver & Fry
Western Thunderer
Hi James
Would you be so kind to post a photo of the brushes that you use as a reference to the uneducated
Joe

The Revell ones have a triangular handle that is said to be more comfortable to work with - I've had no complaints and so am inclined to agree!
I also picked this set of three Tamiya brushes up recently and they cover a nice range of tasks, with a flat brush, a stubbier one and a thin detailing brush:

Hope this helps!
- James
L&Y Dia.3 van
Liver & Fry
Western Thunderer
Joe Keegan
Member
View attachment 231802
The Revell ones have a triangular handle that is said to be more comfortable to work with - I've had no complaints and so am inclined to agree!
I also picked this set of three Tamiya brushes up recently and they cover a nice range of tasks, with a flat brush, a stubbier one and a thin detailing brush:
Hi James
That’s great , a picture paints a thousand words if you excuse the pun
Thanks for sharing
Joe
L&Y Dia.3 van
Liver & Fry
Western Thunderer
I've been toying with the roof hatch on the Dia.3 this evening. This will, eventually, be sheeting over, but some prep work is required:
First of all, the battens around the edge were put in place. These were made from 1mm thick styrene rod.
On prototype photos of L&Y vans with this feature, it would appear that under the tarpaulin (?) sheet there is a ribbed effect (presumably battens attached to the material to keep its shape) and these were replicated with thin brass rod (size unknown, lost to time, but smaller than the styrene).
The roof has then been painted an off white:

I'm currently working on an appropriate medium to replicate the sheet with. On the recommendation of @Herb Garden I am trialing a colour catcher sheet. If this works, then it will be fixed in place and the final detailing can be added.
- James
First of all, the battens around the edge were put in place. These were made from 1mm thick styrene rod.
On prototype photos of L&Y vans with this feature, it would appear that under the tarpaulin (?) sheet there is a ribbed effect (presumably battens attached to the material to keep its shape) and these were replicated with thin brass rod (size unknown, lost to time, but smaller than the styrene).
The roof has then been painted an off white:

I'm currently working on an appropriate medium to replicate the sheet with. On the recommendation of @Herb Garden I am trialing a colour catcher sheet. If this works, then it will be fixed in place and the final detailing can be added.
- James
The main benefit of the triangular handle is the brush won’t roll off the table onto the floor.View attachment 231802
The Revell ones have a triangular handle that is said to be more comfortable to work with - I've had no complaints and so am inclined to agree!
I also picked this set of three Tamiya brushes up recently and they cover a nice range of tasks, with a flat brush, a stubbier one and a thin detailing brush:
View attachment 231803
Hope this helps!
- James
L&Y Dia.3 van
Liver & Fry
Western Thunderer
I'd argue the colour catcher sheet was a success, and so I took the liberty of fitting it, putting a thin layer of glue along the back and pinning the front under a plank glued across the top of the doors:


I need to look up where the numbering goes on these vans - some sources I've seen suggest the ends, whilst others suggest the sides. Once I've confirmed, I'll apply the lettering, with the final task being some handrails.
- James


I need to look up where the numbering goes on these vans - some sources I've seen suggest the ends, whilst others suggest the sides. Once I've confirmed, I'll apply the lettering, with the final task being some handrails.
- James
Liver & Fry
Western Thunderer
Michael Osborne
Western Thunderer
Liver & Fry
Western Thunderer
I am late to this thread so please forgive my butting in.
I have scratchbuilt one of these vans in S7. It is the early version with wide planks.
I have castings for several more L&Y wagons but having moved house very recently, all my modelling tools are packed away.View attachment 232057View attachment 232059
Not at all, that looks good!
- James
Herb Garden
Western Thunderer
It does.... Also to ensure they get saved before they are chucked in the bin you can hang the laundry out and win brownie points!I have the same ones in the kitchen here! I suspect a used one would work just as well.
L&Y Dia.3 van
Liver & Fry
Western Thunderer
We're close to the end now! Tonight has been spent lettering the Dia.3, although numbering is probably a more appropriate term given I needed to put the running number on both sides and both ends, vs the two L and Y transfers! I was struggling to find an appropriate number until I came across No.9423 which is (or at least was in 2012) "preserved" in Warwickshire. This pleased me greatly as it was only four digits long instead of the more common five digits seen on these vans and so would take less time!

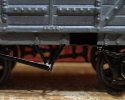
The tare still needs to be added to the solebar, but I decided to make some tweaks first, with the tare going on tomorrow when the solebar is dry; what I've done it repaint the top of the V hangers, from black to grey at solebar level (a previous mistake on my part) and I had some rectangular offcuts of brass from the brake lever etch, which I've applied and painted black to represent wagon plates (as I have no appropriate transfers, these will remain blank):

The aforementioned handrails will also go on tomorrow.
- James

The tare still needs to be added to the solebar, but I decided to make some tweaks first, with the tare going on tomorrow when the solebar is dry; what I've done it repaint the top of the V hangers, from black to grey at solebar level (a previous mistake on my part) and I had some rectangular offcuts of brass from the brake lever etch, which I've applied and painted black to represent wagon plates (as I have no appropriate transfers, these will remain blank):

The aforementioned handrails will also go on tomorrow.
- James
L&Y Dia.3 van
Liver & Fry
Western Thunderer
And we are done!
Tare and handrails have been added and so I am happy to call that complete. As I stated at the beginning, it may not be 100% accurate to a Dia.3, but I think the base model holds up well against the prototype it was meant to represent.
A big part of this project has been A) can you successfully rejuvenate and bring life back to a 60 year old model, creating something that holds up for relatively little cost? And B) can you have fun whilst doing so? I can confirm the latter, as I've wholly enjoyed seeing what I can do with this van. As for the former? Well, I'll let you decide:


- James
Tare and handrails have been added and so I am happy to call that complete. As I stated at the beginning, it may not be 100% accurate to a Dia.3, but I think the base model holds up well against the prototype it was meant to represent.
A big part of this project has been A) can you successfully rejuvenate and bring life back to a 60 year old model, creating something that holds up for relatively little cost? And B) can you have fun whilst doing so? I can confirm the latter, as I've wholly enjoyed seeing what I can do with this van. As for the former? Well, I'll let you decide:


- James
timbowales
Western Thunderer
Very credible effort, James. Definite upscaling of an old "toy"


