Gadgie’s workbench (EM)

BR standard brake vans

Gadgie

Western Thunderer
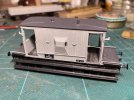
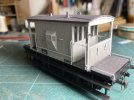
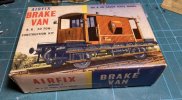
Regarding the Airfix brakevan in post #71 above, I note that you’ve shaved off the handrails and replaced the roof with a thinner plastikard one. Will you be glazing it?
Tim T
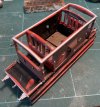
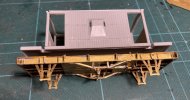
That is the plan. Following in the footsteps of Geoff Kent in vol 3 of The 4mm Wagon, I’ve filed a rebate in the back of the inner ends leaving a window bar and frame thickness of about 0.7 mm. It would have been nice to go a bit further, but the ends were becoming a bit fragile, and I decided to stop there. I’ll add glazing after paint, and probably glaze the duckets with Kristal Klear.

IMG_2735.jpeg

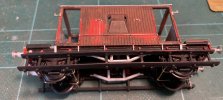
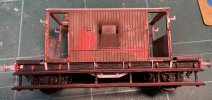
I’ve had a marathon session to fit handrails today. This one is going to be one of the early lots, with two part vertical handrails and horizontal end handrails that fit in between the two parts. These were awkward to fit and looked odd, because the handrails slanted inwards towards the ends. Eventually I found evidence that these handrails were actually kinked to run parallel to the concrete end weights, some from the photo collection of preserved vans on WT, and more of from this fabulous collection of photos and recollections on Flickr.

The rest of the van is almost ready for paint. Looking at these photos though, I realise I need to add the door safety rails.
IMG_2738.jpeg
IMG_2732.jpeg

Richard
 

Gadgie

Western Thunderer
It is nearly finished now. The roof is just perched on top for the time being. Once the transfers (Modelmaster) are dry I’ll apply some weathering, possibly based on this photo.

IMG_2745.jpeg

The glazing behind the inner ends was tricky to cut to the right size and fit. Eventually I realised it would be much easier to cut and fit three pieces, one behind each window, and so it proved. As mentioned above, the duckets were glazed with Krystal Kleer, much easier than faffing with small pieces of clear styrene sheet.

IMG_2746.jpeg

Now I need to get to a similar stage with this one.

IMG_2747.jpeg

Oh, and then there is this one too!

IMG_2748.jpeg

Richard

(Edited to correct autocorrect, which changed duckets to Dickey’s …:confused:)
 

Gadgie

Western Thunderer
The second brake van is progressing, with a flurry of handrails and other detailing. Just the guard’s safety bars to fit.

IMG_2841.jpeg

In other news, some NPCS items have started to appear. I picked up a Bachmann CCT cheaply at a Rails of Sheffield ‘rummage’ on Saturday. It’s a very nice model, easy to EM, but missing a detail pack that presumably includes brake yokes — Mainly Trains detailing etch to the rescue.

IMG_2842.jpeg

I have also dug out a very old Lima GUV, which is currently receiving new door furniture, needs some work on the chassis, and will have flush glazing, some replacement buffers and new bogies at some point.

IMG_2843.jpeg

To add to the fun I have also bought a coach kit.

IMG_2845.jpeg

I know there are perfectly good RTR Mk1 BGs out there, but finding a reasonably priced one in BR blue grey was proving difficult, and after all I do enjoy making stuff.

These slightly different models indicate a wind of change blowing through planet Gadgie. After 15 years or so of building locos and wagons for our 1960s (ish) model of South Pelaw, I’ve decided to build a model set in northwest Scotland in the early 1970s — Sulzers, blue grey coaches, grubby wagons, Formica, the lot. Lots of NPCS, and potential for mixed trains to boot. Not especially original I’ll admit, but the excellent Portchullin, Kinlochmore over on RMweb, and Ian Futers’ Lochside have all been strong inspirations, and the brilliant modelling showcased on the emgauge70s web pages has been nagging away for some time. I started train spotting just as TOPS re numbering was beginning, so this feels a very comfortable and familiar era, despite being a worryingly long time ago. I did think about making a move to P4 at the same time, but will probably stick with EM. Probably…

Richard


Edited to fix typo
 
Last edited:

Gadgie

Western Thunderer
At long last the brake vans are almost finished — they still need some lamps, and B951472 has its roof balanced on for now.

IMG_2966.jpeg

IMG_2963.jpeg

IMG_2965.jpeg

Can you guess which one has the Bradwell underframe?

Ducket glazing is Krystal Kleer, transfers are mostly Railtec — including the rather cool works plates — with some Modelmaster. Weathering used a cheap set of artists acrylics, formerly used by our kids for GCSE art, which dry dead matt and allow for quite a bit of subtle colour variation. I’m wondering if this could be an interesting way forward.

These two will be off up north for a turn round South Pelaw next weekend, when we’ll find out how well they run.

Richard
 

Gadgie

Western Thunderer
After a bit of a break for the usual work/family related reasons, I’ve started a batch of three Kitmaster/Airfix/Dapol tank wagons for my Ullapool project. I am imagining a light oils terminal similar to the one at Thurso, so class A tanks with Esso branding will be part of the traffic.

I know there are perfectly good Heljan models of these, but I am a citizen of Yorkshire and the kits are much cheaper, even with wheels, buffers (Dave Franks), and ladders/walkways (RT models). I considered Masokits etches for the chassis after reading Chas Levin’s thread, but eventually decided a plastic chassis would be the pragmatic approach.

I’ve extended the tank by 11mm STH the Geoff Kent approach of a 5.5mm disc stuck to each end then filed and sanded to shape, which resulted in a lot of mess but was otherwise quite effective.

IMG_3101.jpeg

There's much more fun to be had with the detailing etch, and underneath too, but here is the current state of affairs.

IMG_3100.jpeg

The cutest detailing part so far is the RT models hand wheel for the valve on top of the tank.

IMG_3102.jpeg

Hopefully some more progress will be made during the festive season. But we’ve got local Sheffield carols in our pub tonight (raucous singing, brass band, and locally brewed beer; what’s not to like!), so don’t expect an update anytime soon!

Richard
 
Top