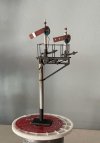
G.W.R. BLT: Almost there.

jonte

Western Thunderer
Hello Jon
Lovely work, as always. Your artistic eye very much to the fore. Marvellous mimicry in miniature :thumbs:

One negative; on my phone, your work is lost in the fussy background of the newspaper ;)

Cheers

Jan
You’ve sussed me, Jan: I find the ploy enhances the overall effect and masks the annoying hamfistedness of the real thing :mad:

There’s much I’d change if I did another, but at least it still moves - the bits I intend to move this time, thankfully :cool:

Actually, I need to invest in a digital camera as the iPhone and iPad seem to have lost their focus. In the meantime, my wife has just bought a brand new iPhone and her pictures seem acutely sharp, so perhaps therein lies the solution until Fr. Christmas lands. Worth a try and in any rate, can’t be worse than what I’ve served up so far. Fingers crossed :thumbs:

Many thanks once again, Jan, for your kind words.

Jon
 

simond

Western Thunderer
I find both ipad and iphone tend to get smeary fingerprints on the camera lens, easily sorted. My phone (8) is much better than the ipad which is a few years older now.

And I understand that if you take them motorcycling, and put them on a handlebar mount, the vibration messes up the camera, permanently.

of course, YMMV :)

Simon
 

jonte

Western Thunderer
Not a lot of progress of late as myriad other distractions have dictated, but at least the finials are on, with lamp brackets having been affixed to the remainder of the semaphores in the meantime:

8c6f7b7a-b2c0-4c08-beb8-5b5e832916e0.jpeg

Perhaps a window towards the end of next week will see the ladders and lamps attached, but other commitments will delay the motorisation for several weeks hence, as demands on time followed by eventual re-routing of some remaining wiring below boards before final siting, will have to be addressed first.

That’ll take me to approximately twelve months since I started the build.

jonte
 

jonte

Western Thunderer
There has been little time for modelling since my last; preliminary jobs around the home prior to commencement of building work (thankfully undertaken by contractors) in the new year, punctuated with the odd sojourn or two, has put all matters modelling on the back burner for the present, although I’m hoping to recommence within the next couple of weeks or so.

So, what’s the point of this post?

Well, whilst I look forward to the finish of the new build as mentioned, I’m afraid modelling in the home, as at present, will be curtailed; the prospect of spoiling yet another new item of furniture is beyond the pale for my long suffering other half. As my modelling den is almost full to the rafters with unfinished layouts, notwithstanding the proposed inclusion of yet another, the prospect of trying to squeeze in a modelling desk and sundry ancillaries, is yet another shining example of fruitlessly trying to squeeze the proverbial quart into a pint pot.

So, when my brother in law suggested partitioning off a section of garage for the purpose, I jumped at his offer.

Several lorry loads of timber and three days of hard graft (at least for me) have produced the following:

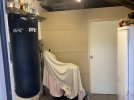
The view from the double doors of the garage:
IMG_1999.jpeg

The task was an ideal opportunity to off load twenty odd years of clutter (just a few more bits to dump), including the downsizing of gym equipment. The ‘bag’ remains and the squat stands - with a vastly decreased number of weights - will be returned to the allocated space for my gym, and sited just behind the bag adjacent to where the exercise bike lies covered. Hooks for the new chinning bar will be fixed to the longitudinal beam as one of the final tasks. We really do need to look after our joints in our old age, and my eventual return to footy after all these years is a spur to increasing my fitness.

Meanwhile, we’ve retained the space above the new workshop for storage as before.

The door and partitioned wall at the entrance to what will become the workshop:

IMG_1995.jpeg

The door from inside the workshop:

IMG_1996.jpeg

The wall where I will site my desk, which is currently the dining room table which I’ve ruined:

IMG_1997.jpeg

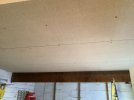
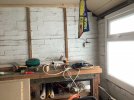
Looking towards the far wall and existing bench:
IMG_1998.jpeg

A couple of bricks will be required to bung up the wall, then the walls within can be whitewashed to brighten up the place.

Lighting will be addressed next and one or two batons attached to finish.

The false ceiling will prevent the dust fall to which the garage has been prone.

An oil-filled radiator (portable) I’ve had for many years will provide heating during inclement spells.

Finally, the existing brackets will be removed and new shelving added under the direction of my wife who is far more organised than I!

The existing bench I envisage will be used for soldering, much as it does at present.

At a guess, I’d estimate the footprint of the new workshop to be 9’x8’.

Cheers.

jonte
 

Pencarrow

Western Thunderer
Good effort that man, looks like a good man cave. Hope the building work goes well, enjoy the building dust that gets absolutely everywhere.
 

jonte

Western Thunderer
I can see the space above that ceiling being used for storage...
Indeed, Chris.

In the first of the five photos above, you might just be able to make out two of a set of three trestles from a previous layout, poking out above. They’re placed on a frame made for the purpose, which was replaced at the end of play yesterday.

Jon
 

jonte

Western Thunderer
Progress has been a case of fits n starts.

Work has stalled due to the lack of success in fitting the lamp and bracket to the inner (main) post. Seemingly umpteen attempts with different glues failing to bond has seen enthusiasm wane. As this is only the second semaphore I’ve built - and the first multi-post - I’ve been trying to work out the best order of assembly. This is one part oft the build where I’ve definitely cocked-up. Access to the bonding area of the inner post is limited ordinarily - although allowing a greater spacing twixt arm and blind this time round was a move intended to ease the issue - but in practice, was wholly compounded by the backing signal causing obstruction. Actually trying to keep the tiny lamp in place for the glue to set seemed nigh on impossible; the mating surfaces of both post and lamp are limited to say the least (on some of the others which are in different stages of assembly, I’ve fixed the bracket on first, for whatever difference it will make).

I returned to the job determined to sort it once and for all, and it was while preparing for this final test of endurance, I noticed that the hole in the in the lens penetrated the body of the lamp, which brought to mind an idea. If it didn’t work, I was just going to have to let it go.

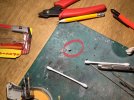
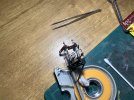
The solution was a scrap piece of signal wire placed through the hole and bent into an L shape. If nothing else, this would ease the placement:

IMG_2094.jpeg


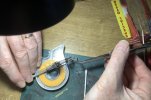
Super glue was carefully dispatched to the post with a cocktail stick, then the lamp lowered onto the post with tweezers:

IMG_2095.jpeg

After a couple of minutes I tried to ease the grip on the clamp type tweezers, but in doing so lost my grip…..

Take two, and it’s on; of sorts:

IMG_2096.jpeg

I’m afraid it’s the best I can do.

I’ll have to leave it there as collecting my granddaughter from nursery presently and minding her till Mum gets home, so that should give it until tomorrow to cure. If it comes off………..

Now I can at last drill the baseboard for fitting, relocate a number of under board wires that are in the way and finally wire up the motors.

jonte
 
Top