Dave's 4mm scale Industrial Loco Workshop.

Dave

Western Thunderer
Oh no!

You could try araldite to put it back together and some rod to line it up?
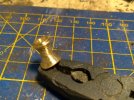
I tried that but with Loctite instead of Araldite. It actually worked and I managed to hand file the flare.
20240524_140450.jpg

It's a chimney, but not the right chimney. A forum member has very kindly offered to make me a proper one.
DSCF1003.JPG

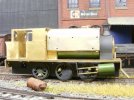
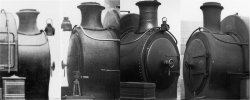
1814 had at least 3 chimneys in its life. Firstly the short one, then what appears to be a taller Manning Wardle chimney and finally a tall replacement that was its last and appears to have been fitted to either a new boiler or at least a new, welded, smokebox.
MW1814 chimneys2.jpg

The last but one photo, with the cylinders and slide bars on, ought to have come after this one.
20240521_141318.jpg
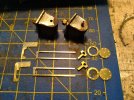
The cylinder ends and motion brackets are made from 18 thou. hard brass, the slide bars from 30 thou. nickel silver and the strange bits are the piston glands or whatever. The extra bit is there to give something to hold in pliers whilst filing them to be a good fit in the slide bars. It was sawn off after the part was soldered into the slide bars.

The slide bars are made overly long so that the part on the left sticks out beyond the motion bracket and keeps the bars to gauge until they are soldered into the motion bracket. The excess is then sawn off, leaving two bars soldered in and lined up.
 

Dave

Western Thunderer
The chassis works. I have attached wires to the motor in order to test it out. The next thing to do is to make and fit the brakes and then make and fit pickups. After that it's just about finished.
20240527_134529.jpg

I purchased various bits and pieces for it at Railex, yesterday - whistle, springs, hand rail pillars and buffers.

Jobs remaining on the bodywork are:

Fit chimney.
Finish detail and Install firebox/backhead into cab.
Make and fit cab roof, cab steps, sand boxes, reach rod, couplings.

Finish smokebox door and add hinges etc.

I will put it on the scales and see what it weighs. I estimate 250g.
 

Herb Garden

Western Thunderer
The chassis works. I have attached wires to the motor in order to test it out. The next thing to do is to make and fit the brakes and then make and fit pickups. After that it's just about finished.
View attachment 216289

I purchased various bits and pieces for it at Railex, yesterday - whistle, springs, hand rail pillars and buffers.

Jobs remaining on the bodywork are:

Fit chimney.
Finish detail and Install firebox/backhead into cab.
Make and fit cab roof, cab steps, sand boxes, reach rod, couplings.

Finish smokebox door and add hinges etc.

I will put it on the scales and see what it weighs. I estimate 250g.
Goodness Dave, you've been busy!

Awesome stuff!
 

Lyndhurstman

Western Thunderer
I need some help with this part.

I am attempting to make the chimney. I don't know much at all about making chimneys but I am aware that when starting with a brass bar it needs to have the curve of the smokebox put in using a fly cutter in a lathe. I have a very small Unimat lathe but not only am I not very experienced in using it, I don't have a fly cutter or a holder for the work. I came up with a bit of hillbilly engineering to hopefully get around this.
An interesting approach, and I’m sorry it didn’t work out. But huge credit for trying, As a fellow Unimat owner, and stymied by the stumbling block of the chimney flare, I’ve wondered off and on if it’s not possible to put the chimney blank in the tool post, and a range of diameters of milling cutters in the chuck.

Cheers

Jan
 

Lyndhurstman

Western Thunderer
You can certainly do that, this is a chimney blank having its base cut with 3/4” slot drill, albeit on Myford.
The advantage of a fly cutter is that the radius can be varied to suit the job in hand while Milling cutters only come in a finite range of sizes.
Ian.


View attachment 216369
Indeed. And I’d agree. But I’m all about using what’s to hand, these days (Needs Must, and all that..) and I’ve been lugging a bespoke selection of machine tools around the West of England waiting for an opportune moment :)

Cheers

Jan
 

Dave

Western Thunderer
An interesting approach, and I’m sorry it didn’t work out. But huge credit for trying, As a fellow Unimat owner, and stymied by the stumbling block of the chimney flare, I’ve wondered off and on if it’s not possible to put the chimney blank in the tool post, and a range of diameters of milling cutters in the chuck.

Cheers

Jan
I plan to make a fly cutter for the next scratchbuild, whenever that may be. I've got a length of 5/8ths steel bar for a start. Put a drill down the centre and tap threads in for a screw. Cross drill it to be able to slot a drill bit in, which will be held by the screw. The drill bit will be ground to become a cutter.

I had started to make my own leaf springs but I found some on the Branchlines stand, at Railex, that were just the right size, so that saved me the trouble.
20240529_172513.jpg
The tank bracket isn't yet fixed. I'll need to get the chimney fitted first so that I can file a curve in the bracket to fit around the chimney base.
The cab roof has been annealed and bent to shape but won't be soldered on until later.

The cab and tank on the prototype had lots of small rivets, too small to be able to put them into the metal in this scale, or at least my knowledge and skills won't allow it if it is in fact possible. I plan to use rivet transfers, which would be straightforward if the livery was to be one plain and unlined colour. It won't be lined as such but the tank and cab panels need to be edged in black and this edging is exactly where the rivets will be. I'm worried that if I put the rivet transfers on, paint over them and then apply masking tape to enable me to do the black edging, the tape may pull the rivets off. I don't have any experience of using rivet transfers so perhaps I'm just worrying about nothing?
 

Dave

Western Thunderer
Dave,

How were you planning to do this? I had a go on my last scratch build and made a right mess of it so I was wondering what your trick was?

George
Hi George,

I milled the top leaf with eyes and hangers and then milled the rest of the leaves as a separate part as the smallest cutter is 1mm dia. and wouldn't be able to go right in to where the leaves meet the hangers.
20240525_185623.jpg
That was the first and only attempt. With a bit of filing, and a covering of paint, the soldered joint could have been improved and a short length of bent brass strip soldered on to represent the buckle would have completed it. I saw the Branchlines springs and decided it wasn't worth the effort.
Getting a consistent distance of line between the leaves is difficult and getting the real number of leaves impossible. The springs on the prototype had dozens of leaves, so it's a matter of having a representation that it isn't simply one solid block. I suppose it's one of these things that you don't notice until you come to make it and when you do you realise that no one else makes them right either - at least not in this small scale.
 

Dan Randall

Western Thunderer
Hi Dave

I know the wheels are ex Hornby Peckett and were already green, but given that you’ve scratchbuilt the cylinders from brass, have you re-painted the wheels to match the cylinders and if so, which brand/name/number of paint have you used please?

It’s a rather pleasing shade of green, that could suit the 7mm scale fireless loco I’m building. :)


Regards

Dan
 

Dave

Western Thunderer
Hi Dave

I know the wheels are ex Hornby Peckett and were already green, but given that you’ve scratchbuilt the cylinders from brass, have you re-painted the wheels to match the cylinders and if so, which brand/name/number of paint have you used please?

It’s a rather pleasing shade of green, that could suit the 7mm scale fireless loco I’m building. :)


Regards

Dan
Hi Dan,

I painted the wheels because the sides of the tyres on the wheels are left bare metal by Hornby and because the brass balance weights that I added also needed paint. I used an etch primer before the colour coat, which is Railmatch LNER Doncaster green.

This photo shows the balance weights before paint and also how I line up the slide bars and motion bracket parts, as described earlier.
20240527_124005.jpg


Brakes.
20240530_155219.jpg
Top right are the parts as they come off the pantograph and below is one finished brake assembly. I used two layers of 10 thou. cartridge brass, spaced by .45mm brass wire with a 1mm plasticard brake shoe. The reason for using plastic brake shoes is so that I can fit the shoes as close as possible to the wheels without risk of causing a short circuit. The shoes are free to pivot on the wire. One down, five to go...
 

Dan Randall

Western Thunderer
Hi Dan,

I painted the wheels because the sides of the tyres on the wheels are left bare metal by Hornby and because the brass balance weights that I added also needed paint. I used an etch primer before the colour coat, which is Railmatch LNER Doncaster green.

Thanks Dave

I’m off to the GoG show at Kempton Park this Saturday, so I’ll see if I can get hold of some. :)


Regards

Dan
 

Dave

Western Thunderer
It's getting very close to the stage where I will have to paint everything with etch primer. Before the top coats I will have to apply rivet detail to the cab and tank. I plan to order some rivet transfers from Railtec but I don't know about the size and spacing. The tank has the rivets very closely spaced, with a double row of them around half way along its length. I think those on the cab are the same size but are further apart.

Can anyone advise on the size of the heads and the spacing, please? Here is the list of those that Railtec produce - Railtec Transfers - waterslide model railway transfers (decals) for 4mm/OO gauge, 2mm/N gauge, 7mm/O gauge and all other gauges and hobbies
Untitled2.jpg
 

Dave

Western Thunderer
I can see the finish line now.
20240601_125409.jpg
The brakes are all done and fitted and it has gained cab steps since the last overall view. I replaced the cast tank filler, that was found in my spares box, with one made for the job and looks far more as it should. The obvious change is of course that magnificent chimney, made by Ian@StEnochs, to whom I am very grateful.
 
Top