Building a shay locomotive

mike evans

Active Member
Hello Mike
I wasn't aware of Steam Technology, another one to add to my list. Will you fit one injector and an axle pump or two injectors?

Cheers

Dave
Hello Dave
Your question has caught me a bit on the hop.
I am following Kozo’s book chapter by chapter and not looking too far forward. However, I have made a three cam oil axle pump so there are three copper pipes passing through three individual non return valves then one pipe to the top of each of the steam chests.
I hope this answers your question.

Cheers

Mike
 

Dangerous Davies

Western Thunderer
Hello Mike
I meant the boiler feedwater supply. Thinking more about it an axle feed pump would be impractical because of the fact that the loco has bogies not a rigid chassis. An injector would be one method, another would be a steam driven feed pump. I'm not familiar with Kozo's design so just curious.
Cheers
Dave
 

adrian

Flying Squad
Hello Mike
I meant the boiler feedwater supply. Thinking more about it an axle feed pump would be impractical because of the fact that the loco has bogies not a rigid chassis. An injector would be one method, another would be a steam driven feed pump. I'm not familiar with Kozo's design so just curious.
Cheers
Dave
Having had exposure to miniature live steam locos and builders in various scales I suggest that the minimum for current designs is an "axle pump" and a manual pump in the water tank. Steam driven pumps and injectors are notoriously difficult in the smaller scales.

A manual pump allows you to top up as and when required however builders like Rafe Shirley, Eddie Cooke and Clary Edwards would incorporate an axle pump. With a little fine tuning they would get the bypass set correctly to allow continuous running without needing any manual intervention.

I deliberately put the "axle pump" in quotes specifically for the Shay locomotive because I would suggest that due to the Shay's drive system where there is a fixed crankshaft on the loco frame which the cylinders drive this is the best location for the axle pump. Rather than mounting an axle pump on the bogie I personally would put an eccentric to drive a pump from the crankshaft on the loco body.
 

mike evans

Active Member
Good morning Adrian and Dave
If I may, I will explain how Kozo designs the water feed system on the Shay.
There are two pumps, the axle pump and the hand pump, both of these I have made ready to fit.
The hand pump is in the water tank with a detachable handle and access is through the man hole cover.
The cam for the axle pump is on the rear axle of the rear bogie. The pump is fixed to the front cross member of the rear bogie. The feed to the pump is via copper tube and a section of flexible hose.
The pipe work from the pump heads towards the rear of the rear bogie where it bends through 180 degrees and continues towards the underside of the cab and then vertically to the bypass valve.
The run of pipe from the pump to where it enters the cab floor is about 350mm.
Kozo explains that this run of pipe will allow the bogie to move as the loco goes round bends.

The horizontal drive shaft from the cranks to both bogies is taken up with sliding joints and universal joints so there is no space available for the ‘axle pump’

I hope this adequately explains Kozo’s method for the water system.

Mike
 

mike evans

Active Member
Some more progress with the Shay.
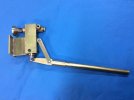
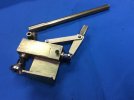
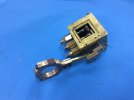
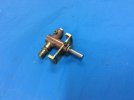
Have now made the oil pump, the axle and hand water pumps.
The hand water pump has a detachable handle as the access is through the man hole in the water tank.

I have to locate some stainless spring wire to make the springs that hold the stainless ball in place.
Has anyone any ideas where I might buy this, please ?

Here are some photos of the pumps

3FA9599C-67C6-4384-9220-323D54D319B9.jpeg6B4B1F10-0F60-4DDC-8719-922818903654.jpegD40F6BFB-7CBE-4CF6-B084-B33215A869BD.jpeg35BD99F2-AE23-431B-A945-E9A6A44C554D.jpeg

Hope you found this interesting

Mike
 

Ian@StEnochs

Western Thunderer
When I built my 3" scale traction engine I couldn't source stainless steel wire springs for the water pump and whistle valves so used Phosphor bronze instead. Still working after 30+ years!
Ian.
 

michael080

Western Thunderer
Sorry, I can't help with a UK source, but this is the material my continental supplier uses for stainless steel springs:

EN 10270-3-1.4310

I hope it helps.

Michael
 

mike evans

Active Member
When I built my 3" scale traction engine I couldn't source stainless steel wire springs for the water pump and whistle valves so used Phosphor bronze instead. Still working after 30+ years!
Ian.
Thanks Ian
Having had another search for the wire I want without success it look like phosphor bronze.
If the Shay is still running in 30 years time it won’t be me at the controls!

Mike
 

adrian

Flying Squad
I have to locate some stainless spring wire to make the springs that hold the stainless ball in place.
Has anyone any ideas where I might buy this, please ?
It depends on the gauge required, for small lightweight suspension I use guitar wires and for the larger 7mm requirements a search for Piano wire gives several potential suppliers. Are you looking for coil springs to use directly or straight wire to make your own coil springs?
 

mike evans

Active Member
Thank you Adrian and Brian for your suggestions.
I have used piano wire for the suspension springs but this is not suitable for water pumps as, unfortunately, It goes rusty.
Placed an order for guitar strings and hopefully one of the strings will be suitable. I need 0.23mm dia. Wire.

Mike
 

OzzyO

Western Thunderer
Hello Mike,

you could try this site,


ATB

OzzyO.
 

mike evans

Active Member
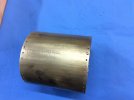
The smoke box is of 1.5 brass sheet and I have managed to roll it cold on my 12” roll, shear and press brake machine.
My next problem is to drill 1/16 holes 3mm in from each end for copper rivets. My indexing rotating rotary table is set up for er collets and I do not have a Chuck that fits.
This is my solution.
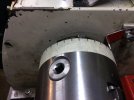
The Chuck is 100mm diam. So multiply by pi to get the circumference. Then marked a piece of masking tape with 36 equal dimensions that add up to the circumference length.
This tape is then stuck to the Chuck.
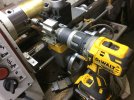
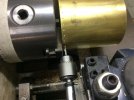
The photos show how I achieved this.
I marked all the holes with a centre drill then opened them up to 1.6mm
The inside of the holes need countersinking for the riveting
To do this I used a long drill bit and pushed the smoke box up to the drill bit whilst turning.
The counter sink is ‘a bit on the huh’ but will be OK when the rivet is dressed.


D53A6846-E12D-493A-8D7E-A55EC8AE1AC2.jpeg7E6300A7-EE1B-4559-8B54-0AC9F3808D44.jpegA014E9CD-832B-4155-B179-DC9366A75A89.jpeg04FC845E-CE92-480A-8E4E-091119B83F4D.jpeg

I hope you find this interesting

Mike
 

OzzyO

Western Thunderer
Hello Mike,

why not just use a 1/16" centre drill (number12) or a 1.6mm centre drill.


HTH

OzzyO.
 

mike evans

Active Member
Hello Mike,

why not just use a 1/16" centre drill (number12) or a 1.6mm centre drill.


HTH

OzzyO.
Thanks OzzyO. My usual supplier does not have such a large range of centre drills so I have book marked Armstrong’s site for future reference

As the drilling pressure on this scheme is yours truly pushing on the drill, with a centre drill, the sudden movement when the drill breaks through could cause a countersunk on the outside of the smoke box.
This did happen on one hole on the underside of the smoke box
The countersunk needs to be on the inside.

Mike
 

simond

Western Thunderer
Mike,

i made a (none too pretty) ally thing that clamps onto the cylindrical nose around the spindle of my Proxxon drill, and which fits one of the lathe tool holders. That way, I can use the main, cross slide or top slide feed to drill, provided I’m a bit careful about lining up the axis of the drill with that of the slide. No risk of overshooting.

can you not do something similar with your Plummer block?

atb
Simon
 

mike evans

Active Member
Mike,

i made a (none too pretty) ally thing that clamps onto the cylindrical nose around the spindle of my Proxxon drill, and which fits one of the lathe tool holders. That way, I can use the main, cross slide or top slide feed to drill, provided I’m a bit careful about lining up the axis of the drill with that of the slide. No risk of overshooting.

can you not do something similar with your Plummer block?

atb
Simon
Simon
Thanks for that-certainly worth looking at.
The small Chuck unit I bought about 4 years ago, for about £15, and made a fixture to use it on the quick change tool post.
Drilling the smoke box is the first time I have used it (apart form the initial test) and I take your point about the overshoot.
I tend to do all my drilling on the Mill using the DRO - centre drill first followed by the drill bit. If I use the drill bit first this can tend to wander.
Building the Shay there are 2.5mm tapped holes with 2.6mm clearance holes, so not a lot of room for error.
Any advice on cutting out the centre drill operation would be most welcome.

Atb

Mike
 
Top