A small country halt somewhere west of Middlesex

michael mott

Western Thunderer
Now that the 12 foot by 2 foot baseboard has been completely stripped, I have begun playing with some ideas. being a confirmed "rubber gauger" and by that I mean that I am not really committed to any particular gauge for a long term. I am often envious of those of you who can build fantastic layouts and or dioramas that might take years to complete. My models take a long time for completely different reasons, I end up running out of steam on any particular project for a while and pick up one of the other earlier ones. This process seems to be the pattern that I have over the last 50 years or so fallen into. This probably came out of the years that I worked professionally building all sorts of models in all sorts of scales and genres, from architectural to design prototypes , and movie props.

Be that it may it is a cross I have to bear. At 70= years I really don't see me turning a "new leaf" at this point in my model making hobby and or life.
Which leads me to my new layout
I had made a comment on Alan's "Blackney A glimpse of the forest" layout about trees.
In my back yard I have a medium sized Amur Maple tree and some of the tips of it die off and look like miniature trees.
IMG_2728x1024.jpg
IMG_2727x1024.jpg
I rented one of those extended tree pruning loppers and cut off as many as I could reach. Thes were then hauled into the garage for analysis as potential trees.

IMG_2729x1024.jpg
A bunch of small scrap plywood bases were used to stand up the best examples after a bit of clipping and shaping.

IMG_2721x1024.jpg

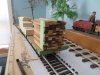
One ca clearly see my affliction of "rubber gauging" a few 1:20.3 figures behind some Peco O gauge track and some Lima coaches awaiting some "work" they might get included aka the 1950's version of the Ruslip Miniature Railway which was my "genesis" induction into the world of railways as a 4 year old. One or two might wind up behind this once Lima F3 loco which over the last 17 years has morphed into a pretend P2
DCP06495.JPG

And with a 1/12 driver the loco is set up with a Chris Rennie Locoremote mini B running nicely on 3 AA batteries.
IMG_2680x1024.jpg

Currently it looks like this, A lot of the plastic has been replaced with some .020 hand sawn brass sheet. I take my hat off to all of you who put brass etched kits together.

IMG_2718x1024.jpg

So now that I've spilled the beans I will select a few of these "trees"

IMG_2731x1024.jpg
IMG_2724x1024.jpg
IMG_2725x1024.jpg
It could all change tomorrow though, I go to see the surgeon about the Carpal Tunnel situation.

And finally

IMG_2726x1024.jpg
The layout might be close to the processing shed near Verner's Bog. Time to look at dressing up some of these "trees"

Michael
 

michael mott

Western Thunderer
Thanks Tony, this is just the start, I will be adding foilage to some of them and Might leave one or two naked.

Michael
 

michael mott

Western Thunderer
A bit of beginning foliage work, I think this is going to take a while.

IMG_2744x1024.jpg
Also some more work on the miniature railway locomotive I can fit the Loco-remote and battery now in the boiler so wont need to worry about a connection to the tender.
IMG_2735x1024.jpg
The smokebox has prominent rivet detail which I can simulate with the rivet punch The annealed .020 brass shows the detail well enough, so I can lay out the pattern before wrapping it around the smoke-box tube.
IMG_2745x1024.jpg

Michael
 

michael mott

Western Thunderer
Pressing on with the foliage experiments, only because the evergreen stuff is expensive with the trees this big, I had an old cushion that had been retired from its intended purpose a couple of years ago and not wanting to waste the stuff I thought it might be a good foundation for some heavier type foliage. first I looked at the potential massing

IMG_2748x1024.jpg
and after spraying it with three different rattle cans of green commercial type spray paints, then pouring all the stuff that falls out of the woodland scenics foliage when you stretch it out it looks pretty reasonable

IMG_2749x1024.jpg

IMG_2752x1024.jpg

I was curious however to see if I could get a decent massing with some yellow cedar planer shavings


IMG_2757x1024.jpg
These were tipped into the coffee grinder (secretly)

IMG_2759x1024.jpg

the results looked promising

IMG_2758x1024.jpg

so another wad of the stuffing material similar really to "Angel Hair" was spryed with the three greens then rolled around in the ground cedar shavings.

IMG_2760x1024.jpg
Plonked onto the "tree" and shaped and resprayed again. took it outside to compare with the real stuff.

IMG_2766x1024.jpg

the bottom right massing obviously needs more work.

IMG_2768x1024.jpg

Overall I think that I will be able to refine it a little and get some decent "trees"
Also popped the rivets into the smoke-box wrapper, they look a bit over scale but that is because it is a miniature locomotive running on O gauge representing 15 inch gauge.

IMG_2769x1024.jpg
That's my story and I'm sticking to it.

Michael
 

michael mott

Western Thunderer
Thanks Simon, I am Familiar with the RH & DR having ridden on it and have some publications that also cover it over the years.
I woke up this morning with an Idea that perhaps some blended dry oak leaves might also be a good foundation on the Fibre foundation of the cushion stuffing.
I found my old Blender with the broken top so now do not need to do the blending in secret. some dried oak leaves from the garden showing the hand crumpled then blended leaves after picking out the long fibres.

IMG_2772x1024.jpg

The lightly sprayed wad of cushion stuffing was placed into a recycled plasting food container and then shaken with the blended leaves.

IMG_2775x1024.jpg

IMG_2776x1024.jpg
this was resprayed with the light green and dropped into a second container with the blended cedar shavings.

IMG_2778x1024.jpg
Then using some long tweezers placed the still sticky wet wad onto the "tree" and shaped it a little with the tweezers.

IMG_2780x1024.jpg

IMG_2784x1024.jpg

A little more spraying with the different greens

IMG_2790x1024.jpg

IMG_2791x1024.jpg

A shot of the materials used .

IMG_2781x1024.jpg

The green oak leaves are from some recent pruning and as soon as they are completely dry I am going to see how they look after blending.

Michael
 

michael mott

Western Thunderer
Some further ruminations on the layout, I think that the main area will be 45mm gauge using Llagas Creek Flat bottom code 215 rail with the narrow gauge sleepers set further apart and using Stub points.
IMG_2814x1024.jpg
These were used successfully on quite a few small industrial lines and I have built a working 3 way stub points with code 332 rail many years ago. So regular points will be easy by comparison.There are some nice photographs of this design of points in the latest issue of The review .

IMG_2817x1024.jpg

IMG_2818x1024.jpg

Playing with location of trees at the same time.

Michael
 

michael mott

Western Thunderer
While I was busy with thinking about the track a few wagons hauled in a bunch of new sleepers (ties) for the proper laying of the points and such.

IMG_2824x1024.jpg

The odd thing was the strange green tarp like wrappers.

Michael
 

Attachments

  • IMG_2823x1024.jpg
    IMG_2823x1024.jpg
    134.8 KB · Views: 8

michael mott

Western Thunderer
My 18 inch gauge Sipat look a like hauling in the new ties.

IMG_2826x1024.jpg
Laying out and gluing the timbers for the points.

IMG_2829x1024.jpg
A bit of pre weathering the rest will be done later when all the track is down.

IMG_2831x1024.jpg
Made up a couple of rolling gauges and all the fixed rails are spiked now on one of the points one more to go then all the links to make them operate

IMG_2832x1024.jpg

IMG_2833x1024.jpg

looking north some interesting contrasts with the three types of representations with 45mm gauge track all using the 215 Llagas Creek components.

IMG_2836x1024.jpg
Up close the hand built points with micro scale spikes and Cedar Sleepers, left background gauge 1 main line right background Llagas ties for 3 foot gauge with a 1/10 conversion of the 1;19 Accucraft Bagnall . and tucked against the wall an old Lima O gauge coach.

Michael
 

jonte

Western Thunderer
Very effective, Michael. Forgive me, but what happened to your ‘hospital(?)’ layout with the tracks laid into the floor of a corridor and triangular formation?
 

Yorkshire Dave

Western Thunderer
Hi Michael

What prevents the stub switch rails and 'floating frog' being overthrown.

Is there a maximum throw limiter/lock hidden beneath the switch rails or will there be a switch stand which will do this?*

Edit - a harp style switchstand? There happens to be a scaleable drawing in here.
 
Last edited:

michael mott

Western Thunderer
I have been remodeling the air in the second picture in the last set of pictures over a few years now, here are a few pictures and the latest work on the frames which were done in brass to replace the styrene ones that were sagging.
IMG_2179X1024.jpg
IMG_2173X1024.jpg

The end buffer beams were a bit oversized so the are being remade as well. The final look will be similar.

Capture2925.JPG

Capture2626.JPG

Capture2927.JPG

But I am happy that the frames are now straight. This model did start out as a Aristo craft 0-4-0 shunting loco, hence the wheels and motion linkage.
The loco is meant to represent this one that is on display at Banff as part of the Bankhead Mine display
IMG_3163X1024.jpg
IMG_3156x1024.jpg
Eventually I will make a decent model from scratch with an all brass construction with the proper gauge which was 27 inches, this model was built to a scale of 30mm to the foot so that the 45mm gauge track represented 18 inches.
I know a whole lot of rubber gauging, but that is the way it happened.

Michael
 

michael mott

Western Thunderer
Yesterday I got so fed up with the layout looking like a large shelf full of stuff unrelated to the concept of a layout that I had a late afternoon tidy up, removed everything not related to the idea that this will become a small layout of large scale "mining" type layout.

Inspired I guess by Larry's open long views of his layout.
The various iterations that one mulls over in our minds, I'm convinced this is an affliction that a lot of people who work with layouts suffer from. And I am still not really clear on the direction of this layout although it is not a "pointless one" to borrow a phrase I noted here some time ago.
Perhaps I just needed a break from the neck torturing work on the coach last evening. A few shots of the tidy up.
the classic long view, with the two small "mine type" locos. all the shelf queens have been removes to another "shelf".

IMG_5079x1024.jpg

I do like this rather ugly bit of machinery.

IMG_5081x1024.jpg

Looking the other way

IMG_5086x1024.jpg

The little Penrhyn loco waiting for more work. it is 7/8th scale so the track gauge represents 24 inches which is actually incorrect for the Penrhyn system, according to the history I have read was built to 2 feet and half inch between the centers of the rails in 1800 and rebuilt to 1foot 10 and 3/4 inches in 1832.

I recently read a couple of interesting articles in the latest issue of Narrow Gauge & Industrial Railway Modelling Review #131 "Of Scales Gauges And Time" by Peter Kazer, Page 138 and "A Problem Of Scale" by David Hughes page 140.
The point was made by David Hughes of the conflation of measuring systems ie using 7mm to represent 1 foot.
These two articles have given me a lot to think about.
Given the modern advances in computer programs and scale converters for those of us who basically model for our own little worlds and have little opportunity to "run" on others "layouts" It would make more sense in some ways to choose a scale that is consistent with one measuring system either metric or imperial and not mix them. I am only talking about those model builders who do all their own track-laying and fabrication of rolling stock.
I grew up learning the English imperial system of measurement, and still think of lengths in feet and inches. then there is the issue of fractions versus decimals in the imperial system. Machine tools are for the most part marked in decimals either metric or inches. So while thinking of scales I might visualize a 1/4 inch as a foot when drawing in one of the CAD type programs I generally use the term .25" My digital "vernier" caliper has the option of metric/fractions/decimal, which is handy to say the least.

My favourite scale is a ratio of 1:8 1/8th of an inch equals 1 inch so 1 1/2 inches equals 1 foot. but for our model building in our miniature empires or cameos or small layouts it is a bit too big. A ratio of 1:16 would be better so that 3/4 of an inch equals 1 foot and going even smaller we come to the more acceptable ratio of 1:32 The beauty of these 3 ratios is that they all divide beautifully in whole numbers of fractions of an inch.

The track I have laid is 45mm (1.772") which represents 18 inches in 30mm scale or 15 inches in 36mm scale but if I wanted to use only one system of measurement say 1:8 to represent 15 inches then the track gauge would be 1 7/8 inches or 1.875" or 47.625mm.

David Hughes said "I am going to choose a scale ratio for my next railway and use it. I shall glower at anyone who looks at the layout and asks "What gauge is this?" because that of course is of less relevance than the fidelity, the believability, of the way i have captured the - er- prototype. I shall call it No Gauge , or NG for short"

Ramble off.


IMG_5092x1024.jpg
The points still need a bit of fine tuning.

IMG_5094x1024.jpg

Hmmm what to do next?

Michael
 
Top