3mm Workbench: Scratch-building a chassis for a J50

BetweenTheTunnels

Active Member
Well an hour or so working on the Gresley etches last night ended up being a total waste of time! My own fault really, getting to grips with the new soldering iron and trying to solder the door vents onto the main bodyside etch. I ended up with too much solder on, then the vents wouldnt laminate with the main etch.

I concluded that lack of heat with was the problem, despite the new iron being an Antex 50W and set to 450 degrees - I think the default bit that came with the iron is only a 2.3mm bit, and am still waiting on a 6mm bit, the largest Antex do, arriving in the post. I think that should help the issue, and suspect the brass is acting as a heat sink against the a glass craft board and the current bit isnt big enough to heat the brass sufficiently. Ah well, another part of the learning curve, and of course as is typical with me, I chose one of the harder coach types to start with!

Richie
 
Last edited:

Blackstar

New Member
Well an hour or so working on the Gresley etches last night ended up being a total waste of time! My own fault really, getting to grips with the new soldering iron (See my journey in 3mm thread) and trying to solder the door vents onto the main bodyside etch. I ended up with too much solder on, then the vents wouldnt laminate with the main etch.

I concluded that lack of heat with was the problem, despite the new iron being an Antex 50W and set to 450 degrees - I think the default bit that came with the iron is only a 2.3mm bit, and am still waiting on a 6mm bit, the largest Antex do, arriving in the post. I think that should help the issue, and suspect the brass is acting as a heat sink against the a glass craft board and the current bit isnt big enough to heat the brass sufficiently. Ah well, another part of the learning curve, and of course as is typical with me, I chose one of the harder coach types to start with!

Richie
Try using Garryflex blocks to clean the brass & remove excess solder. Garryflex blocks - Google Search
 

BetweenTheTunnels

Active Member
Hi All,
A quick update, family and work life, challenges and problems have totally dominated this year, so little has been done. However, the mist is starting to clear as they say, so I am looking forward to getting back to this project.

The Gresley coach hasn't progressed at all. I hit concerns in my mind about soldering the two halves of the bodyside together, then trying to get the tumblehome to come right. I concluded that it would be best to approach the Mk1 coach etches that I had acquired from Worsley Works first, as these have complete sides, learn how to get the tumblehome right with a complete side then come back to the Gresley. So that is my plan going forward.

I have also been gifted some wagon kits by various family members for the coming Christmas, so from Boxing Day onwards, I shall have more than enough to keep me busy! I have acquired some GWR wagon buffers from the 3mm Society shop to replace the damaged ones on the original Mogo kit, so that will be dealt with in the next few weeks I think. I have also acquired the body kit for a J50, which although it has an etched chassis with it, I am going to try scratch building my own chassis by milling out from some brass bar. It may not work, but it would give added weight I think. Still plenty to keep me going over the winter months.

Thoughts have also turned to a little layout. It will be nothing more than for a little bit of shunting and photographing vehicles, so two or three sidings I think. I have ordered some rail and chairs with that effect in mind. I am very tempted by the 3D printed options now available through Templot, but the various options, configurations etc needed to get the track work to print appears one step too far at this point, so will likely use the CAD outputs from Templot to get some sleepers laser cut.

All this goes to show that the thread and the project isn't dead! Just other things have had to take precedence this year, and I am looking forward to actually doing some modelling again!

Richie
 
J50 Chassis Query

BetweenTheTunnels

Active Member
I have been giving some thought in recent days to the chassis for the J50. I have acquired the white metal J50 body from 3SMR (although I have had it taken off me as it's a Christmas present apparently!) which includes various chassis components. Now I could use them, but why go the easy way :)

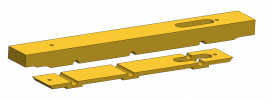
The opinions of those reading and following along would be welcomed, but I have this idea about creating a chassis by milling it out of brass bar. I have access to a small milling machine, and my idea is that the brass bar would give plenty of low down weight. The intention is to power it from a 8mm cordless motor, running through spur gears to a worm on the axle. My idea being to create a smooth running chassis that is well weighted. While a fair amount of inner section of the brass bar would need to be milled out for the gears and access to the back of each frame side, I still think it would be heavier than etches.

It would probably need to be milled in two halves and wiper pick-ups would need to be added - the wheels have a metal tyre and plastic inner so are electrically separate from the axle. I am debating about the bearings and axle boxes. My original thought was to use High Level Kits Hornblocks (the axles are 1/8") which I concluded I could still use with a milled chassis, but now I am wondering is normal 2mm style bearings in a slightly elongated hole, with a springy wire pressing down on the inside would be better/as good? I'd like to think I can create a standard way of creating chassis - and as I may need a few similar locos for the 'grand plan' (if it happens!) a chassis that is repeatable sounds a good idea.

But does anyone have any thoughts? Is the whole thing a bad idea, or has it been done before? I am assuming I am not trailblazing a new path here, although I haven't seen many (if any) other milled chassis?

Id welcome anyones views, thoughts, comments, (polite!) suggestions, advice. This is all new to me, so please feel free to tell me I am going about it the wrong way and be constructive as to the way forward....

Richie
 

Brian McKenzie

Western Thunderer
Block chassis suggested for J50 loco.png

Suggest screwing two pieces of brass bar together, so that they can be disassembled along the axle centreline.
Drill/ream axle holes on this parting line (not bothering with other forms of axle box or bearings).
Slot at chosen axle for gears.
Mill all to the external profile of your prototype.
If desired, relieve some of the underside - leaving thin edges along the sides to represent plate frames.
 

D6356

Western Thunderer
Hi
The chassis follows a tradition and while giving a rigid chassis over compensation nothing wrong with the approach. Back in the day when more folk had engineering work or contacts therein getting a "foreigner" bit of work done such a chassis was easier. The development of photo etching from hand drawn art work and now CAD allows for use of less metal and allowing springing in whatever form. 3D printing goes back to block form easily enough but without the machining - Older Triang chassis being an blend of block ends and thick brass plate sides which 3D print and etching can emulate easily and ensure a square chassis easily enough ( he says looking into the skill area as a novice.- I cut my first minitrix chassis in half aged 12 )
Certainly whatever gives a square and true chassis is a foundation of a good runner.
Happy modelling
Robert
 

Overseer

Western Thunderer
tell me I am going about it the wrong way and be constructive as to the way forward...
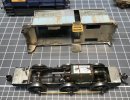
Don’t do it. A milled chassis can be made to work and could be fun if you have the urge to use a milling machine but it is not the best way. It is the sort of thing recommended by Ahern in 1948 but is less likely to result in a smoothly running loco. I suggest reading post 1980 books or magazine articles about scale thickness frames and three point compensation, using the coupling rods to set the wheelbase. Easy to build with no machine tools and works reliably. Especially for 14.2mm finescale. You don’t need extra weight with a white metal body. Compensation improves pickup and traction.

This is a simple compensated 0-6-0 chassis a bit larger than yours will be, HO scale on 18.3mm gauge, built in 2002 and has done quite a few days of low speed exhibition running with complete reliability (and no added weight in the nickel silver shed body - it was a steam loco converted to diesel in the 1950s).

7A67BD9D-66BB-47E1-B137-3FDCB0A4D67A.jpeg

Plastic centred wheels are never perfectly concentric so a milled chassis would need slop to work well. Better to control the slop with compensation.

All just my opinion.
 

adrian

Flying Squad
But does anyone have any thoughts? Is the whole thing a bad idea, or has it been done before? I am assuming I am not trailblazing a new path here, although I haven't seen many (if any) other milled chassis?
It's something I've seen a few times, although predominately with 2mmFS where weight is essential.
Don’t do it. A milled chassis can be made to work and could be fun if you have the urge to use a milling machine but it is not the best way. It is the sort of thing recommended by Ahern in 1948 but is less likely to result in a smoothly running loco.
As mentioned there quite a few 2mmFS models with milled chassis, I guess 3mm scale is on that cusp between 2mmFS where the weight is essential and 4mm scale and above. To some extent it may depend on whether DCC and stay alive is used, I suspect a milled chassis with DCC and stay alive will give a smooth running loco.
 

BetweenTheTunnels

Active Member
Thanks to all for the responses.

@Brian McKenzie you raise an interesting point as I had not considered cutting the two halves down the middle of the axles horizontally - I was thinking more vertically, so there is some room for thought there.

@Overseer That viewpoint is appreciated, I did ask for pros and cons! :) I am definitely of the thought that some form of compensation needs to be included. I have not yet decided on a control scenario - I have used DCC in the past but to be honest, recently I worked a friends DC powered layout and it was really nice to get back to basics! So for now I am working on the DC route, and if it becomes DCC then nothing is lost. I take all the comments onboard that you've made tho.

@adrian Of course, I didn't think about that and being a 2mm Association member I really should have done from the society magazine. I do think 3mm is a bit of a dual-edge sword in that respect, more like 4mm than 2mm in many ways, but I think a combination of weight and compensation on the axles will be needed. The question is to go milled, or go for etched frames as @Overseer suggests, but then subsequently mill some brass blocks down and position them for and aft within the frames to give added weight.

More food for thought, but thanks guys. I may attempt a milled chassis just to see what happens (and yes I do fancy having a play with a milling machine!) As Robert mentioned its getting it square and true that is the critical aspect.

Richie
 

BetweenTheTunnels

Active Member
Thinking on the comments from @adrian - I remember one of the 2FS chaps, Nick.... I have forgotten his surname, did a YouTube video of building a 2FS chassis for a Peco Jubilee. That was etched, but his compensation used slightly elongated holes and Simpson springs to give a fraction of a mm movement. That may be an option worth looking at if I do go down the milled scenario.

Richie
 

BetweenTheTunnels

Active Member
After much thought I have decided to stay with the traditional etched frames approach, but potentially adding brass blocks fore and aft within the frames to add weight, and possibly adding some led shot to the body if necessary.

I have got the frames roughly drawn up, some measurement checks to do. But I am going to use High Level Kits horn locks and CSB tags to try and give some suspension on the leading axles.whether they arrive by Christmas is another matter. But after Christmas ive a whole stash of wagons to work through, so plenty to keep me occupied.

Can anyone advise what the name of the wire is that is use for wiper pickups and where to get it from. I know what it is, just my brain has gone blank! My track order has arrived from the 3mm shops, has a 3D printer as a birthday treat to myself. So January May see a little bit of progress on the little shunting yard testbed layout.
 

BetweenTheTunnels

Active Member
The wire from Cambrian comes nice and straight. I've a stock of coiled wire that I can't get straight at all...

Thanks Paul, thats useful to know. I am assuming at 0.35mm would be ok for pick-ups? Or is it one of these things that the thicker the more springy it is and 0.5mm would be the better option?

Thanks also for flagging Cambrian up Paul, I hadn't realised they did a 3mm wagon kit - and as this picture :

shows one of the LMS D1656 fitted vans still operating in 1963 (my layout will be 1957/1958) I may well order one of those at the same time!! Cheers!

Richie
 

Paul Tomlinson

Western Thunderer
Thanks Paul, thats useful to know. I am assuming at 0.35mm would be ok for pick-ups? Or is it one of these things that the thicker the more springy it is and 0.5mm would be the better option?

Thanks also for flagging Cambrian up Paul, I hadn't realised they did a 3mm wagon kit - and as this picture :

shows one of the LMS D1656 fitted vans still operating in 1963 (my layout will be 1957/1958) I may well order one of those at the same time!! Cheers!

Richie
Richie, I'd suggest 0.35mm for your application. Thanks for documenting your progress!
 

BetweenTheTunnels

Active Member
Thanks Paul,
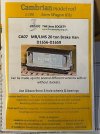
0.35mm is out of stock with Cambrian, but a pack and one of the brake van kits has been ordered! I'll add it to the pile!!

I am hopeful that it might encourage the odd other modeller to give 3mm a go. Coming from somebody who has only ever built two plastic wagon kits before, and is not construction minded - its either going proof that anyone can do it or that anyone can mess it up :) and if its the latter further proof that if you mess it you, you can work out a way to get it back right again ... he says hopefully!
Richie
 
Top