SimonD’s workbench

1366

simond

Western Thunderer
Enough muppetry!

time for a win :).

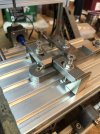
the slide bars were finished on the miller last night before going to see Soft Machine in Canterbury. Fabulous musicianship, though I found a couple of the tracks a bit impenetrable, a bit too jazz for my taste.

Anyway, they need cleaning up, and a little filing here and there, but we now have two locos’ worth.

image.jpg

So as MrsD was off to a tennis tournament (neither strawberries nor Wimbledon weather!) I had the opportunity to make more noise.

I’d borrowed a steel packer from work, so with a 2.5mm hole drilled through it, I put a drill in the miller chuck, lined it up, and then clamped the block at a known location. A trial run on a bit of plasticard required a couple of goes, to correct a typo (I was lucky, they can be expensive!) and double check everything before doing the front rods for my 1361 ST.

IMG_8602.jpeg

IMG_8605.jpeg


These went well, so I stripped the rods off Chris’ Pannier, and did them too.

IMG_8608.jpeg

IMG_8609.jpeg

the bore is actually nice & crisp, the reflections confuse the iphone camera. Needs no more than the fluff cleaning off. Now I need to turn up a new pair of bushes and with a bit of luck, the most difficult bits of this build will be sorted.

This little machine is proving useful!

And Scotland waiting for the decision… no try, unbelievable.
 

Attachments

  • IMG_8603.jpeg
    IMG_8603.jpeg
    124.5 KB · Views: 9
Last edited:

simond

Western Thunderer
Been doing bits an pieces today, just turned these little crankpin bushes, two for Chris’ pannier and two for my ST

IMG_8623.jpeg

Annoyingly I thought I had some csk 12BA screws but they’re all cheese head. I’ll have to order some or do a bit of deft turning!

It would be nice to get the pannier running soon, Chris will have finished the layout and won’t be able to run to timetable…
 

simond

Western Thunderer
Well, I have a lathe so try…

IMG_8624.jpeg

It worked, so I shortened the screws and installed them

This side is not quite what I was aiming for, but I expect I can improve matters - need to check where the error is.

IMG_8628.jpeg

This one is better - pretty much spot on.

IMG_8627.jpeg

Don’t worry about the slotted screws, they’ll never show behind the crosshead.

Motion bracket to fix next!
 

Pencarrow

Western Thunderer
Been doing bits an pieces today, just turned these little crankpin bushes, two for Chris’ pannier and two for my ST

View attachment 209533

Annoyingly I thought I had some csk 12BA screws but they’re all cheese head. I’ll have to order some or do a bit of deft turning!

It would be nice to get the pannier running soon, Chris will have finished the layout and won’t be able to run to timetable…

:)) You're racing me finishing the layout! I strongly suspect you have a little while longer...
 

AJC

Western Thunderer
Thought there would be no rush - after all it's only GW :))........ SR rules the day :thumbs:

Certainly when it comes to caring about late running (certainly in the '60s when dad was spotting at North Road in Plymouth, anecdotally from a signaller at Yeovil Pen Mill 25 years ago, and even now, apparently, according to someone who works in timetabling I was talking to yesterday - for balance, the Eastern Division of the old SR are pretty lax these days...).

More seriously, I love proper engineering going into resolving the crosshead clearance problem, very neat.

Adam
 

simond

Western Thunderer
Looking again at the photos of the Didcot building, further up the thread, I think they are blue bricks. On the track side, there is also a layer of dirt, probably splashed up from puddles in the space between building and track, which makes it hard to see what is going on. The weathering of the bricks, and the lighter areas under the window sills where the rain is kept off, throw the eye out, I think - there are several layers and different weathering effects in addition to the underlying brick colour. Overall, though, my money is on blue bricks for the lower courses.

Anyway, whatever final decision you make, it’s a very nice model from an excellent kit.

Nick.

Back in December we were discussing whether the bricks in the lower courses of the sand furnace were fired darker than the others, or painted. Well, I’ve just found this which is pretty much proof that the bricks were exactly the same - Lyons 1947, pg 70.

image.jpg

Didcot, being built between ‘29 & 32. Funny that you can’t find it at the time…

At least we now know they were painted (assuming they didn’t knock it down & build it again!)
 

Heather Kay

Western Thunderer
At least we now know they were painted
Hmm, I’m not sure about that. The lower courses in that photo are still different from those higher up.

I wonder if they were a different sort of brick that was harder wearing than the main wall bricks, designed to withstand boots, tools and trolleys knocking into them?
 

simond

Western Thunderer
Hmm, I’m not sure about that. The lower courses in that photo are still different from those higher up.

I wonder if they were a different sort of brick that was harder wearing than the main wall bricks, designed to withstand boots, tools and trolleys knocking into them?
Well, they’re surely the same colour when that photo was taken, and they surely weren’t in later photos - I’m going for paint. See my photos in


it’s really different!
 

simond

Western Thunderer
This loco is proving a little challenging…. But, slidebars fitted, it rolls without binding :)

Clearance…?

image.jpg

Fag paper!

This crank bush has been slightly fettled and further subtle fettling is in order, close, but no cigar, yet. The other side is just a little better.

You can also see the packing twixt frame and cylinder, which is not ideal - just shy of half a millimetre or nigh 7/8 of an inch in real money.

But it rolls sweetly :)

And the body fits and it seems to look ABLTRT

image.jpg

image.jpg

Progress towards, though not arrived at, the destination.
 

Rob R

Western Thunderer
About that packing piece 'tween frame and cylinder.
I vaguely remember reading something in one of the "standard" loco building tomes (Roche/Ahern/Williams etc) about putting the slidebars, pistion rod etc, slightly outboard of the cylinder centreline to gain a couple of midges wotsits in clearance without altering the overall width. Would that help?
 

simond

Western Thunderer
Oh yes, every midge’s whotsit helps, as the nice lady almost certainly didn’t say…

I’m sure I could reprint the cylinders with such a subterfuge if required :)

current plan is not to have the back of the crosshead at all, and rely on the piston rod for guidance.
 
Last edited:

Pencarrow

Western Thunderer
This loco is proving a little challenging…. But, slidebars fitted, it rolls without binding :)

Clearance…?

View attachment 210025

Fag paper!

This crank bush has been slightly fettled and further subtle fettling is in order, close, but no cigar, yet. The other side is just a little better.

You can also see the packing twixt frame and cylinder, which is not ideal - just shy of half a millimetre or nigh 7/8 of an inch in real money.

But it rolls sweetly :)

And the body fits and it seems to look ABLTRT

View attachment 210026

View attachment 210027

Progress towards, though not arrived at, the destination.

Oh, look see you, lovely isn't it.

Well done that man and your fag paper.
 
Last edited:

JimG

Western Thunderer
Oh yes, every midge’s whotsit helps, as the nice lady almost certainly didn’t say…

I’m sure I could reprint the cylinders with such a subterfuge if required :)

current plan is not to have the back of the crosshead at all, and rely on the piston rod for guidance.
Another trick used on the protoype was to thin the driving wheels. Drummond used wheels of 4 3/4" width on his small 0-4-0 pug to get another 3/4" clearance each side.

PugClearance.jpg


Jim.
 
Top