You are using an out of date browser. It may not display this or other websites correctly.
You should upgrade or use an alternative browser.
You should upgrade or use an alternative browser.
The Chronicles of Canary Sidings - the Tale of an Untidy Workbench
- Thread starter Herb Garden
- Start date
-
- Tags
- 4mm scale em gauge ger pre-grouping
Threadmarks
View all 32 threadmarks
Reader mode
Reader mode
Recent threadmarks
2024.14 - Road traffic on Burnt House Lane 2024.15 - Skeetsmere - ground cover and ballast 2024.16 - Skeetsmere - architectural planning 2024.17 - Skeetsmere - power and control 2024.18 - Experiments with 2mmfs 2024.19 - Drewery 0-4-0DM 2024.20 - Skeetsmere - more electronics 2024.21 - WagonsJames Spooner
Western Thunderer
I have to say George, that is a very impressive and neat demonstration of wiring! Resolution to self: don’t let George look under the Elmham Market baseboards!Looks even neater when you put the trunking lids on!
View attachment 219666
The CBus command wires are now in just got the second track feed plug and the stuff at this end of the box to fit and it's done....
View attachment 219667
Nigel
That is a proper job. Yes, trunking is very useful; the top covers are great for unblocking drainpipes! I've used some 16x38mm to create a sort of viaduct for my 2mm edge of room efforts. As this was first foray into modelIing I wanted to keep the cost and difficulty down. Faced with stone/brick card it works fairly well, and also prevents stock taking a nosedive onto the floor. It sits on some scrap wooden battens screwed onto the wall for support and kept in place with a few pins. Here's a test bit I made up, and a finished section with more card covering the wood batten underneath. I originally tried emery paper as ballast but then discovered double sided foam underlay and ballast which makes it robust enough to be picked up and moved about, and looks much better than the emery paper - I've used that more convincingly for road surfaces and shed roofs. 


Herb Garden
Western Thunderer
Resolution to self.... Inspect when Nigel's back is turned.....Resolution to self: don’t let George look under the Elmham Market baseboards!
Thanks although it probably wouldn't meet the standards of our electrical team leader but nothing would....That is a proper job.
On an unrelated note @ovener you are a very brave person posting photos of western region diesel hydraulics on canary sidings! This is one of the strongholds of the GER mafia don't ya know!


* Other locomotives are available... I'm actually more of a LSWR/Southern person (my 4mm plank is based on that), but I just like the look of Hymeks and Westerns, and in 2mm they are reasonably runners, sadly unlike most of the steam ones that I have, (M7, 3MT, 14xx, A1X and a 56xx. No panniers though..Resolution to self.... Inspect when Nigel's back is turned.....
Thanks although it probably wouldn't meet the standards of our electrical team leader but nothing would....
On an unrelated note @ovener you are a very brave person posting photos of western region diesel hydraulics on canary sidings! This is one of the strongholds of the GER mafia don't ya know!


Herb Garden
Western Thunderer
Getting back on track.... More electrical stuff....
Once again the courier decided not to deliver parts so I'm unable as yet to install the boards at the end of the box.

But I've got the second pc the two track power connectors in now so that side of things is done.

Another thing I need to modify is the shield for the Arduino. This is adapted from some random electronics starter kit to provide connections for the servos to run the level crossing. The crossing is operated by code written by myself with help from my good friend Peter who taught me to code.... But this shield was made of or Skeetsmere MK2 and the header pins for the servo mean on MK3 that the cables protrude above the box.... Rats....

After much swearing I've been able to replace at least one header with a right angled one. Just going to wait for some day light cos my eyes are struggling with the desk lamp being broken.... Ah well another thing to fix...
Once again the courier decided not to deliver parts so I'm unable as yet to install the boards at the end of the box.

But I've got the second pc the two track power connectors in now so that side of things is done.

Another thing I need to modify is the shield for the Arduino. This is adapted from some random electronics starter kit to provide connections for the servos to run the level crossing. The crossing is operated by code written by myself with help from my good friend Peter who taught me to code.... But this shield was made of or Skeetsmere MK2 and the header pins for the servo mean on MK3 that the cables protrude above the box.... Rats....

After much swearing I've been able to replace at least one header with a right angled one. Just going to wait for some day light cos my eyes are struggling with the desk lamp being broken.... Ah well another thing to fix...
adrian
Flying Squad
This is definitely a benchmark to aim for - plenty of inspiration for my next project.Looks even neater when you put the trunking lids on!
As an aside what are the sources for the brass threaded inserts in the casing? - is it just an Amazon search? Likewise for the wiring numbered sleeves.
Herb Garden
Western Thunderer
Thanks, really appreciate the kind words.This is definitely a benchmark to aim for - plenty of inspiration for my next project.
As an aside what are the sources for the brass threaded inserts in the casing? - is it just an Amazon search? Likewise for the wiring numbered sleeves.
The boxes are from a company called flexgenix and the inserts come pre fitted. There were kind enough to tweak the dimensions of them for me so they fitted under the baseboards at no extra cost
Control boxes
The wire numbers are cable craft ones but many people make the same thing. Mine came from the skip at my old work but RS, rapid and other suppliers have them
Herb Garden
Western Thunderer
And it's done!
Well almost.....

Everything is in and all wiring complete

I've tried to keep the servo cables away from the DCC.... Hopefully that will work...

But I do need to change the fixings on these single servo boards.... I'm not sure why the kit designer included M3 fixing holes when they didn't leave enough space for M3 nuts without them touching other components on the board....

Also invested in a new lamp after the old one who h had more repairs than original lamp finally gave up.... Cleaned the workbench just need to find a home for all the things I found whilst cleaning up the bench.... That's a tomorrow problem
Well almost.....

Everything is in and all wiring complete

I've tried to keep the servo cables away from the DCC.... Hopefully that will work...

But I do need to change the fixings on these single servo boards.... I'm not sure why the kit designer included M3 fixing holes when they didn't leave enough space for M3 nuts without them touching other components on the board....

Also invested in a new lamp after the old one who h had more repairs than original lamp finally gave up.... Cleaned the workbench just need to find a home for all the things I found whilst cleaning up the bench.... That's a tomorrow problem
Suffolk Dave
Western Thunderer
Your picture reminds me of the old Iain Rice comment that went something like: give a railway modeller a billiard table to work on and still there would only be six square inches of space to do any modelling!
For the record, mine's no different...
For the record, mine's no different...
Herb Garden
Western Thunderer
Yep I know the feeling.... And that photo is after I tidied up! Tis amazing what I found!Your picture reminds me of the old Iain Rice comment that went something like: give a railway modeller a billiard table to work on and still there would only be six square inches of space to do any modelling!
For the record, mine's no different...
David Waite
Western Thunderer
How many times that I have found a nut or bolt that is so close to something that a spanner could not fit correctly,
Just a thought If the threads that protrude above the circuit board are long enough you could always put a sleeve over
the thread and the nut could be screwed on at a higher position away from any components.
David.
Just a thought If the threads that protrude above the circuit board are long enough you could always put a sleeve over
the thread and the nut could be screwed on at a higher position away from any components.
David.
Good idea - how about some PCB nylon round standoffs, or file/turn down some nylon PCB hex pillars. I've used a few layers of heatshrink to create my own custom ones in the past.How many times that I have found a nut or bolt that is so close to something that a spanner could not fit correctly,
Just a thought If the threads that protrude above the circuit board are long enough you could always put a sleeve over
the thread and the nut could be screwed on at a higher position away from any components.
David.
Herb Garden
Western Thunderer
2024.18 - Experiments with 2mmfs
Herb Garden
Western Thunderer
It's odd, I've been feeling rather deflated since yesterday's AG meeting. It has been planned for a while that Skeetsmere would pay a visit to this particular meeting as it was 2/3 of the way to the show deadline to have it working but now Ive done that I feel exhausted.
On reflection I'm much more of a sprinter than a marathon runner. I like jumping between projects and modelling activities. When something becomes a bore I simply move to something else until I feel refreshed to tackle the previous job anew. I'm sure some of you may resonate with that.
That said I now have 3 months to get the layout working to a state where I can at least run a goods train in and out and there is a lot still to do. But I'm taking a short break from Skeetsmere and doing something completely different to aid recharging.

That something is the starter kit from the 2mm scale association. I've never modelled in 2mm but have been a member of the association for a year or so, mainly to explore the possibilities of using the track standards for 4mm narrow gauge projects but have not done anything with that except attend the excellent NEAG meetings.

So I thought I would build my starter kit. So far I've put the track together and made a start on the wagon. But for the record, the 2mm people look after their membership superbly. The quality of products and the price is astounding but the design of this kit is something else. It's so simple and yet effective. We all have something to learn from this im sure
On reflection I'm much more of a sprinter than a marathon runner. I like jumping between projects and modelling activities. When something becomes a bore I simply move to something else until I feel refreshed to tackle the previous job anew. I'm sure some of you may resonate with that.
That said I now have 3 months to get the layout working to a state where I can at least run a goods train in and out and there is a lot still to do. But I'm taking a short break from Skeetsmere and doing something completely different to aid recharging.

That something is the starter kit from the 2mm scale association. I've never modelled in 2mm but have been a member of the association for a year or so, mainly to explore the possibilities of using the track standards for 4mm narrow gauge projects but have not done anything with that except attend the excellent NEAG meetings.

So I thought I would build my starter kit. So far I've put the track together and made a start on the wagon. But for the record, the 2mm people look after their membership superbly. The quality of products and the price is astounding but the design of this kit is something else. It's so simple and yet effective. We all have something to learn from this im sure
Herb Garden
Western Thunderer
I can always tell when I'm excited about a modelling task as I will subconsciously wake myself up earlier than usual so I have more time at the work bench before I head off to do the day job....

Today was one of those days!
On this wagon project I've been experimenting with just using solder paint and the rsu and so far it's working.... I will keep you posted....

Today was one of those days!
On this wagon project I've been experimenting with just using solder paint and the rsu and so far it's working.... I will keep you posted....
Dave Sutton
Active Member
I made some 2mm items for a friends layout 'Little Salkeld'....I told him 'never again' ....luckily his current project is in EM.
Herb Garden
Western Thunderer
Excitement also breeds stupid mistakes it seems.... Not very happy with myself at the moment....

Got the solebars on no problem this evening and oh how lovely they are.... Then I realised I had to make an adjustment in comes the iron not realising that the axles were still in place and the axle got hot and I ended up moving the wheel on the axel and loosening the tyre on the wheel! What a fool I was.
If any of the 2mm members have any advice on resetting the wheels now is the time to say....
2024.19 - Drewery 0-4-0DM
Herb Garden
Western Thunderer
So it's been a bad couple of days in terms of modelling confidence following the AG meeting and the 2mm debacle.
With the encouragement of @Liver & Fry I've got back at the workbench and am making again...
Even though I'm not really working on the layout yet.... At least this helps get some momentum again....
Back in the early days of this thread Post 8 featured a little 0-4-0DM chassis.
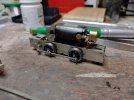
But at the time I didn't really explain what it was for. It's a branchlines chassis replacement kit for the Hornby 06 which I built just to practice chassis building in EM I'm not sure I even had a suitable body for it.
Initial inspiration came from the small 4 coupled drewery shunters. Now I know that the chassis I had built is longer in the wheelbase so the project was expected to be an inspired by rather than accurate representation of....
Although a bit more research revealed that drewery did specials as well as the standard catalogue items

So the project got a bit more of a credible inspiration
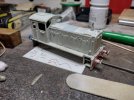
Like many of you I'm guessing my first loco kit I ever built was a dapol drewery shunters and I had the body hanging around from eons ago in a bit of a shabby state. So this I where I started working from.
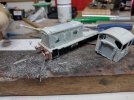
The old cab was removed and work began in cleaning up the bonnet.
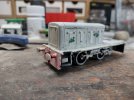
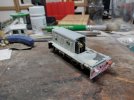

Plenty of work still to do but it's good to be back doing something.
With the encouragement of @Liver & Fry I've got back at the workbench and am making again...
Even though I'm not really working on the layout yet.... At least this helps get some momentum again....
Back in the early days of this thread Post 8 featured a little 0-4-0DM chassis.

But at the time I didn't really explain what it was for. It's a branchlines chassis replacement kit for the Hornby 06 which I built just to practice chassis building in EM I'm not sure I even had a suitable body for it.
Initial inspiration came from the small 4 coupled drewery shunters. Now I know that the chassis I had built is longer in the wheelbase so the project was expected to be an inspired by rather than accurate representation of....

Although a bit more research revealed that drewery did specials as well as the standard catalogue items

So the project got a bit more of a credible inspiration

Like many of you I'm guessing my first loco kit I ever built was a dapol drewery shunters and I had the body hanging around from eons ago in a bit of a shabby state. So this I where I started working from.

The old cab was removed and work began in cleaning up the bonnet.


Plenty of work still to do but it's good to be back doing something.
Herb Garden
Western Thunderer
Thanks for all the likes. It really helps encourage me to keep making....
A half day at home this afternoon waiting for the boiler to get serviced has allowed me to make some progress with the drewery.
The eagle eyed will have spotted the cab for this loco on one of the recently etched sheets.... It was a useful space filler on the sheet but made making a cab much easier

The window frames were soldered in place and then the whole thing folded up and joined with one seam.... Simple you would think...

Apart from the fact I had designed it in a rush and it was too short and had no cut out for the gearbox that protrudes into the cab space. Oh and don't mention handrail holes....

Had to make a plasticard plinth for it to sit on.

Looked good once all dressed and the footplate shortened.

Since installing the cab I have reduced the cab height a bit and I think that has improved the look. A run on the test track has proved we have all the required clearances for slow free running. Here she is hanging out with the unique K1/1 61997.


And also spending time with fellow 204hp sibling my old Bachman 04 from the shelf of opportunity.
A half day at home this afternoon waiting for the boiler to get serviced has allowed me to make some progress with the drewery.

The eagle eyed will have spotted the cab for this loco on one of the recently etched sheets.... It was a useful space filler on the sheet but made making a cab much easier

The window frames were soldered in place and then the whole thing folded up and joined with one seam.... Simple you would think...

Apart from the fact I had designed it in a rush and it was too short and had no cut out for the gearbox that protrudes into the cab space. Oh and don't mention handrail holes....

Had to make a plasticard plinth for it to sit on.

Looked good once all dressed and the footplate shortened.

Since installing the cab I have reduced the cab height a bit and I think that has improved the look. A run on the test track has proved we have all the required clearances for slow free running. Here she is hanging out with the unique K1/1 61997.


And also spending time with fellow 204hp sibling my old Bachman 04 from the shelf of opportunity.
Threadmarks
View all 32 threadmarks
Reader mode
Reader mode


