You are using an out of date browser. It may not display this or other websites correctly.
You should upgrade or use an alternative browser.
You should upgrade or use an alternative browser.
Templot Plug Track Developments
- Thread starter simond
- Start date
martin_wynne
Western Thunderer
adrian
Flying Squad
And it’s very cheap.
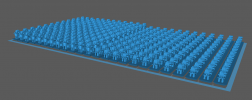
I can get 24 sprues onto my build plate, ie 288 chairs, and allowing the costs I calculated last Sunday, I make the cost of a chair to be £0.01119444444444. That’s £5.60 for 500.
As someone with 101 jobs to do - time is the most expensive component so I'd have to factor in manufacturing time as a cost as well as the material cost.
simond
Western Thunderer
The chairs took a little over an hour to print, but didn’t need supervision. The sleepers took a bit longer but much of that was faff. If I had the right sleeper material and had “dialled it in” I expect it would be an easy hour to cut ~ 170 sleepers but I’m not keen on leaving the laser unsupervised.
The assembly was fiddly, but I’d not done it before and, as I said, you’d probably have the Templot plan stuck down and then glue the sleepers to it, I reckon it would not be slower than ready to plonk track.
edit:
what I failed to mention here is the tedium of pushing chairs onto rail. Same as C&L (and Slaters, I imagine), painful on the fingertips and not quick. I will loosen the fit, which will help, but this does need to be considered. I had some good music on and got better at it, but it’s still a faff.
Last edited:
adrian
Flying Squad
However there is time to account for. It takes time to load, process and clean the 3D printer, time to wash and cure the print.The chairs took a little over an hour to print, but didn’t need supervision. The sleepers took a bit longer but much of that was faff. If I had the right sleeper material and had “dialled it in” I expect it would be an easy hour to cut ~ 170 sleepers but I’m not keen on leaving the laser unsupervised.
SimonT
Western Thunderer
I chamfer the end of the web of the rail to ease the chair on. There were an awful lot of chairs on Aberbeegwhat I failed to mention here is the tedium of pushing chairs onto rail.

martin_wynne
Western Thunderer
@simondwhat I failed to mention here is the tedium of pushing chairs onto rail. Same as C&L (and Slaters, I imagine), painful on the fingertips and not quick. I will loosen the fit, which will help, but this does need to be considered. I had some good music on and got better at it, but it’s still a faff.
Hi Simon,
This was of course what prompted me to develop the loose outer jaws option in Templot. No need to thread chairs and no sore fingers.
Also no need to chamfer the ends of the rail. Check and wing rails can have neat squared-off ends just like the prototype -- just a touch on the sanding disc is all it takes. The difference this makes in appearance is more noticeable than you might think -- at least to track nerds.

Also isolation gaps can be very narrow. A smear of epoxy on a cigarette paper between squared-off rail ends will barely notice.
cheers,
Martin.
simond
Western Thunderer
Thanks Martin, I understand the drop-in nature of loose jawed plug track, and will certainly try it at some point. I can’t believe I just typed that 
Re insulation, when I built PD loco, I used the C&L moulded plastic fishplates shaped like an elongated “H”, so each length of rail has a dropper. Except where I cheated and sawed a slot in the rail head, and cut the fishplates down to fit either side…. Anyway, fishplates are an obvious thing to 3DP. I presume the nuts are the same size as those on the chairs?

Re insulation, when I built PD loco, I used the C&L moulded plastic fishplates shaped like an elongated “H”, so each length of rail has a dropper. Except where I cheated and sawed a slot in the rail head, and cut the fishplates down to fit either side…. Anyway, fishplates are an obvious thing to 3DP. I presume the nuts are the same size as those on the chairs?
martin_wynne
Western Thunderer
@simondI presume the nuts are the same size as those on the chairs?
Hi Simon,
No, a bit larger. Fish-bolts are more critical to track safety than chair fixings and vary in size for different types of fishplates, e.g. insulated fishplates for track circuits.
However the standard fish-bolt for BS-95R bullhead rail is:
15/16" dia. 4.3/4" long, Whitworth thread 9 tpi
domed head is 1.3/4" dia. and 7/8" high.
nut is 1.5/8" square and 1.1/8" thick.
The head is normally on the gauge side of the rail, and the nut on the outside.
Fish-bolt hole centres are at 2.1/2" from the centre of the fishplate and 4.1/2" to the next. i.e. 4 bolts not evenly spaced -- centres 4.1/2" - 5" - 4.1/2"
Fishplates are normally 18" long.
The above is the REA standard. Some GWR fishplates use a different bolt design -- 1" dia. with a square head and hexagon nut.
cheers,
Martin.
simond
Western Thunderer
ok, I was not going to do this today, but...

this is a raft (actually 24 rafts) of 6 LH & 6 RH keyed GWR/WR 95R ordinary chairs, with (the rail gap increased by 0.1mm and) the nuts corrected.
Half of them are flat-bottomed and will stick to timbers - and I have left the fang bolts out so you can pin them to the sleepers and then nip the head off the pin too, if you are inclined to sew your shirt to your trousers as well as wearing a belt and braces
I'll print these this morning, and if all is well, I will put the STL files for both types of chair on the Resources page. Apropos the conversations about copyright - these are all my own work (with a bit of help from published data, @martin_wynne and others) and I am posting them so that WT members may use them for their personal use only. If anyone wants to use them for commercial purposes, I'm very happy to discuss - please PM me.

this is a raft (actually 24 rafts) of 6 LH & 6 RH keyed GWR/WR 95R ordinary chairs, with (the rail gap increased by 0.1mm and) the nuts corrected.
Half of them are flat-bottomed and will stick to timbers - and I have left the fang bolts out so you can pin them to the sleepers and then nip the head off the pin too, if you are inclined to sew your shirt to your trousers as well as wearing a belt and braces

I'll print these this morning, and if all is well, I will put the STL files for both types of chair on the Resources page. Apropos the conversations about copyright - these are all my own work (with a bit of help from published data, @martin_wynne and others) and I am posting them so that WT members may use them for their personal use only. If anyone wants to use them for commercial purposes, I'm very happy to discuss - please PM me.
simond
Western Thunderer
I guess they didn’t need to tighten the fang bolt nuts very often. I’d have been a grumpy granger if I’d had to carry two spanners…nut is 1.5/8" square and 1.1/8" thick.
martin_wynne
Western Thunderer
I guess they didn’t need to tighten the fang bolt nuts very often. I’d have been a grumpy granger if I’d had to carry two spanners…
And a big hammer for the loose keys.

martin_wynne
Western Thunderer
.
Unusual to see two adjacent nuts both at exactly the same rotation.
(Templot chair screw heads have random rotations.)
Martin.
Unusual to see two adjacent nuts both at exactly the same rotation.

(Templot chair screw heads have random rotations.)
Martin.
That's why parametric CAD existsYes, more difficult to do in CAD. The four are different, but having different orientations on adjacent chairs would be more work that I care for!
And they are quite small…

John Walker
Active Member
I have just found this thread. I too am experimenting with plug track, in Scale 7 (C&L code 125) and 3mm 14.2 (3mm Society code 60). I am writing it up here:

 sites.google.com
I found that I could not fix my sleepers to a paper Templot template accurately enough to align the chairs accurately. That led to breakages on assembly. Better to assemble the track on the bench and then fit to the template. One of the benefits of plug track is that it aligns the chairs on the sleepers so accurately.
Another source of breakage is trying to install the rail through the chairs after the chairs have been plugged into the sleepers. If the rail is not perfectly aligned with the gap between the jaws as you ease it in it has a tendency to break the inner jaw, especially on curves. Martin rightly emphasises that his plug design overcomes this problem when used as intended. However, my "combs", which are similar to your's, do help to fettle the rail position after assembly without risk of distorting the formation. I find a toffee hammer is very useful for easing the rail through the chairs both with plug track and RTR.
Regards
John Walker
Swanage in 3mm - Track
Templot Plug Track - updated 19 April 2024 I have started playing with Templot plug track. After much trial and error I have printed the chairs for a straight B8 turnout directly on my build plate. Our 3mm Society finescale rail threads nicely between the jaws/keys as shown below.
I found that I could not fix my sleepers to a paper Templot template accurately enough to align the chairs accurately. That led to breakages on assembly. Better to assemble the track on the bench and then fit to the template. One of the benefits of plug track is that it aligns the chairs on the sleepers so accurately.
Another source of breakage is trying to install the rail through the chairs after the chairs have been plugged into the sleepers. If the rail is not perfectly aligned with the gap between the jaws as you ease it in it has a tendency to break the inner jaw, especially on curves. Martin rightly emphasises that his plug design overcomes this problem when used as intended. However, my "combs", which are similar to your's, do help to fettle the rail position after assembly without risk of distorting the formation. I find a toffee hammer is very useful for easing the rail through the chairs both with plug track and RTR.
Regards
John Walker
John Walker
Active Member
Simon, I meant to ask. What are you using to colour your sleepers?
Regards
John Walker
Regards
John Walker


