Tales from the Tinkering Table - Brinkley Works

Pencarrow

Western Thunderer
Greetings all,

A few days ago, a good friend discovered a part-built Ratio Bogie Van B. He brush-painted the model, but all the brass detailing parts had been forgotten about (the model was started quite a long time ago). Brian tried to fit the parts but found it very tricky as his hands have never quite been the same since his carpal tunnel opp. I very quickly offered to finish the model by way of thanks as I have used Brian's lathe a considerable amount turning 00 wheels to P4 profile over the past few months.

Some of the photos aren't quite right as I used my phone, and it doesn't like close-up work like a proper camera.

I thought the best bet was to strip the paint off the model and start afresh.
View attachment 192521
The first job was to strip the paint with Super Strip. I then used a knife to carefully remove the clogged planks (that was a labour of love!).

View attachment 192519
The etches are very small. I decided not to use the handrails as they were just too flimsy.

View attachment 192520
I used my Bill Bedford Jig (the Scalefour Society has some of these if anyone is after one - very useful!)

View attachment 192523
End handrails on.

View attachment 192522
Bar the guard's handrail, the detailing was complete.

View attachment 192524
Into the spray booth and a coat of Games Workshop Mechanicus primer - a great undercoat for green paint.

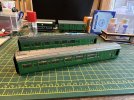
View attachment 192525Using my Neo airbrush, I gave the van a coat of Precision Post-War SR Malachite Green (Brian models the Southern circa 1947). I spray at 20PSI and thin the paint 50/50 with their general thinner.

View attachment 192526
The body ends were painted Humbrol Matt Black - I realised I forgot to fit the vacuum and steam heating pipe. D'oh!

I am very pleased with the paint work. It has gone on very smoothly, with no gritty feeling or orange peal. I also was very happy with the Tamia masking tape!

More to follow on this one soon. The next job will be to fit the missing pipes, brush paint the chassis and then varnish.

Thanks for reading,

Nick.

Hi Nick

I thought it was just me that received these Ratio Van Bs from people in various stages of abandonment. Think I have one I made from scratch plus 4 or 5 donations...
 

Nick Rogers

Western Thunderer
Hi Nick

I thought it was just me that received these Ratio Van Bs from people in various stages of abandonment. Think I have one I made from scratch plus 4 or 5 donations...

Hi Chris,

You couldn't make it up, really! I must be mad volunteering to update these older models. Having said that, I still enjoy bringing stuff up to scratch and in Brian's case, it is nice to help out a friend who isn't able to do this type of work now (his hands just don't do what he wants anymore, which must be hideously frustrating for him).

I would definitely like some help there. The side-only repainted BCK/BSK set will be the first to be done. I did wonder if set 25 would be suitable?

Regards,
 

Pencarrow

Western Thunderer
Hi Chris,

You couldn't make it up, really! I must be mad volunteering to update these older models. Having said that, I still enjoy bringing stuff up to scratch and in Brian's case, it is nice to help out a friend who isn't able to do this type of work now (his hands just don't do what he wants anymore, which must be hideously frustrating for him).

I would definitely like some help there. The side-only repainted BCK/BSK set will be the first to be done. I did wonder if set 25 would be suitable?

Regards,

You have a PM
 

Nick Rogers

Western Thunderer
Greetings all,

Not a huge amount of work to report as the weather hasn't been suitable for painting. However, I have almost (hooray!) completed the Masokits SR utility van underframes. I discovered about 6 weeks ago, when giving them a run on our test track, that there was a bit of slop in the axles. I modified the bearing carriers with a small 0.2mm brass washer, which as the videos below will show, resolved the problem.


All the vans need their sprung buffer heads fitting, along with the steps, and then they can progress to the paint shop.

The Van C is a Hornby model, which was converted by Maurice Hopper. I acquired it a few years ago. It needs a bit of tweaking, as the Hornby set-up seems to have a lot of resistance in it. The rear PMV is a Bachmann model, which is ridged and has Rogers/Pearce turned wheels. :D My other Bachmann PMVs will be converted to P4 the same way.

Most of this stock will run on Rod and John's Balcombe layout.

Best wishes,
 

Nick Rogers

Western Thunderer
Greetings all,
I haven't spent much time on any forum over the past year or so, but a few friends have been asking what I've been up to, so I thought I would share things here.

A fair amount of my modelling time has been spent working on the baseboards for DRAG's (Devon Riviera Area Group) new test track (TT3). I'll post something about that in the future. I've also been supporting various friends with their modelling projects.

First up are some of Brian Pearce's SR CCTs and PMVs. The CCTs are by Wrenn, and the PMVs are Parkside kits. They were built to P4 standards, with compensation or springing and lots of underframe and buffer beam detailing. Brain also replaced the doors and fitted more accurate castings for the roof vents, sprung buffers and AJ couplings. I believe these are older than me! I did a bit of repair work on them. Then, primed, painted, lettered and weathered them. I commissioned Fox to produce a COVCAR transfer for me: I don't believe there is a COVCAR SR transfer for 4mm. Precision SR Malachite was applied through my Neo airbrush. I then weathered them using three different precision colours: roof dirt, track dirt and frame dirt.

IMG_4887.JPEGIMG_4894.JPEG

A few weeks ago, Ian Harrison kindly provided running rights on his lovely Dulverton layout. I'm quite pleased with the work.

IMG_7111.JPEG

IMG_7112.JPEG

IMG_7114.JPEG

I've learned a few things, prompting me to purchase a new airbrush. I've swapped from the Neo to a Badger 150. I've also been experimenting with various needle sizes, which has been pleasing. The Badger 150 is certainly easier to clean and seems to produce a more consistent finish compared to the Neo. It's all fun.

Anyway, thank you for reading. Please feel free to comment. I promise it won't take a year till the next post!
 

Nick Rogers

Western Thunderer
Following on from my previous post, here is about half of Brian's stock I've been working on over the past 8-9 months. It has been a real pleasure to work on them. Brian is delighted with the work, and I have thoroughly enjoyed researching each prototype and giving each vehicle a custom finish. All of the stock in the picture has now been weathered and is ready for revenue-earning service.
IMG_6978.JPEG

IMG_7134.JPEG

Another vehicle I've enjoyed working on is this rather nice Chivers PMV. I've added some of the fiddly metal strapping and other smaller details. I then painted, varnished, and lettered the van. I have just door handles and grabs to do, and I need to fit a brake lever (which wasn't present with the bits). Then I'll weather her to typical post-war condition!

IMG_3927.JPEG
This was the custom Fox Transfer I mentioned in the previous post. The fokes at Fox have been incredibly helpful and turned this around very quickly.

Built to P4 standards, using the built-in compensation, with AJ couplings and sprung buffers. I really enjoyed working on it.

Regards,

Nick.
 

Nick Rogers

Western Thunderer
Sticking with the Southern theme, I'm ashamed to admit I began work on this Maunsell P-Set during the first lockdown! :eek:

Spams very kindly provided a lot of information and assistance; many thanks, old Fruit. I've opted for set 179, a thoroughbred SR P-Set.

The basic models are a pair of Hornby BCK and BSK coaches, which I've significantly reworked. I followed Peter Swift's article in MRJ and lowered the internal corridor windows—quite an involved task for a mm. Then, I detailed the compartments using Peco's card product. I did get it scanned and printed at a local printer, as I only had one sheet of each set.

Both coaches had their glazing removed, a task fraught with danger! I managed to get away with just repainting the sides on one coach. However, the other was in quite a rough state when it arrived, so a strip and full repaint was necessary. Precision SR Malachite was used thinned 50/50 and applied through my old Neo airbrush.

IMG_1941.JPEG

IMG_1942.JPEG

The compartments were populated with figures from Modelu. Mike asked years ago what these figures were destined for... it is nice to find a permanent use for them. I painted them, again during the first lockdown.

IMG_7298.JPEGIMG_7299.JPEGIMG_7300.JPEGIMG_7301.JPEG

The next couple of photos show the corridor modifications more clearly. Would I do this again? Probably not. I would add the cream panelling, but wont be getting the file out!

IMG_7302.JPEGIMG_7303.JPEG

Transfers next. I've realised the 179 CCT transfers need a high gloss finish, so they will need a bit of weathering to help hide the film.

IMG_7328.JPEG

Body side transfers are a mixture of Fox and Methfix.

IMG_7330.JPEG

IMG_7329.JPEG

I'll write about their proposed working in a subsequence post.

Thank you for reading!
 

Attachments

  • IMG_7307.JPEG
    IMG_7307.JPEG
    278.4 KB · Views: 1

Nick Rogers

Western Thunderer
So, what does a Maunsell P-Set have to do with a GWR branch line? I hear you ask!

As any long-term stuffers readers will know, I am working towards building Horrabridge (and a smaller cameo layout) on the former GWR line from Plymouth to Launceston. I have several photos of SR stock running on the branch. I believe (it is certainly hinted at in various publications) that between 1943 and 1946, SR crews had a few turns on the branch to retain knowledge as a diversionary route.

In 1943, a connection was made at Lydford, with similar arrangements being installed at Launceston and St. Budeaux to give flexibility should other lines be damaged due to wartime bombing. What isn't totally clear is whether GWR or SR motive power was used. Certainly, in the early 1950s, SR stock was used on the branch. There were similar arrangements with western crews, with one such working being the Plymouth-Lifton Sunday milk service, which was booked via Tavistock South on the down working, but the up return involved crossing from western to southern metals at Lydford Junction, and hence back to Plymouth on the SR route. During the winter, this western turn involved just the southern route.

PANNIE~1.JPG
Ex-LSWR stock in the hands of 4658 at Yelverton.

A hazy picture thought to be taken at Lydford during 1962. Copyright Mike Roach.jpg

SR Mogul, on down Okehampton-Friary service, waits for the board to come off whilst a WR 4575 with a 3-coach set crosses from the Launceston branch to the up SR line. 1962

The rationale behind the P-Set is that it will be allocated to a Southern working as part of a turn for crew route knowledge and retention. Due to the nature of such workings, it runs depending on stock and crew availability. The turn is quite involved but follows the published information about the western's SO milk working.

SR Turn 125
Empty Stock Friary Yard/Carriage Sidings to North Road via Lipson Junction.
Service working - North Road to Tavistock South, calling at Marshmills, Bickleigh, Yelverton, Horrabridge and Tavistock South (not calling at Plymbridge, Clearbrook Halt or Shaugh Bridge Platform).
Then, form a non-advertised Tavistock South - Lydford GWR working (running as required).
Empty Stock
- Lydford SR to Brentor.
Service working - Brentor to Friary, all station stopper.

Initially, a Southern M7 will be the motive power of choice. However, in the long run, I would like to replace this with a kit-built O2. I almost bought a Gibson one at Railex last month but resisted as I think I have a SEF white metal one hiding in the maturing box.

Anyway, thank you for reading. Please feel free to comment. I don't want a dull thread!
 

Pencarrow

Western Thunderer
Sticking with the Southern theme, I'm ashamed to admit I began work on this Maunsell P-Set during the first lockdown! :eek:

Spams very kindly provided a lot of information and assistance; many thanks, old Fruit. I've opted for set 179, a thoroughbred SR P-Set.

The basic models are a pair of Hornby BCK and BSK coaches, which I've significantly reworked. I followed Peter Swift's article in MRJ and lowered the internal corridor windows—quite an involved task for a mm. Then, I detailed the compartments using Peco's card product. I did get it scanned and printed at a local printer, as I only had one sheet of each set.

Both coaches had their glazing removed, a task fraught with danger! I managed to get away with just repainting the sides on one coach. However, the other was in quite a rough state when it arrived, so a strip and full repaint was necessary. Precision SR Malachite was used thinned 50/50 and applied through my old Neo airbrush.

View attachment 218684

View attachment 218685

The compartments were populated with figures from Modelu. Mike asked years ago what these figures were destined for... it is nice to find a permanent use for them. I painted them, again during the first lockdown.

View attachment 218686View attachment 218687View attachment 218688View attachment 218689

The next couple of photos show the corridor modifications more clearly. Would I do this again? Probably not. I would add the cream panelling, but wont be getting the file out!

View attachment 218690View attachment 218691

Transfers next. I've realised the 179 CCT transfers need a high gloss finish, so they will need a bit of weathering to help hide the film.

View attachment 218694

Body side transfers are a mixture of Fox and Methfix.

View attachment 218696

View attachment 218700

I'll write about their proposed working in a subsequence post.

Thank you for reading!

Ashamed?! There's no shame in working on stock from the better railway...

Looking excellent Brinkers.
 

Nick Rogers

Western Thunderer
Ashamed?! There's no shame in working on stock from the better railway...

Looking excellent Brinkers.
Thank you, Chris! I have enjoyed working on them. I do have one of Hornby's rather nice Bulleid L-Sets, which might double as an alternative set. Although, that will have to take a back seat... some western stuff is needed to tip the balance!

All the best,
 

Nick Rogers

Western Thunderer
One last southern post for the evening.

A few years ago, Maurice Hopper embarked on an alternative approach to model railway layouts. He started working on a monochrome-themed P4 layout—very alternative and quite arty-farty! He decided not to proceed with it and kindly passed his 4mm stock over to me. Amongst his offerings were three Bachmann PMVs. Two he had reworked to monochrome, and the other was just heavily weathered. I opted to revert the trio to pre-1948 livery (they were in post-1956 BR livery originally).

Last summer, I repainted them (please see an earlier post), using a rather nice photo of an uneven-planked SR PMV at Exeter Queen Street as my inspiration.

SR PMV.jpeg
Exeter Queen Street, circa 1947

IMG_7310.JPEG
The trio have all received Precision Malachite and a coat of gloss varnish. The lettering was a mix of CCT and Fox transfers (which aren't perfect, but for wartime and post-war vehicles, I think they will do). I need to weather and fit couplings to them.

IMG_7311.JPEG

S1253 sports the post-1947 livery, where a simple S was applied in front of the van number, rather than the more traditional Southern lettering.

IMG_7312.JPEG 1068 and 1945 have the more recognisable Southern branding.

I had planned to convert them to P4. However, a couple of friends have proposed rebuilding an existing layout from P4 to 00, so they will likely see service there. I also plan to build a small 00 layout over the coming months, so they fit into that scheme, too. It is, however, a western region layout with some southern workings. You can't have it all, Spams!
 

ovener

Active Member
Lovely work Nick, Thank you for sharing with a wider audience. It has inspired to try and sort out a PMV of my own for my IOW plank..:)
 

Nick Rogers

Western Thunderer
Lovely work Nick, great to see you back at the bench.

Mke

Hello Mike!

Thank you very much: it is nice to share what I'm up to with friends! I visited Ian Harrison this afternoon and had a play with his Finney 41xx. I hope you have managed to get yours running sweetly now.

All the best,
 

Nick Rogers

Western Thunderer
Good evening all,

This afternoon, I had a rather productive session with Ian. I bought along some 'almost finished' freight stock to run on his rather lovely Dulverton layout. A visit always motivates me to get on with certain projects. Thank you, Ian, for your hospitality.

I brought over about 50 freight vehicles. One pick-up goods, a fully-fitted set and my cattle vans.

IMG_7343.jpg
My class 33 test locomotive was the motive power for the long van train, which consisted of 18 sprung vehicles and a brake van. All ran beautifully, with no derailments.

IMG_7344.jpg
Drone view - 4410, a Malcolm Mitchell kit, hauled the cattle working. One Hornby Maunsell van derailed on the station throat. However, that was down to the back-to-back being closer to EM gauge than P4! A quick adjustment and all was well again.

The shorter pick-up freight was in the hands of my 45xx locomotive, another Malcolm Mitchell kit. Annoyingly, I forgot to photograph that formation. It did, however, perform faultlessly! It was a very satisfying afternoon.

Once again, thank you, Ian, for your company. I hope the vans will all be weathered by the next visit. :)

Best wishes,
 

paulc

Western Thunderer
Hi Graham,

I use Archer's Resin Rivet Head fine tranfers.

View attachment 102768

Essentially, they are the same as a normal transfer. I 'float' them off as a strip in warm water. I put some Micro Set on the area of the model, slide the rivets off with a OO brush, dab down with a cotton swab (bub) and then dab some Micro Sol over them and leave them alone for a couple of minutes. Then I give them a quick dab with the cotton bud to make sure they have stuck down and leave well alone!

They are a godsend for things like this. I can't remember where I got these from, but I have several HO scale sets: the spacing varies from set to set.

Archer Fine Transfers, Decals, Surface Details and Dry Transfers for model builders

Amazon also stock them.

Hope this is of use.

Regards,

Nick.
Those rivets are the bees knees Nick . I have used them to replace rivets on a friend's whitemetal tender that i was fixing for him after it had been dropped ( not by me ), rivets were harmed in the process but after paint you couldn't pick the difference between those and the originals .
 
Top