Rowan Colliery 4mm/00

40057

Western Thunderer
The assembly of the Grainge & Hodder base-boards for ‘Rowan Colliery’ has commenced. Today.

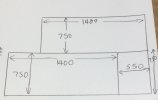
I had intended to make a start ‘during the Christmas holiday’, so I am a little late. There are to be three base-boards:
A7B66889-AB39-4D00-A585-525C52641300.jpeg

The sizes chosen are designed to minimise the number of tracks (ideally just one) crossing the joints between the different boards. However, I think there will have to be two tracks across the join between the two ‘front’ (scenic) boards — the main circuit and a head-shunt. Otherwise the head-shunt will be very short and severely limit train length in/out of the sidings on the main scenic board.

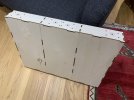
As this is a learning experience for me, I have started with the small board:
65F57A70-2BE1-4151-BD5D-0DF5D22EFB6A.jpeg

The main structure is complete.

I have also ordered some more of the track I will need. I will start track laying though with the FY board, the assembly of which is not yet begun.
 

Pencarrow

Western Thunderer
Neil,

Having read articles by Norman Solomon in which he used a firm foam rubber, I tried something similar, but found it difficult to glue.

Presumably your mat is not expanded polythene / polyethylene?

Do you know what kind of polymer it is, and what kind of glue do you use, please?

cheers
Simon

Late to the party... Yes, I also tried the firm foam as underlay but had a hell of a job getting it to stay flat. I also found that even the firm foam was a bit too squishy. I also didn't find it was any quieter than cork. In the end I removed it all and went back to cork.
 

40057

Western Thunderer
My journey into the unknown continues. The to me unknown world of modern model railways. Last time I posted a photo of the small base-board for Rowan Colliery, it looked like this:

5D3DD679-DC42-4E8D-9CA9-A81835D78053.jpeg

The front of this board is on the right. When photographed, I had not glued the right-hand flooring panel in place, intending to do so the next day. However, I then realised this would be the only place within the scenic area where I could have some of the ground surface below the level of the railway. So I have modified this panel to create a lower lying drainage channel:

F4B19B87-CA82-4770-94FE-4B7F0C4A5CDD.jpeg

I’m not planning a stream. There might be a bit of standing water under the culvert and a few puddles elsewhere, but the intention is rank wetland vegetation — rushes mainly. Obviously different to the vegetation in the better drained areas.

I will now need to build an embankment across the lower section. I have marked out the alignment of the track so I can position this correctly. The culvert is just resting on the board in the above photo but it will be incorporated into the embankment.

The overall plan for this board is starting to take shape:

10D0F3AF-6793-4EA9-933E-4D97E9F2DA2A.jpeg

The front of the board is to the left. Right at the front — the head-shunt for the sidings on the main scenic board. Then the running line (circuit). Across the middle of the board, a road on an embankment crossing the railway on an overbridge. Behind the road, rising ground with trees, to block the view of the running line disappearing into the FY.

Help, please! What is the recommended way of contouring the sides of my low-lying wet area? Plaster, papier-mâché or something else? Any advice gratefully received.

And I will need some small willow trees — sallows or similar. Does anyone sell such things?

Thank you in advance.
 

Pencarrow

Western Thunderer
Hi,

I've done the scenics on quite a few layouts over the years. Others may / will give differing advice based on their own preferences, but I've always liked forming contours and the landscape using polystyrene type materials. Light and easy to carve, and easy to amend if you change your mind. Also good for planting trees into.

The polystyrene layers are glued together using PVA. Weighted down whist the glue sets.

On top of the polystyrene I use a material bought from Wickes. It's a tub of premixed lightweight filler. For larger areas I embed some open weave bandage into the filler. No more than around 5mm is required for the filler thickness. Wickes Lightweight Ready Mixed Filler - 1L | Wickes.co.uk

Once the filler is dry is brush over a layer of grey or brown paint (not gloss) to hide the white colour. I will then brush some PVA over the top to harden the surface off. You can apply the base layer of green stuff at this stage...
 

Pencarrow

Western Thunderer
Regarding your search for a girder bridge, I don't know what span you are after but this looks ok: 300mm Steel Plate Bridge Model Kit. Brick Supports. Railway . OO/HO Gauge | eBay

Never used them but at least they don't have magic floating girders! You could always trim a bit off each side of the deck/ girders to shorten the span?

If you want to be a bit more creative you could build the girders from this kit: Pardon our interruption... (No idea why the link comes with that title, but it does work)

But that does leave you with the abutments to source.
 

40057

Western Thunderer
Regarding your search for a girder bridge, I don't know what span you are after but this looks ok: 300mm Steel Plate Bridge Model Kit. Brick Supports. Railway . OO/HO Gauge | eBay

Never used them but at least they don't have magic floating girders! You could always trim a bit off each side of the deck/ girders to shorten the span?

If you want to be a bit more creative you could build the girders from this kit: Pardon our interruption... (No idea why the link comes with that title, but it does work)

But that does leave you with the abutments to source.
Thank you. It’s very kind of you to take the trouble to post these links. I wasn’t aware of those kits. I would have to shorten the span considerably, or use a different deck. But that could be done.

This modelling lark, as currently practised, is certainly a learning experience for me. Firstly, there is so much stuff available. So choices have to be made. Do I want brick or stone abutments, an arch or a girder etc etc. I have already bought a ‘stone’ culvert. So is it OK to have a brick-built bridge a few scale yards away? Does my choice of building material for the bridge mean I should have similarly built buildings? In which case are kits available, in the right material, for the buildings I will need? It’s difficult to know where to start. But I don’t want to make a choice now I will regret later.

Life is much easier, strangely, in the vintage world of Rivermead Central. Bassett-Lowke, for instance, made two tunnel mouths — single and double — in brick. After WW2, finished to represent concrete. That’s it. Find one of those or scratch build. Other vintage buildings similarly. Use what you can find or make one.

The other eye-opener for me is prices. I’m buying bits and pieces for Rowan Colliery, and individually mostly costing only a few pounds. But it does add up. I never realised before how little, relatively speaking, vintage equipment sells for. The track I’m using for Rivermead Central, vintage 0 gauge, costs less to buy than the new 00 stuff I’m buying for Rowan Colliery. Sure, the vintage track has to be found, cleaned and (sometimes) repaired. But the price is low. Certainly, there are rare and valuable vintage locomotives. A Bassett-Lowke A4, if you can find one, will be many thousands of pounds. But generally, at current prices, I now realise vintage equipment, in nice condition, is relatively remarkably inexpensive.
 

andi4x4

Member
Referring to the first link you posted for the laser cut bridge - it is worth contacting these ebay sellers of laser cut stuff to ask if they can do you a 'one off' - if all you need is shorter sides ( you can cut the deck to length yourself ) they quite often are happy to oblige as it may only require a couple of minutes of their time sat at the computer to make the relevant alteration, and it potentially puts another product or variation in their portfolio.
 
Top