Rob R's Scattergun Workbench

Rob R

Western Thunderer
Rather than butting in on other threads I thought it best to start one of my own.
Mostly S scale with a bit of 7mm/16mm/G3 plus whatever turns up.

The current project to hand is to get at least one decent 3d printed wagon body done for the SSMRS agm on the 5th and following on from advice given on another thread (and a resin delivery) the latest attempt is currently on the printer (Elegoo Mars 2 Pro).

GNR 4 plank open printing upside down with a sacrificial 0.5 x 0.5 ridge around the top to be sanded back after curing, angled 45 deg one way and 5 deg the other at 50um layer height, anti -aliasing set to 4 ( no idea what it does ).
Elegoo water washable ceramic grey resin.(Which may, or may not, be half the problem).
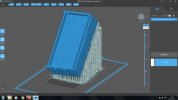
GNR 4 Plank top ridge v2.jpg

The last attempt had some creases (which refuse to be photographed) where the red arrows are, so this time I have tilted it on the second axis (5 deg), used heavy supports all round and supported the supports to stop them waving around in the breeze.
Time will tell.
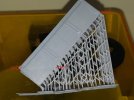
20220227_211300.jpg
 

IanB3174

Member
Re anti-aliasing, if it's the same as in photoshop is the removal of jagged edges along a boundary of pixels. It's algorythmic... I suspect it's the same processing all graphics software
 

Mike W

Western Thunderer
My ears pricked up when I read "G3" in there. Not solid printing a whole wagon in G3 surely ..... ? Or must I be patient to find out?

Mike
 

Rob R

Western Thunderer
Not the whole wagon Mike:)

No.2 son got himself a Slaters (sorry) G3 MR 5 plank and then announced that he wanted me to build it for him. Hmm, one day maybe.

I would like to see if it is possible to 3d print G3 wagon ironwork (strapping etc rather than axleboxes/buffers) to fit onto timber bodies and possibly modular coach bodies, much like those Jamie (?) did in resin on WT a few years back.

Don't hold your breath though, there is a whole pile of S stuff to get through in the "design and print one day list" and a loft full of 7mm shelf queens...

But there again, you never know where the butterfly will land next.

Rob
 

AndyB

Western Thunderer
I would like to see if it is possible to 3d print G3 wagon ironwork (strapping etc rather than axleboxes/buffers) to fit onto timber bodies......
I've had the same thoughts - just don't have time and space at present to get a 3D printer to try it out. Would be happy to collaborate on doing some CAD work though, and contribute to resin costs.

Andy
 

Mikemill

Western Thunderer
Rob

Call me old fashioned if you will, but I can’t see the need to print a wagon body as one piece, surely much easier to print the the sides, ends, and floor as separate items and then stick together!!!!

Think ABS white metal or Copper Craft (that was) plastic kits that make up to be very nice models.


Mike
 

Rob R

Western Thunderer
Rob

Call me old fashioned if you will, but I can’t see the need to print a wagon body as one piece, surely much easier to print the the sides, ends, and floor as separate items and then stick together!!!!

Think ABS white metal or Copper Craft (that was) plastic kits that make up to be very nice models.


Mike
Mike,

Printing a flat pack kit is an option to be explored although the advantage of whitemetal and injection molded kits is the option to use solder/MEK for assembly rather than an adhesive such as epoxy or cyno.
I am also not yet convinced that a "hobby" resin printer can produce "thin/flat" components without warping etc.
Experimentation is the name of the game, in part design, print settings and resin spec.
Definitely a "hobby within a hobby".
Rob
 

Rob R

Western Thunderer
Hi Rob, I am very tempted with the S scale stuff........what are the prototypes?
Julian
Julian,
The wagon in the posts above is a GNR 4 plank open.
I also have a 1923 spec RCH 7 plank on the go but still with the same issues at the print stage
Rob
 

Rob R

Western Thunderer
I've had the same thoughts - just don't have time and space at present to get a 3D printer to try it out. Would be happy to collaborate on doing some CAD work though, and contribute to resin costs.

Andy
Andy, the G3 is a little way down the list at the moment but certainly some time this year. As to resin costs, I am currently on my 3rd bottle and have still spent less than going out to watch 22 premier league jessies kick a ball around a field and I might have learnt something in the process
Rob
 

Rob R

Western Thunderer
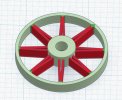
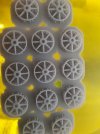
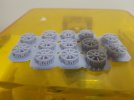
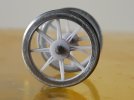
Fresh off the printer, the first run of the 42" open spoke wheels.
I still need to play with the shrinkage allowance but I am not sure about the gap between the spoke pairs. The prototypes I have been looking at are quite slender but the printing has closed the gap up.
42 inch 8 open spoke wheel v2 Tinkercad.jpg20220404_190620.jpg20220404_190651.jpg20220404_190827.jpgUntitled.jpg
Edit: Just spotted it. I need to open up the gap in the spokes so that they touch at the hub. V3 beckons....
 

Rob R

Western Thunderer
I didn't completely redraw the wheel, just added some fillets into the inside corners of the spokes and printed vertically.
It takes a bit longer vertically but you can fit more on the build plate.
Pictured assembled (pushed on by hand), runs nice and true except for the eccentric pinpoint on one end of the axle.
I also had to mix and match the tyres as the bores aren't all the same.
A small bottle of black resin next on the shopping list to save painting inbetween the spokes.......
v4 assembled.jpg
Rob
 

Chas Levin

Western Thunderer
Nice looking results Rob - did you also make the tyres, or did you re-use tyres from commercially made wheels?
 

Rob R

Western Thunderer
Chas,
The tyres are from the SSMRS, intended for their range of lost wax brass centres.
As far as I know these are the only tyres this size with the right profile.
Rob
 

Rob R

Western Thunderer
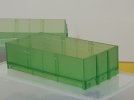
Back to the GNR 4 plank open again with a change of resin and a slight tweak to the design.
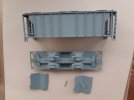
I have put two 1.5mm square holes in the floor at one end to overcome the suction issues and I am now using the Elegoo Water Washable Transcluscent Green. This resin prints nice and crisply compared to the WW grey, presumably because it isn't stuffed full of inert filler to give the grey colour.
Printed on Mars 2 Pro at 45 degrees on long axis, 0.03mm layer height.
All other settings as per default except the bottom layer exposure (15 seconds instead of 35 seconds).
Pictured by crappy phone camera in near zero light after support removal but before curing.
Will give it a squirt of primer later in the week if it stops raining and take a better picture or two.
Rob
20220605_204958.jpg
 

Rob R

Western Thunderer
When work is stupidly busy, DIY and other domestic stuff is pliling up, exhibition deadlines are creeping ever closer (Trowland), what is a guy supposed to do?

Start a new project of course!

I have been collecting things for a mid 1970's Frisco themed layout for a while so it was about time to make a start.
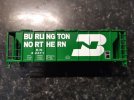
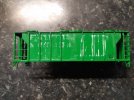
First off the rank is a short rake of PS-2 covered hoppers for cement service. There are plenty of S-Helper Service PS-2s around but none in Frisco livery, (there aren't that many prototype piccies around either as there were only 200 of them on the Frisco) so reworking what is available is the order of the day.
The Big Nasty cascade green one was chosen as the guinea pig and after stripping down:-
20220823_155318.jpg

and after 5 minutes with the 400 grade wet n dry (used wet)
20220823_160841.jpg

another 5 minutes saw the rest of the lettering gone and a gap inbetween the showers allowed a quick squirt of rattle can primer
20220824_135710.jpg
I trip to the local car spares place tomorrow should result in a suitable grey rattlecan for the top coat (there are loads of grey cars around in a multitude of different shades).
The primer is too dark for faded 25 year old paint and being matt the decals (K4) won't stick.
Hopefully progress won't be too glacial..
Rob
 

geoff_nicholls

Western Thunderer
I would like to see if it is possible to 3d print G3 wagon ironwork (strapping etc rather than axleboxes/buffers)
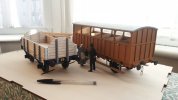
sorry to be slow in responding, but I've only just seen that comment The Eastern Counties wagon in this photo has 3D printed stanchions. The frames and (functioning) buffers are also 3D prints. The wagon body and solebar overlays are laser cut ply as it gives a much better surface. There's no substitute for real wood20210109_133036.jpg
 

Rob R

Western Thunderer
Virtual workbench time. A quiet (ish) night shift with a colleague who knows a bit about Fusion 360 has provided the ideal opportunity to have a play.
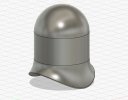
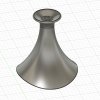
Typical Sharp Stewart dome and safety valve cover. Probably not the easiest things to start with but examples of what TinkerCad can't do.
SS Dome 01.jpgSS Safety Valve 03.jpg
Drawn at 1/32 for printing at 1/64 using "Lofting with Guidelines".
If you know what that is then you don't need it explaining.
If you don't know then I wouldn't worry about it.
Rob
 
Top