7mm Ressaldar's working diorama - Pembury

Ressaldar

Western Thunderer
Hi Martyn,,

many thanks for your input. The platform is1.100 long - just right for a small prairie + B set, so the signal box will be placed as far back on the platform as possible, might even extend the platform depth locally to give maximum space to the guard and any passengers in that area.

regards

Mike
 

Ressaldar

Western Thunderer
Some progress over the past couple of weeks in as much as the signal box has been completed and painted apart from the interior and the guttering and RWPs neither of which which are in the kit. However, I have now made a start on the gutters and the RWPs using Modelu components but the gutters were too banana shaped to use and therefore substituted half round Plastruct coupled to the Modelu outlets and fitted them in readiness for the downpipes etc. only to find that the offsets that I used were nowhere long enough and have ordered {hopefully} the right length offsets to complete the job.

P1020225-001.JPG

showing where the outlets had been fitted. The fascia board was not provided with kit and had been fitted to the ends of the barge boards which unfortunately are too long and therefore need attention to get the gutters to fit correctly. The roof is a loose fit until such times that the interior is completed.

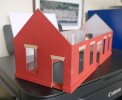
The main station building is a simple single storey unit with the walls fitted into slots on a base with the plinth courses added after initial assembly.

P1020224.JPG


The fit is excellent, no sanding or trimming required at all. The is no interior or any form of support for the roof so I will be creating an 'egg box' drop in interior that will not only give sense of completeness but will also support the roof with two front to back walls cut to the end wall profile. Again, as with the signal box, there is no provision for the gutters and RWPs.

At least with the simple nature of the kit, you cannot get too far ahead and forget to paint items in advance of fixing them to the model so I have sprayed the walls with red primer and now painted the stone lintels in advance of fitting the windows and doors.

P1020223.JPG

Here are the components that are still to fix, all have been given three thin coats of acrylic paint and the windows assembled using the provided glazing glued to the backs and cut oversize to enable them to fit flush with the back of the openings. the doors will be fitted in the same manner. The cills are a precise fit once the windows are in place. The only other items in the kit are two pieces for the main roof and a single piece for the canopy roof.

I am thinking of 'pointing' the brickwork before fitting the windows and doors and having never got this far with a main building before am not sure whether to seal the primer with a matt varnish before applying the pointing paint or just go ahead and not worry about the varnish - your thoughts would be welcome.

I have also assembled a small lineside hut

P1020226.JPG

which will be heavily weathered before the window is glazed.

More to follow soon

regards

Mike
 

Attachments

  • P1020227.JPG
    P1020227.JPG
    283.1 KB · Views: 8

Ressaldar

Western Thunderer
This week has seen further progress on the station building and the signalbox, such that to all intents and purposes, they are finished externally save some weathering to the signalbox. The parts all fitted together without any fettling.

IMG_1187.JPG
the station building has had a basic roof dirt wash applied and I might just leave things there. Internally, there is an 'eggbox' structure to create a booking hall, ladies and gents waiting rooms and a circulating area behind the platform facing doors. The walls are painted and I made several photo copies of the painted doors and then applied them to the walls with Pritt in their proper positions and left it at that.
Toe canopy roof just had location lines cut on the top surface so I used those lines as a guide for the standing seam/glazing bars which are formed from Plastruct T section (1.85 wide at the base) and then painted with Ammo 'steel' to represent a metallic finish. The two courses of brickwork which show above the canopy roof were also painted 'steel' to represent the flashing. I have made no attempt to install any rainwater goods as I was uncertain as to how it would have been installed in reality.
IMG_1190.JPG
The signalbox is complete externally and the gutter outlets are a loose fit in the downpipe so that the internals can be installed at some later date. I think that it will be left in this fresh paint finish so that the Branch Closure Notice can be expected at any time!
P1020233.JPG
Roughly in position on the layout.

The platform is next up for decoration and installation, that will then be followed by ballasting,

More to come soon.

cheers

Mike
 

Ressaldar

Western Thunderer
The last month has seen much work, mostly trying to work out a suitable/workable fiddle yard including the use of a three way point in conjunction with a number of Y points to just two Y points. sector plates and transversers and all sports of combinations in between! In order to stop the speculation, I ordered a Peco Y point, with a Peco point adaptor plate (the tie bar is over a cross brace in the baseboard) a CDU and suitable power supply and a frog juicer to see if that would sort out the thought process.

The items were delivered the next day (well done Digitrains) and the point installed but the motor/CDU/power supply would not change the point over, even with the spring removed from the point itself. I decided that it would be easier to just change the point by hand. Then having reviewed the resulting options I decided to go for the sector plate solution especially as I had the rail in stock and would not need to buy any further point motors etc.

The sector plate was fashioned from an offcut of 9mm ply that was wide enough for two tracks side by side and of sufficient length to hold a B set + small prairie - the longest train likely on the 'Branch'. having got things wired up and working I realised that there was sufficient space for a kick back siding either side of the 'main line' to hold a couple of small tanks etc., so these have also been included. The end result is here - the scenic area being up to the left hand side of the bridge, Unfortunately, the brick pier is in the wrong place although while typing this and looking at the plan, I might move the bridge to fit against the left hand side of the pier and disguise the pier as some form of building which would also make the backscene a lot easier to sort out - which is the next item of the agenda,

Pembury as built 11.08.2023.jpg

A bit of a hectic week ahead - Diamond wedding anniversary on Thursday and consultation with the main man at the cancer clinic on Friday and family anniversary celebrations over the weekend so further installments might be a week or too away, deepending on sobering up and results.

regards

Mike
 

Ressaldar

Western Thunderer
The Anniversary weekend got off to a flying start with the Consultant phoning to say that my PSA reading was now 0.09, down from the 7.7 that started off the treatment cycle and that he would call again in six months time following my next blood test and hopefully if things are about the same, that will be that. The dinner on Saturday evening and lunch on Sunday with all the family was great. Two weeks later, our present to each other arrived after being on order for three months - we now have a very comfortable three piece suite.

So the modelling mojo is returning at long last and I have received a three sheet photographic backscene which was ordered off of ebay and have placed it in position, without cutting it down, to judge just how much has to be trimmed - top and bottom.

IMG_1256.jpg
hiding the brick pier and possibly staying as is.
IMG_1257.jpg
I think that the grass strip is too deep and I might cut it down by a third and cut the sky down to a couple of inches above the tallest trees. The left hand 'scene' does not match up with the next sheet so I will use the station building to disguise the join as the bushes will be well below the roof line.

A trip to Hobbycraft is booked for Sunday to purchase some stiffish card to fix the scene onto and then that in turn will be fixed to the foamboard backing sheet that is already fixed in place. I will then start the ballasting and other ground treatments.

More to follow soon.

regards

Mike
 

Attachments

  • IMG_1258.jpg
    IMG_1258.jpg
    113.2 KB · Views: 17

Ressaldar

Western Thunderer
Hi Richard,

indeed it is. Especially when you consider that A) you are unaware that there is anything wrong in the first place and B) you are totally unaware of any sensation/feeling whilst having the radiotherapy, so you do not know if anything is happening - good or bad until you have the blood test and then it was another week before knowing the result. But the timing of everything around the middle of August could not have been written for a Hollywood blockbuster, especially the happy ending - not a dry eye in the house!

kind regards

Mike
 
Top