You are using an out of date browser. It may not display this or other websites correctly.
You should upgrade or use an alternative browser.
You should upgrade or use an alternative browser.
7mm North Kent Yard
- Thread starter Hobbyhorse
- Start date
Hobbyhorse
Western Thunderer
Hi Phil, Gaps are in on the last photo, and holding up without any movement.Simon,
Hopefully it will hold gauge when you put the isolation gaps in.
Simon
Hobbyhorse
Western Thunderer
To help with the assembly of the crossings I put together a few jigs, three in all to cover 1:4,1:6 and 1:8.
Using small brass screws the crossings are positioned and soldered in place, and the overhanging screw heads are then ground back to allow dummy chairs to be glued in place. Wire droppers again are pre soldered before the crossings are fixed.
Closure and stock rails use the screws as well. With the guard rails the screw is set into a brass strip, screwed into position and then the guard and stock is soldered in place. Although this method of construction is a bit slower, the benefit is everything is held in position and gauged, yes the glueing of the chairs is fairly robust but I’m a belt and braces type.


Simon
Using small brass screws the crossings are positioned and soldered in place, and the overhanging screw heads are then ground back to allow dummy chairs to be glued in place. Wire droppers again are pre soldered before the crossings are fixed.
Closure and stock rails use the screws as well. With the guard rails the screw is set into a brass strip, screwed into position and then the guard and stock is soldered in place. Although this method of construction is a bit slower, the benefit is everything is held in position and gauged, yes the glueing of the chairs is fairly robust but I’m a belt and braces type.
Simon
Hobbyhorse
Western Thunderer
The dual gauge track on the gantry crane road I wanted to keep simple in its operation, the previous layout had a similar bit of track which utilised switch blade on the interface with the two gauges. So this time a bit unconventional track work with no switch blades. The standards for the narrow gauge are the same which makes construction easy, and it works well without another point motor needed.


Simon
Simon
Hobbyhorse
Western Thunderer
Thanks Frank, yes that’s it.Lovely stuff. I guess the check rail is what guides the wider gauge from the narrower gauge, hence no switch blade?
Frank
Simon
Jordan
Mid-Western Thunderer
Lovely stuff. I guess the check rail is what guides the wider gauge from the narrower gauge, hence no switch blade?
Frank
Very ingenious.Thanks Frank, yes that’s it.
Simon

Hobbyhorse
Western Thunderer
That’s the standard gauge track completed with the stretcher bars in. Adding all the half chairs to hide all the wire droppers was a bit time consuming, but worth the effort to not have any visible wires. Just the cosmetic fishplates to add before starting on the narrow gauge track, I’ll need to turn the boards around to make it a bit easier to access the space.
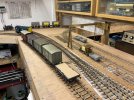
Playing around with a few wagons to visualise the space available.
Simon


Playing around with a few wagons to visualise the space available.
Simon
Hobbyhorse
Western Thunderer
Frank, although it doesn’t like very tight radius the inner line is only 30”, having the additional check rails it does improve the running quality. And like the prototype to keep them on the track and guide the wheel sets with tight radius’s it’s also fitted on plain and turnouts.I like the long curved point. There seem to be some extra rails on it that I don't understand why they are there.
Frank
Simon
Hobbyhorse
Western Thunderer
The narrow gauge element of the layout is fairly simple, three turnouts with a through line to the storage area and the future bit of the build.
Firstly the two boards have been turned around to give easier access, and have put down cork for the track bed.
Using the fixtures and jigs I had from NKLR layout the three turnouts are quick to assemble using code 82 flat bottom rail.
The central section of the narrow gauge will be infilled so this uses copper clad sleepers suitably packed up to align with the standard gauge rails, with the rest of the track is on wooden sleepers which is cut from lime wood.


Simon
Firstly the two boards have been turned around to give easier access, and have put down cork for the track bed.
Using the fixtures and jigs I had from NKLR layout the three turnouts are quick to assemble using code 82 flat bottom rail.
The central section of the narrow gauge will be infilled so this uses copper clad sleepers suitably packed up to align with the standard gauge rails, with the rest of the track is on wooden sleepers which is cut from lime wood.
Simon
I understand now, thanks for the explanation.Frank, although it doesn’t like very tight radius the inner line is only 30”, having the additional check rails it does improve the running quality. And like the prototype to keep them on the track and guide the wheel sets with tight radius’s it’s also fitted on plain and turnouts.
Simon
Frank
Hobbyhorse
Western Thunderer
Not a lot to show but the basic wiring is in for the power management, track and points. Before completing with the point switches and route indicators a bit of testing with a selection of different bits of rolling stock. Only a couple of minor issues with the track, one being with the frog juicer on the three way not changing quickly, so it’s on the list to have a look at when the boards are parted.
Also made up the fiddle plate, it works on the dual gauge and narrow gauge tracks.


Simon
Also made up the fiddle plate, it works on the dual gauge and narrow gauge tracks.
Simon
Attachments
Hobbyhorse
Western Thunderer
Completed the crane and point controls, have kept things very simple as it's all about looking at what's happening around you on the layout, just like on the full size railway. Testing continues and have found that the crane functions well with the switch controls, as against the old RC version.


Simon
Simon
Hobbyhorse
Western Thunderer
The Ruston new from Heljan fits the bill for the BR period. A quick fit for the DCC and running extremely well.
Simon


Simon
Hobbyhorse
Western Thunderer
Hi Mike,Hi Simon,
Is this the sound version of the Zimo Next18 and presumably, it couples straight up to the fitted speaker?
regards
Mike
Yes it is, I went for the smaller chip hopeful that the stay alive would fit under the bonne, but unfortunately not. Stay alive is in the cab but once crew fitted it won’t be visible. The chip is MS591N18. You could remove the large PCB and hard wire a different chip, but I’m in the keep it simple camp.
Simon
Hobbyhorse
Western Thunderer
No problem Mike,Hi Simon,
many thanks for the speedy reply, now have to think of a lame excuse to get one!
regards
Mike
I’m tempted to get another one, but with Accurascale coming out with another cement company coloured industrial I sight have to wait a bit.
Simon