Nick Dunhill's Workbench - Pair of EM2s

Nick Dunhill

Western Thunderer
So this week I managed to finish the pantographs and mount them on the body. The Busbars were completed. The pantographs were fitted with springs from Slater's Plastikard from their gauge 1 vacuum pipes. They give a nice bit of tension to the mechanism.

52312713215_b74deee653_b.jpg


52312582663_a93c530669_b.jpg


52312582568_a9c4bb505a_b.jpg


The next job was fitting buffers. I had some Invertrain BR buffers but the castings of the stocks were a bit flakey and they'd not been drilled concentrically. I bought some Markits buffers and modified them. I soldered a small square of chequer plate on the top of each.

52312712440_83a021510e_b.jpg
[/url]

Battery boxes with some water filler detail and an air reservoir were added to the centre of the underframes. You can see them in the foreground of this piccy.

52312270461_450bff2213_b.jpg


52312697574_d398825f00_b.jpg


On one side of the loco the BR emblem is mounted on a board to clear the body strapping. The name plates (Diane Carney) were added, one of them has packing pieces behind to clear the aforementioned strap.

52312697339_e6fa54bf46_b.jpg


52312697359_0541a384dc_b.jpg


Minerva (no. 5) was the loco that was broken up for spares by the NSR (when sold to them in 1971) to keep the rest of the locos running. The locos were modified quite extensively in their later lives in Nederland.

Well the work has now ground to a halt until I can get some bogies from MM1 Models.

More pics here; nick dunhill
 

Dave Holt

Western Thunderer
Nick.
The railway section of MOSI is currently inaccessible due to major refurbishment. Check before you go to avoid a wasted journey.
Lovely models by-the-way.
Dave.
 

Nick Dunhill

Western Thunderer
Thanks Dave. Another modeller on RMWeb told me that the loco shed at Butterley that houses Electra is also inaccessible due to roofing work. Luckily they suggested that I go to the EVR in Wirksworth in the Peak District to see the 'spare' EM2 bogies belonging to the 10000 Recreation Group based there. I had a very enjoyable (though a bit chilly!) motorbike ride there yesterday and got lots of useful pics.

52383185470_e0ddbb73f6_b.jpg
 

Overseer

Western Thunderer
Thanks Dave. Another modeller on RMWeb told me that the loco shed at Butterley that houses Electra is also inaccessible due to roofing work. Luckily they suggested that I go to the EVR in Wirksworth in the Peak District to see the 'spare' EM2 bogies belonging to the 10000 Recreation Group based there. I had a very enjoyable (though a bit chilly!) motorbike ride there yesterday and got lots of useful pics.

52383185470_e0ddbb73f6_b.jpg
An etched kit for the fabricated bogies would look nice, with 3d printed 'traction motors'. They could have holes in the right places and no chance of structural resin deforming over time. I can't help with useful drawings but the English Electric publicity book elevation of 10000 suggests that JLTRT version may not have all the secondary suspension bits included.
EE 10000 bogie.jpg
 

Nick Dunhill

Western Thunderer
Hi Frazer
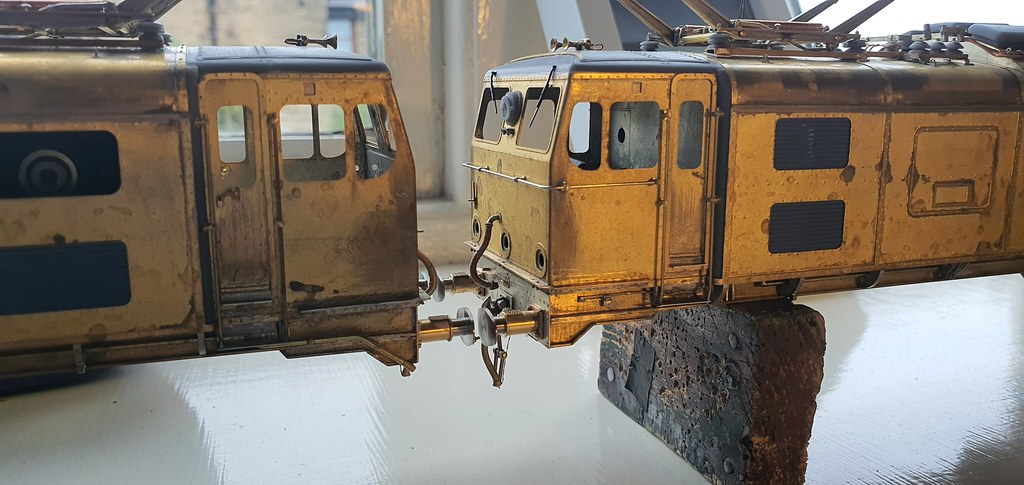
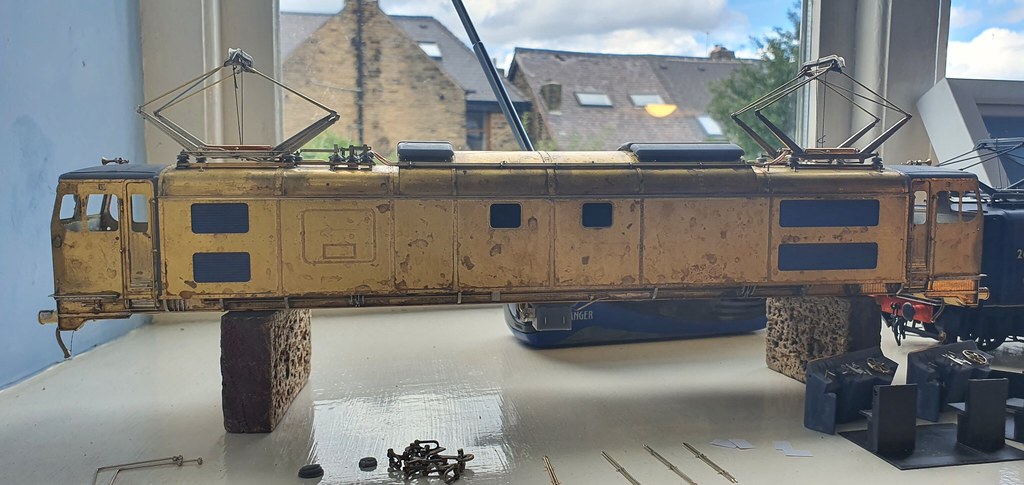
You may be right. I'd hoped that the JLTRT bogie would be a better representation than the awful cast white metal parts in the old MSL Hobbies. In most senses it is, but the end sections of the bogies are very different. The original Ivatt bogies have the sand boxes sitting in fabricated pockets on all four corners of the bogie. These had to be machined and reshaped to better represent the EM2 versions. The EM2 bogie sides don't have a raise section over the centre axlebox and there are differences in the axleboxes themselves. The bogie (coil) springs are enclosed on the EM2 version as well. The donor of the resin bogie parts didn't include any castings, so I don't have the leaf springs or spring planks and swivel links, but maybe they're not in the 10000 kit. The braking system of the EM2s are completely different from that fitted to the originals, so it doesn't matter that I don't have them. None of the commercially available versions of the bogie (PRMRP do a version too) give the impression of a bogie fabricated from plate sections, although I did drill some holes in the JLTRT resin ones to try and give the hollow look.

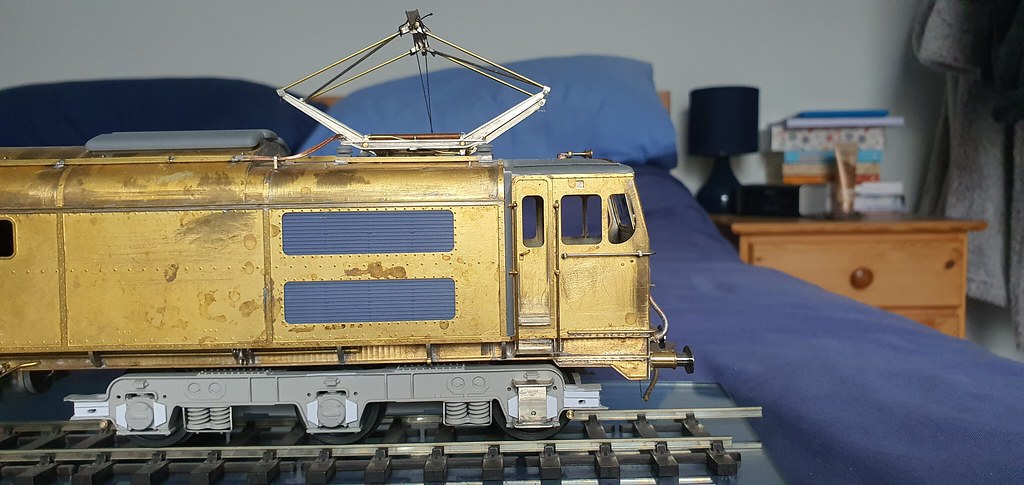
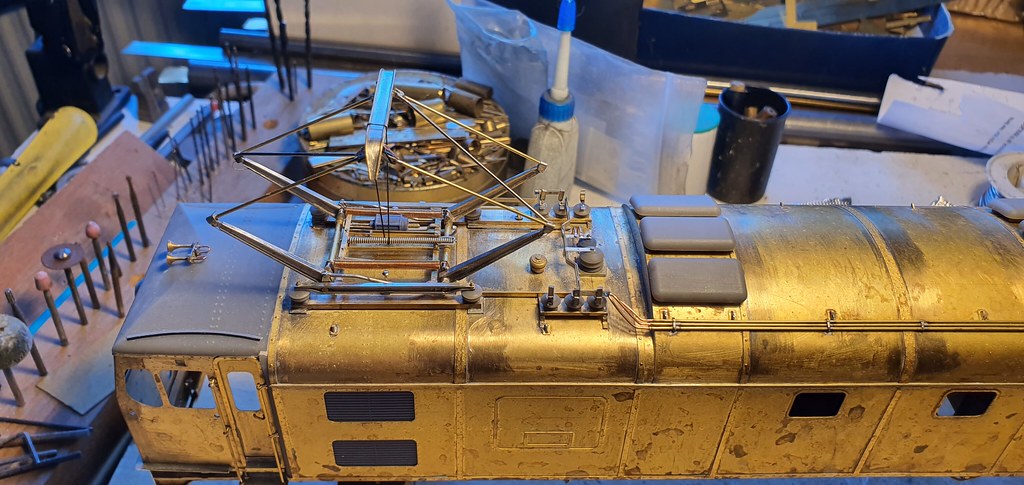
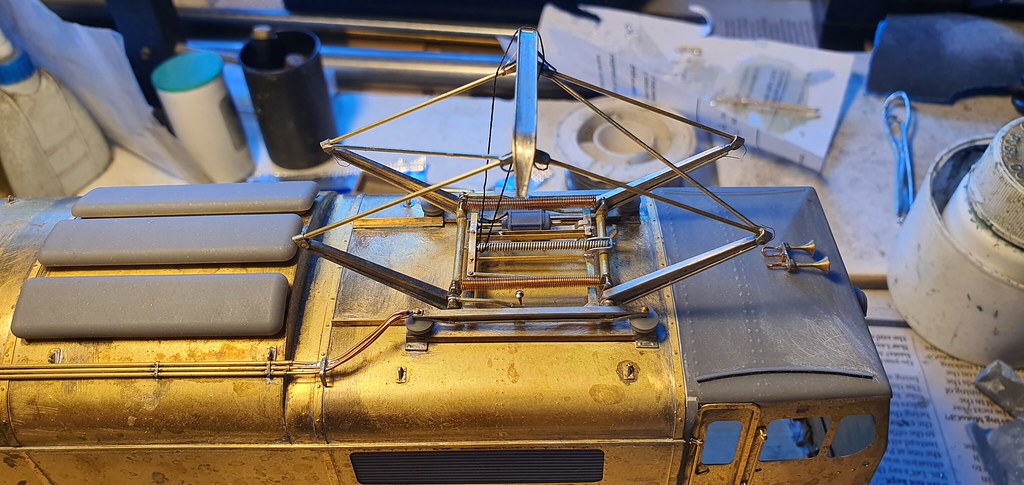
The JLTRT bogies have an inner chassis for the wheels and motor so you don't get that see-through appearence, but I'll take that because they're the best available and good in lots of other ways. The pantos for this build took 3 weeks to fabricate and I would guess that fabbed bogies would take longer, and the cost would begin to run away. If I were making them on an infinite budget I'd go for it and use a couple of ABC traction motor gearboxes on one of the axles.

I have never built owt with a Delrin chain and was intrigued by them. They work really well, and if the infinite budget applied I'd be faffing about with a chain tensioner design after the style of the ones in a (Meriden) Triumph Bonneville primary or an Alfa Romeo Duetto cam chain. It'd be a challenge to find a tensioner that worked with the chain spinning in both directions. Now there's a rabbit hole.........

Nick
 

Nick Dunhill

Western Thunderer
I was thinking an eliptical slipper on both runs of chain with springs between them to maintain tension. The two examples above (Triumph and Alfa) both use a slipper on the 'slack' part of the chain (primary and cam chains only run in one direction,) and I wondered what would work best on the portion of chain that was under tension?
 

simond

Western Thunderer
Derailleur?

bit of bent phos bronze strip?

sprung jockey wheel?

actually, I think Dave’s suggestion is likely best.


simultaneous post! Most cam chain arrangements tension the slack side of the chain, as you say, it only goes one way.

I think an adjustable jockey wheel will add negligible friction on the drive side, and will work fine on the slack side. Alternatively, two jockeys on a sliding bar, but this seems too complicated for limited (if any) benefit.
 

Tim Humphreys ex Mudhen

Western Thunderer
As an alternative to delrin chains these drive belts from First Class Kits work extremely well. I've used both methods and the belt drive is simpler to use, easier to put on the loco with no fiddly connecting and because they are produced to size no sag requiring a jockey wheel.

Tim


simond

Western Thunderer
Wide range of sizes of such belts & pulleys is available online - I got a few items for a turntable reduction gear earlier in the year, though haven’t done the baseplate machining yet. They are just like miniature timing belts, and don’t stretch.

I got mine from “belting online”. Be aware that there are at least two tooth pitches in the sort of sizes we modellers might use, they don’t mix!
 

Nick Dunhill

Western Thunderer
I had hoped that the bogies would just slot into the build but there's a number of detail differences between the Ivatt and later EM2 version. The biggy is the modification to the ends of the side frames. 10000/10001 have a fabricated pocket on the end of each side frame with a sand box within. The EM2 version side frame does not rise up over the middle wheel, the axleboxes are different and the springs are enclosed. Lots of hacking ensued. My budget was blown by now so I sent the bogie to Mick Davies to get some parts printed to save on fabrication costs. He printed new bogie ends as the ones I had were damaged and not quite the same as the EM2s. Here's the result;

52394960546_c8d8a3148a_b.jpg


He's also printing bits of the brake system:

52395468893_140a7e8e43_b.jpg


In the meantime I made some bogie mounts and this is the result.

52394960471_9564222020_b.jpg


I'm hoping to finish next week.
 

mickoo

Western Thunderer
As Nick points out, there are quite a few changes between the 10000/1 bogies and the EM2.

The end beams are unlike each other and the secondary spring plank uses swing links as opposed to tie rods in rubber mounts for articulation.

Things have moved on a bit from Nicks photo earlier in the week, I was't overly happy with the surface smoothness so spent some time with orientations and printer settings to get it much better. I also added the flanges where the sand boxes were fitted and made the changes to the inner end to suit the JLTRT block and lack of guard irons.

Brake cylinders are now all done and fit on the square pegs as seen in Nicks image and new secondary leaf springs with plank and swing links added and fitted.

IMG_1378.jpg

IMG_1379.jpg

IMG_1377.jpg
 

Nick Dunhill

Western Thunderer
Thanks for these parts, and the update Mick. I look forward to getting them.

For the record Mick and myself often work together on etches and 3D prints. Custom etches are a great way to take all the financial pain out of scratchbuilding. I can offer a high quality scratchbuilt engines without having to spend hours cutting out parts and increasing the cost. Similarly 3D printing, as the technology improves to the level that parts don't show layering or distortion, big savings in time and/or cost are gained. Mick gets a full commercial rate for the design and printing work.

This build is a perfect example of that. The locos are built round some basic etched parts, a skeleton with attached detail panels. Some 3D printed parts to replace fabrications that would be awkward and/or time consuming to make. Lots of the locos are however scratchbuilt in the traditional sense, measure, cut, solder. Mustn't forget the bogies 'borrowed' from another model.

In the same way Mick has developed a successful business massively upgrading commercial kits using the above technologies. All power to him.

Are they scratchbuilt? You can decide.......
 
Top