LSWR G6 0-6-0 tank engine

Jon Nazareth

Western Thunderer
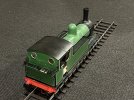
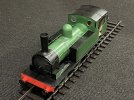
A predicament. The letters on the transfer are too close together. If I applied them as they are in one strip, they would look lost and not as per. If I tried and failed and then removed the transfer, the removal would mark the paintwork. I’ve tried this in the past and that is what happened. If I were to spray the body with a mat varnish it probably wouldn’t show. However, I want this engine to have a semi gloss finish so, this isn’t an option. If I cut out the individual letters, and thinking of my past record for applying transfers, I’d never get them in a straight line and upright. If I can’t make a decent job of something, I’d rather leave well alone. So, I’m not going to apply the transfers and the tank sides will be left blank. I’ll apply the nameplates to the cab sides and leave it at that.

Jon

IMG_0077.jpeg
 

Mikemill

Western Thunderer
Jon

Don't give up, there is a way to fix the lettering.

With a piece of styrene tape or clamp to the tank side with the edge on the line of the base of the letters, working from the centre mark out the position of each letter on the styrene. Cut out each letter and soak in warm water, slide the transfer off of the backing paper with a fine brush and position each letter, soak up remaining water with a tissue, remove the styrene. If you have spare letters practice on a scrape piece of styrene.

Mike
 

Jon Nazareth

Western Thunderer
Mike
I never thought of that, a good idea. But, if I leave the body as is, ie no mat varnish, the cut edge of the transfer will show. I do have some spare transfers and so I’ll give it a go all the same.

Jon
 

cctransuk

Active Member
Mike
I never thought of that, a good idea. But, if I leave the body as is, ie no mat varnish, the cut edge of the transfer will show. I do have some spare transfers and so I’ll give it a go all the same.

Jon

No - the surface should be high gloss before applying transfers; a matt surface WILL trap air and you will get the white appearance of the transfer film.

Apply the transfers to the gloss surface and, when they have fully dried, apply another layer of gloss varnish.

When that has dried, and only then, apply satin or matt varnish - if that is the finish that you require.

Brave souls apply waterslide transfers INTO wet gloss varnish, ensuring the transfer has gloss varnish both beneath and above it. That way, there can be no chance of trapped air.

John Isherwood,
Cambridge Custom Transfers.
 

mswjr

Western Thunderer
yes, As john said above, The finish has to be gloss for the transfers to stick , you can move them around to position them as well. Then varnish over them after, Cut the transfers out as close as you can to the letter, I use tamilya tape for my straight edge, it is available from model shops and will not pull your paint off, I used ronseal hardglaze clear varnish in my airbrush to seal my transfers on my gauge 1 coaches and they look great, This was recommended to me by a painter of models on here. Good luck.
 

Jon Nazareth

Western Thunderer
I tried several ways to ‘redden’ the background of the number plates. In the end, I sprayed with a rattle can, rubbed them on a piece of 800 and then 2000 grade paper before finally picking/scratching off the paint from the small lettering with a scalpel. At this magnification, it can be seen that a lot of this small lettering has etched away. Still, as long there is an impression of the lettering that’s all that matters.

Jon
IMG_2986.jpeg
 

Mike W

Western Thunderer
A lovely job Jon. Red guard irons? I can see the logic for them being red and guess I'd never thought about it before, but were they really that colour?

Mike
 

Jon Nazareth

Western Thunderer
Hello Mike
In, Southern Style LSWR by John Harvey, it states that, Guard irons, buffer sockets and buffer beams Vermillion. Looking at a black and white picture of an O2, there looks to me to be a difference in colour.

Jon
 

Jon Nazareth

Western Thunderer
Jon

You have made an excellent job of building the G6, I have seen four examples in different finishes but all looking good.

Ready for an O2 now?

Mike
Mike
I do like the wheel configuration of the O2 and I was tempted but I’ve a lot more other railway related items that I need to be getting on with. I’d hate to leave the children with boxes of unfinished projects that they probably wouldn’t know what to do with.

Jon
 

DavidinAus

Western Thunderer
At the risk of reopening the colour green debate,my G6 looks very different !
 

Attachments

  • Progress 1.jpg
    Progress 1.jpg
    352.1 KB · Views: 16
  • Progresss 2.jpg
    Progresss 2.jpg
    341.5 KB · Views: 16

NickB

Western Thunderer
Over the years I've built about 20 locos of 19th century prototypes and I have never been able to nail down the precise colour shade. Colour photography didn't exist, and very few colour charts have survived and have probably faded or otherwise changed colour since they were made. At the time the only colour standardisation was recipes for each colour kept by the paint shop foreman. Colours were mixed in batches on site, and so if they went a bit heavy-handed with the malachite one day the colour turned out a bit greener than the previous.

For that reason I can't get too concerned about precise shades for prototypes of that vintage.

Nick
 
Top