jonte

Western Thunderer
A Porky Prime Cut

(a nod to all those who ‘trainspotted’ 45 single runout grooves..)

A pair of Mica’s. X2, I believe. One was a eBay score, the right length, and described as kitbuilt. The other is the Hornby Dublo version. A stretch, on the reality front.

I’m pretty sure the eBay version is scratchbuilt; it was certainly heavily painted, and along with the accompanying wagons, had a lot of burrs. You can hopefully see this after it’s twenty minute bath in Phoenix Paints paint stripper.

The HD version MIGHT bear a cut and shut. IF it’s just a length issue….


The assembly was thick with UHU. The brake shoe assemblies (whitemetal) are very bendy. The 00 wheels have been removed, and the metal bits will be resubmitted to paint stripper. The body does not sit flat, as one of the solebars is too high at one end. And there’s a definite ‘bloat’ to the floor - which might preclude compensation. For all that, it’s an amazing bit of modelling that deserves some resurrection. I hope I can do it justice.

Cheers

Jan
I’d try and keep the bubbling/flaking paint effect, Jan ;)

You’re definitely made of better stuff than me for even attempting to resurrect such relics , if I may be so bold to say so…..

Good luck!

Jon
 

Lyndhurstman

Western Thunderer
I’d try and keep the bubbling/flaking paint effect, Jan ;)

You’re definitely made of better stuff than me for even attempting to resurrect such relics , if I may be so bold to say so…..

Good luck!

Jon
Hi Jon
Thanks! Thoughts of painting are a long way off, but we’ll see what happens. The sanding down of the burring will compromise the planking lines, and I’m in the throes of eyeing up potential parallel scribers, so I need the base to be flat and square from the outset. Those lovely steps are not giving up their hold on the ends, either.

I’m not sure how I got here, but reworking stuff to this degree satiates my engineering genes, and ticks the recycling and research boxes too.

In other news, I’ve the lamp irons on the GNR brake to do, and some Rumney screw links to make up for the GNR van. I’m hoping the variety will keep me motivated. And stop me thinking about work…

Thanks again

Cheers

Jan
 

Lyndhurstman

Western Thunderer
Coupling Up
The last shufflings of the GNR van demand attention to connectivity. This can be something of a minefield, I think. Particularly in the screw link branch of that particular evolutionary tree. So, under instruction, our R&D Department - Will Itwork, a recent recruit to our shabby ranks from Caird & Rayner over in Limehouse Cut - has set to and undertaken an assessment of two offerings; Smiths LP8 and Rumney Models B.96.
IMG_1769.jpeg
Will writes;

Well, both are fiddly!
The Smiths assemblage is 8 potential units loose in the bag, which makes picking out the relevant bits ‘interesting’. They’re accompanied by hooks, but I understand preference is for Exactoscale offerings; which I gather are becoming something scarce…

The Rumney route is via and etched nickel silver fret, four to a fret, and with a variety of links to make different sized loops. I went for the largest combination, in the hope that this will accommodate the curve of the outside slip - I understand this to be the tightest radius on the Wharf.

A 1 mm drill held in a pin vice was press-ganged in to service to form the loops on the Rumney coupling, and a similar technique on the Smiths version (although the drill was slightly larger). Both have midpoints marked prior to bending. Bending is made by applying equal pressure to the ends whilst resting on the forming bar. All pretty straightforward.

The difference comes in the central boss, Boss. The Smiths version is a blackened H plate with a hole in the middle for the tommy bar. With tiny arms to take the holes of the links. The Rumney approach is a triple layer cake of nickel silver that requires soldering - I did wonder about glue, but I erred on the side of mechanical safety..
IMG_1765.jpeg
As you can see, and as per the manufacturer’s guidance, a jig was made to hold the various layers still for soldering. I used solder paste in all aspects.

The real fiddle comes in assembling the units. The Rumney version demands a tight fit on 0.5 mm brass wire, and a quarter of dabs with a 25W solder iron. The Smiths version is a clip fit on the H plate. The latter wins here; it’s a simple springing of the loops over and on to the plate. No burnt fingers, no fluxing issues.

As to cost, the Rumney units work out about a quarter of the price of the Smiths versions. But demand more time to assemble; before you get Time & Motion involved, I accounted 2 hours for the Rumney, and 45 minutes for the Smiths.
This would obviously improve with repetition.

A final note to say that the Smiths coupling is a clip fit into Exactoscale hooks, whereas the Rumney version is slightly too large. I understand that you have some Bedford hooks that could be adapted to take this coupling.

All in all, an interesting challenge. I hope this information proves useful.

Regards

Will

He’s right; some Bill Bedford hooks are lurking in Stores. More anon..

Cheers

Jan
 

Lyndhurstman

Western Thunderer
Tool Appreciation Post.
I like hand tools.
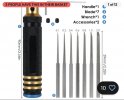
Removing the burrs on this scratch-built GWR Meat Van was a tricky business. Scraping with a flat scalpel blade could only do much. A trawl of the internet led to these.
IMG_1803.jpeg
IMG_1798.jpeg
Model Chisels. Sourced from eBay, come with 7 widths of blade (from 0.1 to 2 mm) and a handle. About £12 inc post. Just the thing for getting into those important little places.

Cheers

Jan
 

Attachments

  • IMG_1812.jpeg
    IMG_1812.jpeg
    212.8 KB · Views: 23

Herb Garden

Western Thunderer
Tool Appreciation Post.
I like hand tools.
Removing the burrs on this scratch-built GWR Meat Van was a tricky business. Scraping with a flat scalpel blade could only do much. A trawl of the internet led to these.
View attachment 216919
View attachment 216921
Model Chisels. Sourced from eBay, come with 7 widths of blade (from 0.1 to 2 mm) and a handle. About £12 inc post. Just the thing for getting into those important little places.

Cheers

Jan
Jan,

Those look excellent, I will have to go shopping

G
 

Lyndhurstman

Western Thunderer
Under Pants
Well that took a turn… Exasperation with the wobbly and discordant underpinnings has led to their removal. This gives me a chance to make the floor flat, and give me a good datum to work from. It also gets me back into rendering three dimensions from flat plastic.. something I need to practice more, I’d I’m going to build Project NZ…
A4312437-4838-4558-97A5-CA467D769472.jpeg
In levelling the floor, I’ve carved a slot in the plasticard to remove the worst of the bump. The glue holding the weight was still tacky… and the fumes… :confused:

Cheers

Jan
 

jonte

Western Thunderer
As I’ve said before, Jan, each is a gem and certainly worth the care and ingenuity lavished to improve on the original.

In fact, Mr. Rooney will have been and gone from ‘The Origargle’ well before you finish :))

Jon
 

Lyndhurstman

Western Thunderer
As I’ve said before, Jan, each is a gem and certainly worth the care and ingenuity lavished to improve on the original.

In fact, Mr. Rooney will have been and gone from ‘The Origargle’ well before you finish :))

Jon
Hello Jon
Thank you. I hope to do the original builder - and your faith in me - justice. The planking is proving a challenge; there seems to be large areas that have some kind of polystyrene cement washed over them, making the cleaning thereof nigh on impossible. We’ll have to see what comes out of it. And I’ve managed to break one of the steps on the end… but righting these things bring small rewards, and I’m grateful for anything these days.

I really hope that Mr Rooney understands the needs and longings of The Green Army. I’m still on the fence…

Cheers

Jan
 

Lyndhurstman

Western Thunderer
The Wayback Machine
A little fitting of the axle guards last night. These were such a pain to get off (the glue, Nurse, the glue!) that I had to do some restorative easing and bending to get them right. And also file them flat on the top of the ‘foot’ so the spring anchors meet with the new solebar.
IMG_1852.jpeg
4807CB9D-EF7B-4FC7-8024-F4867F5A3D3F.jpeg
Here’s one wheelset (00) being trialed. I’m also adding the supports to the solebar. There should be four, but the two under the door pillars are easier to fit; the others are right over the spring bump stop, so I thought it best to put the axleboxes in beforehand, so I can get the positioning right. You’ll see the previous builder has left some nice guidelines in the bottom of the floor :thumbs: .

This wagon is a 9ft wheelbase, and 16ft over solebars, with a large (3’6”) diameter wheel (I need to get on the phone to Gibson’s), so I may see if I can make it without compensation.

Cheers

Jan
 

Overseer

Western Thunderer
This wagon is a 9ft wheelbase, and 16ft over solebars, with a large (3’6”) diameter wheel
16 ft long, yes. But 10 ft wheelbase and 3’ 1 1/2” 8 spoke wheels originally, with GWR OK axleboxes.

The Hornby/Wrenn version needs two cuts per side either side of the doors to produce an accurate model. As linked to previously on WT (Dave's Model Railway Plans and Articles) the January 1929 issue of Model Railway News has a useful article on Micas.
 

Lyndhurstman

Western Thunderer
16 ft long, yes. But 10 ft wheelbase and 3’ 1 1/2” 8 spoke wheels originally, with GWR OK axleboxes.

The Hornby/Wrenn version needs two cuts per side either side of the doors to produce an accurate model. As linked to previously on WT (Dave's Model Railway Plans and Articles) the January 1929 issue of Model Railway News has a useful article on Micas.
Hi @Overseer
Thanks. I made an error in transcription. I meant 10ft but put 9 for some reason. Regarding the wheel diameter, it’s my interpretation of Atkins that they didnt change from the coach wheel diameter when they did away with solid centres. Maybe I read it wrong. I’ll check again.

*edit*
And thanks for the pointers to the MRN articles. Very useful.

Cheers

Jan
 
Last edited:

Lyndhurstman

Western Thunderer
An Attack Of The Bends
3932A99C-8781-4CC0-9EB3-570BF196E7C2.jpeg

Tiny bits for tiny trains. Lamp brackets for the GNR Brake. Sourced from PHD (PHDesigns) and soldered in the bends for strength - and enabling filing of the tabs with a diamond file.

I tried to drill one, for a firm fixing into the van body, but snapped my only 0.3 mm drill. I’m thinking that Zap-A-Gap might be an alternative route…

4 made, 4 to go…

Cheers

Jan
 
Top